
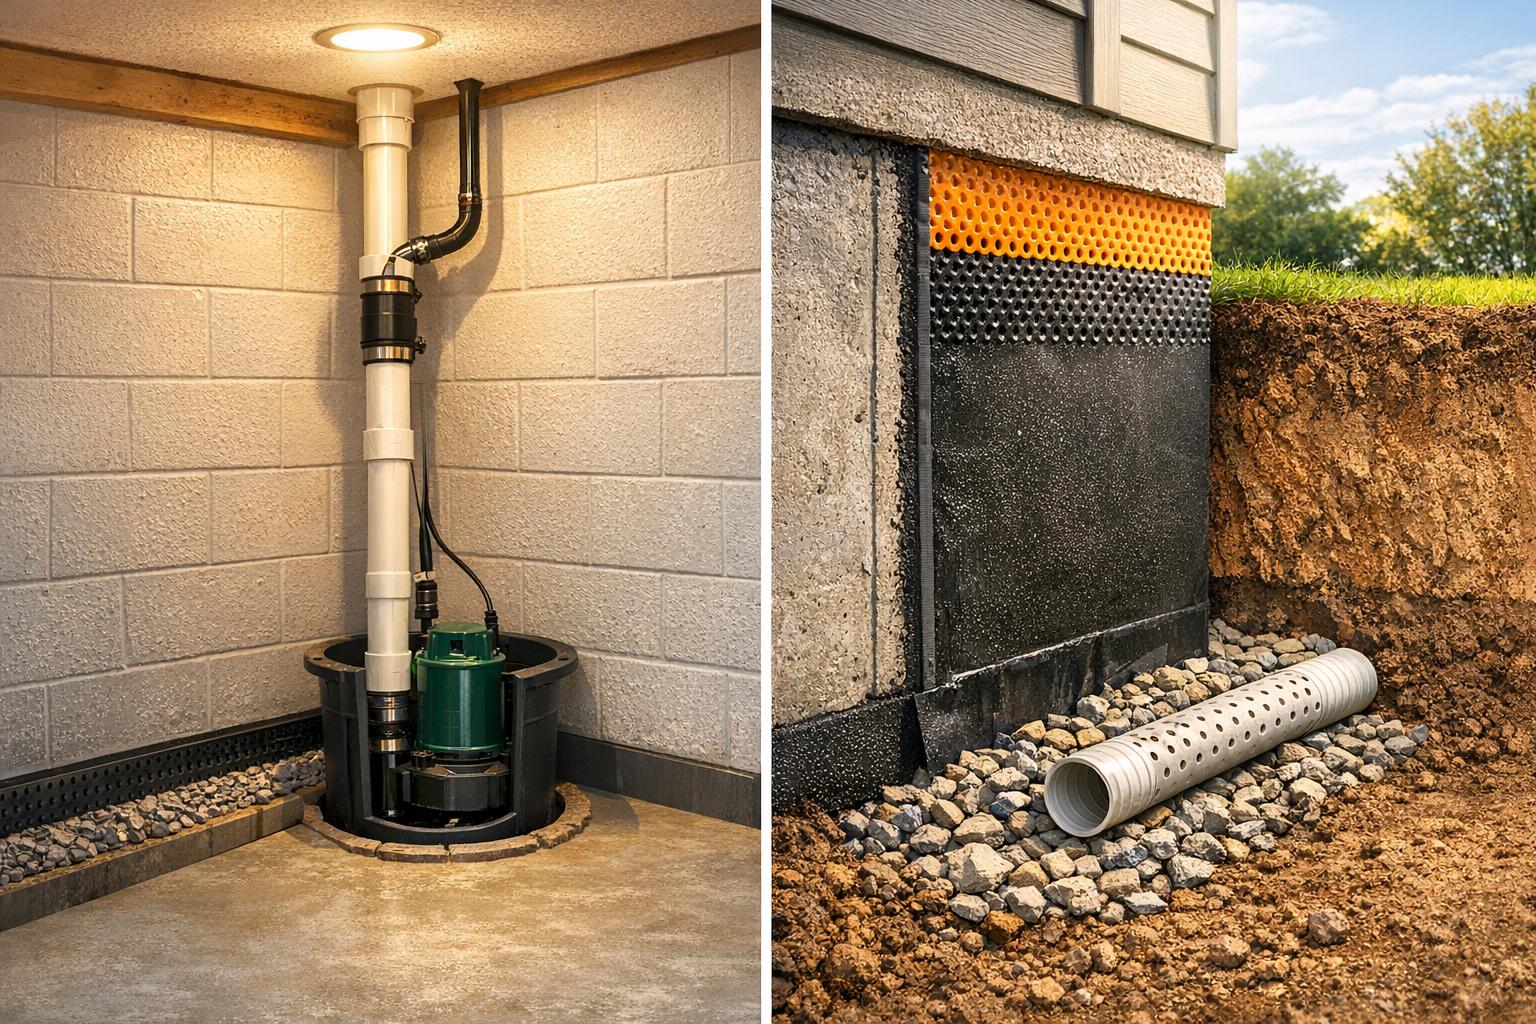
When it comes to protecting your home from water damage, you have two main options: interior waterproofing and exterior waterproofing. Here’s the key difference:
- Interior waterproofing manages water after it enters your foundation, redirecting it away using drainage systems and sump pumps. It’s less expensive (C$230–C$390 per linear metre, or about C$70–C$120 per linear foot) and faster to install but requires more maintenance.
- Exterior waterproofing prevents water from reaching your foundation altogether by sealing the exterior walls and installing drainage systems. It’s more expensive (C$330–C$820 per linear metre, or about C$100–C$250 per linear foot) and disruptive to landscaping but offers longer-lasting protection with minimal upkeep.
Quick Comparison
| Feature | Interior Waterproofing | Exterior Waterproofing |
| Cost | C$230–C$390 per linear metre (C$70–C$120 per linear foot) | C$330–C$820 per linear metre (C$100–C$250 per linear foot) |
| Installation Time | 1–3 days | 1 day to 2 weeks |
| Maintenance | Regular (sump pump testing, cleaning) | Minimal |
| Disruption | Inside basement (may require clearing) | Outdoor (affects landscaping, driveways) |
| Lifespan | Shorter, relies on sump pump | Longer, passive system |
| Best For | Budget-friendly, urgent repairs | Long-term, high water tables |
Your choice depends on your budget, the severity of your water issues, and whether you want a quick fix or a long-term solution. In Toronto, it also comes down to how close the neighbouring house stands and whether your basement is finished. In some cases, combining both methods offers the most complete protection.
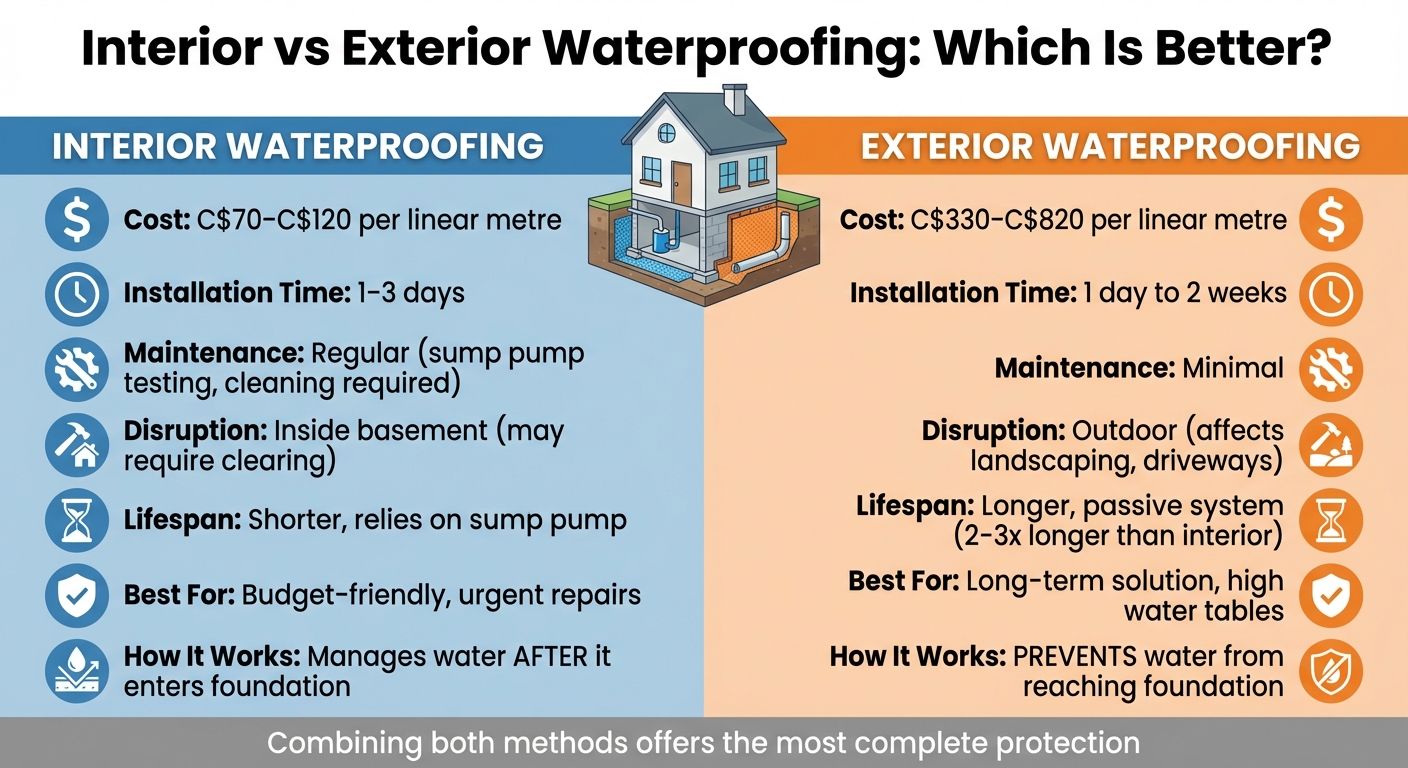
Interior vs Exterior Waterproofing Comparison: Cost, Installation Time, and Lifespan
Exterior vs Interior Waterproofing – Which is best?
What Is Interior Waterproofing?
Interior waterproofing is a system designed to manage water that seeps into your basement. It works by collecting and redirecting water that enters through foundation walls or rises from beneath the floor. Unlike exterior waterproofing, which aims to stop water from reaching the foundation in the first place, interior systems deal with water that has already made contact, ensuring it’s redirected before it can cause damage to your living space.
Here’s how it works: water isn’t stopped from hitting the walls, but once it does, the system efficiently channels it away. As PRO Waterproofers explains:
“Interior waterproofing is mainly about channeling water away with increased efficiency and less hassle. In this setup, water can still technically seep through the foundation wall but the water won’t really get to your basement space.”
This method is particularly useful for addressing hydrostatic pressure – the force created by groundwater pushing up against your basement floor. Left unchecked, this pressure can lead to cracks and leaks. Interior waterproofing systems typically include a few key components: a trench cut around the basement floor’s perimeter, perforated weeping tiles (about 7.5 to 10 centimetres in diameter) to collect water, a drainage membrane on the walls to guide water downward, and a sump pump to remove the collected water.
These systems are usually installed in one to three days, and many contractors offer warranties lasting up to 25 years – often transferable to new homeowners. Considering that the average cost of a basement flood in Canada is around $43,000, having an interior waterproofing system can provide peace of mind and protect your investment.
How Interior Waterproofing Works
The installation is meticulous but straightforward, and it follows a clear sequence:
- Prep the area. Contractors cover the work areas with tarps and remove wall coverings to reach the foundation.
- Cut the trench. They cut into the concrete floor, roughly 15 to 25 centimetres from the foundation wall, to create a channel for the drainage system.
- Release trapped water. On homes with concrete block foundations, small holes may be drilled at the base of the blocks to let trapped water out.
- Apply the membrane. A drainage membrane goes on the interior walls, running from ground level down to the trench so any water seeping through is directed into the system.
- Lay the weeping tiles. Perforated weeping tiles are laid in the trench and connected to a sump pit or storm line, then covered with clear gravel to filter debris and keep water flowing.
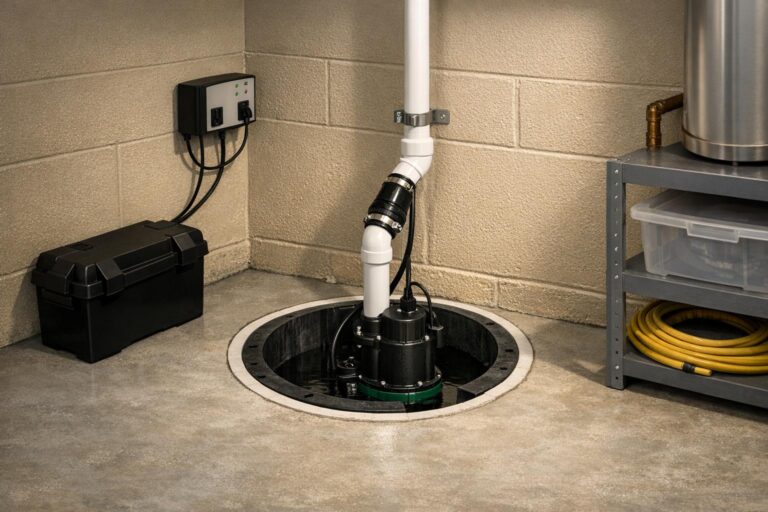
- Install the sump pump. Set at the lowest point of the basement, the pump automatically discharges collected water through an outlet pipe to a safe spot outside the home.
- Re-cement the floor. Contractors cement over the trench for a smooth finish.
For reliability, add a battery backup for the sump pump and test it annually. This matters most during power outages, when the flooding risk climbs.
Interior Waterproofing Costs
In Canada, interior waterproofing costs typically range from $230 to $390 per linear metre, or about $70 to $120 per linear foot. The total cost depends on several factors, including the size of your basement, the depth of your foundation, and whether additional features like a sump pump are required. Finished basements may incur higher costs due to the need for demolition and reconstruction.
For example, a basement with a 30-metre perimeter might cost between $6,900 and $11,700, while a 45-metre perimeter could range from $10,350 to $17,550. These estimates usually cover the drainage system, sump pump, and labour, but actual costs can vary depending on your foundation’s condition and local labour rates.
Pros and Cons of Interior Waterproofing
Interior waterproofing offers several advantages for homeowners in Canada. It’s often more affordable upfront compared to exterior waterproofing, and installation is relatively quick, usually causing minimal disruption to your daily life. Since the work is done inside, there’s no need to disturb landscaping, driveways, or outdoor structures. Plus, inspections and maintenance are easier to perform year-round.
However, there are some downsides to consider. Regular maintenance is essential, including periodic sump pump testing and occasional cleaning of weeping tiles to prevent clogs. As Canada Waterproofers notes:
“This method pushes water that has already entered through the foundation walls or from under the footing away from the finished interior. So the homeowner is re-directing water away… but it isn’t tackling the problem at its source.”
Additionally, you’ll need to clear the basement perimeter of furniture and stored items before installation, which can be inconvenient. For finished basements, the process may involve extra costs and disruptions due to the need to demolish and rebuild walls and flooring. Finally, the system relies heavily on the sump pump. If the pump fails during a storm or power outage and no backup is in place, flooding can occur quickly.
Interior waterproofing is a practical choice for many homeowners, but understanding its limitations is key to making an informed decision.
What Is Exterior Waterproofing?
Exterior waterproofing is all about keeping water away from your foundation by sealing the exterior of your home. Unlike interior systems that manage water after it has already entered, this method stops moisture before it becomes a problem. As PRO Waterproofers puts it:
“Exterior waterproofing is designed to keep water out completely. This means that once exterior waterproofing is in place, water cannot touch the basement wall.”
This proactive approach addresses water issues at their source, preventing it from seeping through cracks, putting pressure on your foundation, or creating damp conditions inside your home. By sealing the concrete, exterior waterproofing helps protect your foundation from wear and tear while reducing the risks of mould, mildew, and structural damage. Harmony Basements sums it up well:
“The biggest difference between the two methods is exterior waterproofing is a preventative solution, whereas interior waterproofing is a corrective solution.”
For Canadian homeowners dealing with challenges like high water tables, clay-heavy soil, or finished basements that need to stay dry, exterior waterproofing provides robust protection. Supreme Basement Solutions highlights the importance of addressing the root cause:
“The most common cause of all basement leaks is a failed footing drain… In both solutions, the footing drain will be replaced because it is the root issue.”
By replacing faulty drains and sealing the foundation from the outside, exterior waterproofing offers long-lasting results, often lasting two to three times longer than interior solutions. The next sections dive into how this system works, what it costs, and the benefits and challenges it entails.
How Exterior Waterproofing Works
The process starts with excavation and works down to the footing, step by step:
- Dig the trench. Contractors excavate around the home’s perimeter, typically 2.4 to 3 metres deep, all the way down to the foundation footing.
- Clean and inspect. Once the foundation walls are exposed, they’re cleaned and checked for cracks or damage.
- Repair the walls. Any issues are sealed with sealants or epoxy injections before the membrane goes on.
- Apply the membrane. A waterproof membrane or sealant, such as Delta-MS or Polyurea Hot Spray, is applied to the exterior walls. A drainage board often goes over the membrane to protect it and channel water downward.
- Install weeping tiles. New weeping tiles (perforated drainage pipes) are laid along the footing and surrounded by gravel, which filters water and keeps soil from clogging the system.
- Backfill and grade. The trench is backfilled with compacted soil, and the ground is graded to slope away from the house so surface water drains off.
Depending on the size of the property and the complexity of the work, this process takes anywhere from a single day to two weeks. It is more labour-intensive than interior methods, but that thorough approach is what gives exterior waterproofing its durability.
Exterior Waterproofing Costs
In Canada, the cost of exterior waterproofing ranges between $330 and $820 per linear metre. This price depends on factors like the excavation depth, soil conditions, and how accessible the site is. For a 30-metre perimeter, you’re looking at costs between $9,900 and $24,600. For a 45-metre perimeter, the range is roughly $14,850 to $36,900. These estimates usually include excavation, membrane application, drainage system installation, and backfilling.
Excavation depth plays a big role in pricing – a deeper foundation means more digging and labour. Clay-rich soil, which holds water longer and is harder to work with, can also drive up costs. If your property has obstacles like decks, paved paths, or air conditioning units, you’ll need to budget for their temporary removal and later restoration. Homes with limited access, such as those with attached garages or close neighbouring properties, may face additional challenges – or make exterior waterproofing unfeasible altogether.
While the upfront cost is higher compared to interior solutions, exterior waterproofing generally requires less maintenance and lasts longer, making it a smart long-term investment for many Canadian homeowners.
Pros and Cons of Exterior Waterproofing
Exterior waterproofing offers durable protection, often lasting two to three times longer than interior systems. It requires little ongoing maintenance since it doesn’t rely on mechanical sump pumps, which can fail during power outages. By stopping water before it reaches the foundation, it prevents structural damage, reduces hydrostatic pressure, and keeps finished basements or living spaces drier.
For homes with finished basements, this method is less invasive – there’s no need to tear out drywall, flooring, or other interior finishes. It’s especially effective for houses built on clay-rich soil, which tends to retain water and increase pressure on foundation walls.
However, there are some downsides. The higher upfront cost – ranging from $330 to $820 per linear metre – can be a hurdle for some homeowners. The installation process is also disruptive to landscaping, often requiring the temporary removal of gardens, driveways, decks, or other outdoor structures. Accessibility can be another issue; homes with attached garages or limited space between neighbouring properties may not allow room for excavation equipment. Additionally, since the process relies on good weather, it’s best done during spring, summer, or early fall.
Interior vs Exterior Waterproofing: Key Differences
Now that we’ve covered how each method works, let’s break down their differences to help you decide which one fits your needs and budget better.
Cost Comparison
The most noticeable difference is the upfront cost. Interior waterproofing typically costs $3,500 to $15,000, while exterior waterproofing runs from $8,000 to $20,000 or more. While interior systems are cheaper initially, they come with ongoing maintenance costs.
Interior solutions require regular upkeep, such as maintaining sump pumps, whereas exterior systems are almost maintenance-free once installed. However, exterior waterproofing often involves hidden expenses like landscaping repairs, driveway fixes, or removing decks, which can significantly increase the overall cost.
Here’s the trade-off: Interior systems manage water after it enters your home, while exterior systems stop it from getting in at all. If you’re planning to stay in your home long-term, exterior waterproofing may offer better value despite the higher upfront investment. Plus, it can even enhance your home’s resale value.
Now let’s look at how each system performs over time and what kind of maintenance they require.
Lifespan and Maintenance Requirements
Exterior waterproofing systems generally last two to three times longer than interior ones and require much less maintenance. By creating a barrier on the outside of your foundation, exterior systems prevent water from ever reaching the structure.
Interior systems, on the other hand, rely on mechanical components like sump pumps, which need professional maintenance at least once a year. You’ll also need a battery backup to keep the system running during power outages. Exterior systems don’t rely on pumps or moving parts – they work passively once the membrane and drainage tiles are installed.
That said, interior systems are easier to repair or modify since they’re located inside your basement. If an exterior system has issues, fixing it may require re-excavating parts of your foundation, which can be disruptive and costly.
Finally, it’s important to think about how each installation process might affect your living space and outdoor areas.
Installation Impact and Complexity
Interior waterproofing projects usually take 1–3 days to complete, while exterior projects can take anywhere from one day to two weeks, depending on the size of your home. But time isn’t the only factor – the location of the work also matters.
Interior waterproofing keeps the disruption inside your basement. You’ll need to clear out stored items and, if your basement is finished, remove any flooring or drywall in the way. The process involves cutting a trench into the concrete floor along the basement’s perimeter, which creates dust and noise but leaves your yard untouched.
Exterior waterproofing, on the other hand, leaves your basement intact but alters your yard. It requires digging 2.4 to 3 metres deep around your home, which may mean temporarily removing driveways, porches, or landscaping. In some cases, such as homes with close neighbours or attached garages, exterior work might not even be an option.
Ultimately, your decision might come down to what you value more: preserving your finished basement or keeping your outdoor spaces undisturbed.
Why Interior and Exterior Waterproofing Costs Are So Different
The gap between interior and exterior waterproofing comes down to what each job physically involves.
Interior work runs from C$230 per linear metre because the crew works inside a dry basement: cut a trench along the floor, lay weeping tile, set a sump pump, re-cement. No heavy machinery, no digging around the house.
Exterior work runs from C$330 per linear metre because it starts with excavation. Crews dig a trench 2.4 to 3 metres deep around the whole foundation, expose the walls, clean and repair them, apply a membrane, install drainage board and weeping tile, then backfill and regrade. The digging alone accounts for most of the difference in labour and equipment.
Three things drive the exterior price up further:
- Excavation depth. A deeper foundation means more soil to move and more labour hours.
- Soil type. Clay holds water and is harder to dig than sand or gravel.
- Site access. Decks, driveways, and air conditioning units have to come out and go back, and tight lots may not fit an excavator at all.
None of these apply to interior work, which is why the difference between interior and exterior waterproofing shows up most sharply on the invoice.
When Exterior Waterproofing Becomes 2-3x More Expensive
The quoted range assumes a clear, accessible site. Once obstacles enter the picture, exterior waterproofing climbs to two or three times the base price, and the extra cost rarely appears in the first estimate. Two factors drive the jump:
- Landscaping and hardscape restoration. A trench around the foundation means lifting driveways, removing decks and porches, and clearing mature gardens, then restoring all of it afterward. A paved driveway alone can add thousands to the bill, and clay-heavy soil pushes labour hours up further.
- Site access. A home with an attached garage, a shared property line, or no room for an excavator forces hand-digging or specialized equipment, both of which raise the rate sharply.
In some cases the site simply cannot fit exterior work at all. That is part of any honest waterproofing methods comparison: the cheapest method on paper is not always the one your lot allows.
Cost vs Value: Which Is More Cost-Effective Long Term?
Upfront, interior waterproofing wins clearly: from around C$3,500 against C$8,000 or more for exterior. Over the life of the system, the maths shifts.
The two methods age differently:
- Interior relies on a sump pump that needs annual servicing, a battery backup, and eventual replacement of moving parts.
- Exterior runs passively once installed, with almost no upkeep for decades and a lifespan two to three times longer, because it stops water before it touches the foundation instead of managing it after.
That difference feeds directly into resale value. A transferable exterior warranty and a permanently dry foundation carry more weight with buyers and inspectors than a sump pump humming in the corner.
The long-term answer depends on how long you stay. For a quick fix or a short hold, interior waterproofing is the cost-effective choice. For a home you plan to keep, or a finished basement you want to protect, exterior work usually returns more over time despite the higher upfront figure. This is the core of the interior vs exterior waterproofing decision, and it is why a professional evaluation matters more than the sticker price.
When to Choose Interior Waterproofing
When exterior waterproofing isn’t a practical option, interior solutions provide reliable protection for your foundation. This approach is often the go-to when budget constraints or site limitations make exterior work challenging: semi-detached and row houses on tight Toronto lots, an attached garage, or well-established landscaping you’d rather not disturb.
When Interior Waterproofing Is the Right Fit?
The method suits several situations in particular:
Older homes with sound walls. Excavating compacted soil around older properties can cause loose-soil problems, which interior work sidesteps entirely.
- Speed matters. Installation takes just 1–3 days, and an unfinished basement needs no demolition at all.
- Year-round work. It handles urgent winter repairs when frozen soil or poor weather rules out exterior excavation.
- No outdoor disruption. It avoids tearing up driveways, decks, or mature trees near the foundation.
- Dampness without active leaks. Damp walls, a musty smell, or light seepage at the wall-floor joint can be managed from inside, with no digging.
- Older homes with sound walls. Excavating compacted soil around older properties can cause loose-soil problems, which interior work sidesteps entirely.
When to Choose Exterior Waterproofing
Exterior waterproofing is your go-to solution when water intrusion becomes a recurring problem. If your basement floods regularly or faces heavy water seepage during spring thaws or heavy rainstorms, this method tackles the issue right at its source. As TrustedPros puts it:
“Exterior waterproofing is like putting on a raincoat for your house. We’re stopping water from even thinking about getting cosy with your foundation”.
Unlike interior systems that manage water after it enters, exterior waterproofing prevents water from breaching your foundation in the first place. Homes in areas with high water tables benefit most: when groundwater rises, hydrostatic pressure pushes against the foundation walls. Exterior systems like French drains or weeping tiles redirect that water away and ease the pressure. They also break the freeze-thaw cycle, where water seeps into concrete, freezes, expands, and cracks the wall.
When Exterior Waterproofing Is the Right Fit
Your basement’s design and condition decide whether this method suits you. Exterior work makes the most sense in these cases:
- Finished basements. Drywall, flooring, and living-space features stay intact, since the work happens outside rather than tearing out the interior.
- Basements you plan to convert. For a bedroom, home office, or rental unit, exterior waterproofing keeps the space dry without a sump pump running in the background.
- Cinder block foundations. Waterproof membranes apply directly to the porous blocks, which makes the method especially effective on this type of wall.
- Stone and brick foundations. Many older Toronto homes stand on stone or brick walls where water works through the mortar joints. Sealing the wall from outside keeps it from crumbling further.
Timing and Access
Exterior waterproofing is easiest during new construction, when the soil around the foundation has not compacted yet and excavation goes faster. Access for heavy machinery is the catch: semi-detached homes, row houses, attached garages, or closely built neighbours may leave no room to dig.
Cost runs from C$8,000 to C$20,000 or more, depending on the size of your home and the complexity of excavation. The benefits usually outweigh the expense. Exterior waterproofing protects the structure, increases property value over time, and needs little maintenance, which makes it a smart long-term choice for homeowners securing their investment.
Using Both Methods Together for Complete Protection
When it comes to safeguarding your home, combining interior and exterior waterproofing methods offers a powerful solution. This approach uses exterior systems to stop water at its source while interior systems manage any moisture that finds its way in, creating a solid line of defence for your foundation. By blending the strengths of both, you get a more reliable and comprehensive strategy.
This dual method is particularly effective for homes in flood-prone areas or those with high water tables. It ensures that if one system falters, the other steps in to provide backup. For instance, Leaquida Waterproofing pairs high-capacity sump pumps with French drain systems to tackle both surface and groundwater issues, offering a tailored solution for challenging conditions.
The benefits of this combination become especially clear during extreme weather. In heavy rainstorms or spring thaws, your exterior system handles the bulk of the water. But if water seeps through or rises from beneath, your interior sump pump is ready as a backup. To enhance reliability, consider adding a battery-powered sump pump, as power outages often occur during severe weather when water intrusion is at its peak.
This strategy also makes sense for homes with high-use spaces like basements converted into bedrooms, home offices, or rental suites. While the initial cost of combining both methods is higher than choosing just one, it’s a worthwhile investment. It not only protects your property but also preserves the value of your living spaces – especially important in Canada’s unpredictable climate.
“Ultimately, it is a mix of both that saves the day”.
Conclusion
If you’re dealing with severe flooding, high water tables, or need a long-term solution, exterior waterproofing is often the better option, though it comes at a higher cost, ranging from $330 per linear metre. On the other hand, if you’re looking for a quicker, more budget-friendly solution, interior waterproofing might be the way to go, with costs between $230 per linear metre. Factors like the severity of water issues, your basement’s layout, and whether the space is finished will also influence your decision.
At Leaquida Waterproofing, we provide expert assessments for homes across Toronto and the GTA, tailored to each property’s specific needs. We carefully examine your foundation, drainage, and surrounding environment to recommend the most effective and budget-conscious solution. Whether you need one method or a combination for full protection, we’re here to guide you toward a decision that keeps your home safe and secure for years to come. Reach out to us today for a consultation and transparent pricing. Protect your home against Canada’s unpredictable climate with a solution designed just for you.

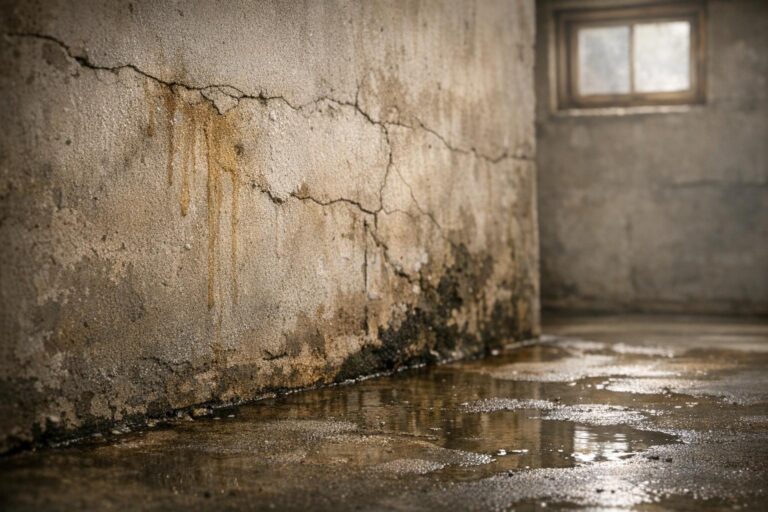
 CLOGGED OR BROKEN WEEPING TILE