
Water damage is one of the most common and costly problems for Canadian homeowners, accounting for nearly 50% of home insurance claims. From burst pipes in winter to spring snowmelt and heavy rains, the risks are constant. The good news? You can prevent most water damage with regular maintenance and smart upgrades.
Here’s a quick summary of key steps to protect your home:
- Inspect seasonally: Check for cracks, clean gutters, and test sump pumps.
- Fix grading and drainage: Ensure water flows away from your foundation.
- Waterproof your home: Apply exterior membranes and use interior drainage systems.
- Prepare for emergencies: Install leak detectors, know your water shut-off valve, and keep a sump pump backup.
- Maintain plumbing: Insulate pipes in winter and replace appliance hoses regularly.
Water Damage in Your Home? 👀 Stop Mold, Find Leaks & Protect Your Walls Fast
sbb-itb-5761e20
Understanding Water Damage Risks
Water damage rarely happens in an instant; it usually develops over time through small cracks, unnoticed leaks, or delayed maintenance.
Common Sources of Water Intrusion
Plumbing issues are among the main causes. Things like burst or cracked pipes and old appliances, such as water heaters – most of which need replacing every 10 to 15 years – can release large amounts of water when they fail.
Improper grading and drainage also play a big role. If the ground around your home slopes towards the foundation instead of away from it, rain and melting snow can pool against the walls and gradually seep inside. Blocked eavestroughs, malfunctioning sump pumps, and clogged downspouts make the problem worse. Foundation cracks and basement window wells can also allow water to enter under pressure.
Sewer backups are another common issue. These can occur due to tree roots invading pipes, grease build-up, or overwhelmed municipal sewer lines during heavy rainfall, forcing wastewater back into your home through floor drains or toilets.
How the Canadian Climate Raises Water Damage Risk
Canada’s extreme weather conditions add extra stress to homes. In winter, freezing temperatures can cause water in pipes to freeze and expand, leading to cracks or bursts. Poor attic insulation can allow heat to escape, melting rooftop snow, which then refreezes along the eaves. This creates ice dams that trap water under shingles.
Spring comes with its own challenges. A sudden temperature rise can cause rapid snowmelt. If the ground is still frozen, it won’t absorb the water, leading to pooling around foundations and increased hydrostatic pressure on basement walls and floors. Heavy rains in summer and fall can also overwhelm municipal sewer systems. It’s worth noting that nearly 50% of all home insurance claims in Canada are related to water damage.
Types of Damage to Watch For
Water damage doesn’t just leave unsightly stains – it can seriously weaken a home’s structure. Continuous exposure to moisture can cause wood to rot, concrete to weaken, and metal to corrode. This puts floors, walls, and the home’s framework at risk long before visible signs appear.
Beyond structural issues, water intrusion can create health and safety risks. Damp environments encourage mould growth, which can trigger respiratory problems and worsen conditions like asthma. Sewer backups are particularly dangerous, as they bring black water – highly contaminated wastewater – into living areas. Additionally, water near electrical systems poses a heightened risk of fire or electrocution.
Here’s a breakdown of water damage categories based on contamination levels:
| Water Category | Name | Description | Health Risk |
|---|---|---|---|
| Category 1 | Clean Water | Comes from sanitary sources like pipes or sinks | Low to none |
| Category 2 | Grey Water | Moderately contaminated, e.g., from dishwashers | Moderate; could cause illness |
| Category 3 | Black Water | Highly contaminated, e.g., sewer backups | High; poses serious hazards |
Recognizing the type of water involved is key – not just for proper cleanup but also to determine when professional help is necessary. Being aware of these risks highlights the importance of regular maintenance, which we’ll cover next.
Importance of Regular Maintenance
Spotting small problems early can save you from pricey repairs down the road. Taking a seasonal approach to maintenance ensures tasks stay manageable and nothing gets overlooked. Below, we outline seasonal strategies to help you handle Canada’s varied weather conditions effectively.
Seasonal Inspection Checklist
Canada’s weather shifts dramatically with each season, and each brings its own risks for water damage. Tackling maintenance season by season keeps things organized and ensures you’re prepared.
| Season | Priority Maintenance Tasks |
|---|---|
| Spring | Check foundation for cracks and signs of efflorescence; clear eavestroughs; inspect roof shingles; test sump pump. |
| Fall | Remove leaves from gutters and catch basins; inspect yard grading; service HVAC systems; drain outdoor pipes. |
| Winter | Remove heavy snow and ice from roofs if snow exceeds 60 cm or ice reaches 5 cm; watch for ice dams; insulate exposed pipes. |
| Bi-Annual | Test all plumbing shut-off valves; inspect appliance hoses; check bathroom grout and caulking. |
Spring deserves extra attention. Rapid snowmelt combined with frozen ground can lead to water pooling around your foundation – a situation that worsens quickly if clogged eavestroughs from the previous fall aren’t cleared.
High-Priority Maintenance Tasks
Focusing on critical tasks can significantly reduce the chance of severe water damage. For example, testing your sump pump before spring rains arrive is crucial. A failed pump during a storm can lead to a flooded basement in no time. Ensure the discharge pipe channels water at least two metres away from your foundation.
Appliance hoses are another common weak point. Check hoses on your washing machine, dishwasher, and refrigerator ice maker for wear and tear. Replace them every few years, and test your main water shut-off valve along with individual fixture valves twice a year to ensure they’re working properly.
Before winter, seal any cracks in siding, masonry, or around windows. Even small gaps can expand when frozen, making them worse over time.
Documenting and Tracking Issues
Keeping a detailed maintenance log is a smart move. It not only helps you stay on top of repairs but also supports your case if you ever need to deal with insurance. Record the date of every inspection, repair, or professional service, and keep receipts. This way, you can identify recurring problems early and have proof of responsible upkeep.
Most standard home insurance policies in Canada exclude damage caused by gradual leaks or ongoing neglect. If an adjuster finds that a leak has been developing for months, your claim might be denied. A well-documented history of maintenance shows that you’ve been proactive and that any damage was sudden, not due to neglect.
Exterior Protection Measures
Taking care of the exterior of your home is a key step in preventing water damage. It’s all about managing how water flows around your property, ensuring that runoff is directed away from walls and the foundation.
Managing Grading and Surface Runoff
The ground around your home should slope away from the foundation. If the slope is flat or tilts inward, water can collect and potentially cause damage.
For surfaces like driveways and patios, concrete is a common choice but isn’t ideal for drainage since it’s impermeable. Instead, consider permeable options like gravel, permeable block paving, or turf. These materials allow water to seep into the ground naturally, reducing runoff near your foundation. If you’re installing paving slabs, use a water-permeable jointing compound and ensure they’re laid over an aggregate sub-base for better drainage.
For areas prone to pooling, such as garage thresholds or front door entries, installing a channel drain can help. These drains catch water and direct it away before it gathers at entry points.
Protecting Foundation Walls
Hydrostatic pressure, which pushes water through foundation cracks, can lead to significant damage. A reliable solution is positive-side waterproofing. This involves applying a waterproof membrane directly to the exterior of the foundation wall, working with the water pressure rather than against it.
Two popular options for this are 60‑mil rubberized asphalt sheet membranes and fluid-applied liquid membranes. Sheet membranes are ideal for large, flat surfaces and are often used in new builds. Fluid-applied coatings, on the other hand, are seamless and highly elastic – some can stretch up to 900% – making them perfect for handling minor foundation movements and cracks. Before applying these membranes, seal any cracks under 6 mm with an elastomeric sealant on a clean, dry surface.
Once the membrane is installed, add a drainage mat or board over it. This layer directs moisture downward toward the footing drain and reduces hydrostatic pressure on the wall. When backfilling, use at least 40 cm of granular material, like crushed stone, against the foundation wall to improve drainage.
When to Call a Professional
Some tasks related to exterior water protection are best left to professionals. Excavating around the foundation to install or replace waterproofing membranes, repairing damaged weeping tiles, or installing a French drain require specialized tools and expertise. Similarly, if your roof hasn’t been reshingled in over 15 years, it’s wise to have it inspected. Older roofs are more likely to allow water intrusion.
Cracks in exterior masonry, siding, or brickwork should also be assessed by a professional. While it might be tempting to patch them yourself, only a specialist can determine if the crack is merely cosmetic or a sign of structural issues. They can also seal it properly to prevent moisture from seeping into the wall. Acting early often saves money compared to dealing with extensive damage later.
Interior Waterproofing Techniques
After addressing exterior waterproofing, interior methods come into play to handle any moisture that bypasses the initial defences. These techniques are especially useful for finished basements or homes where exterior access is limited. The goal is to manage water already inside the home effectively.
Sealing and Moisture Control
Before applying any waterproofing products, it’s essential to pinpoint the source of the moisture. A simple way to test this is by using the plastic sheet test. Tape a piece of plastic to a damp wall and leave it for 24 hours. If moisture collects on the wall side, the issue is seepage. If it gathers on the room side, condensation is the culprit, which can be managed through dehumidification and air sealing.
When using polyethylene vapour barriers in interior insulation assemblies, placement is critical. Incorrect installation can trap moisture, leading to mould and rot. Once moisture sources are addressed, you can move on to drainage systems to handle any remaining water.
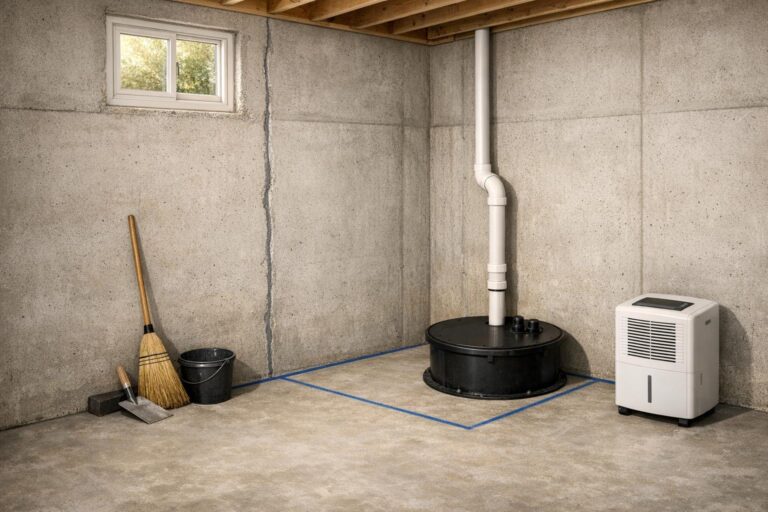
Interior Drainage and Sump Systems
If water enters at the wall–floor joint, especially during heavy rain, installing a perimeter drainage system paired with a sump pump is a practical solution. This process involves cutting a trench along the basement slab’s perimeter, laying perforated pipe surrounded by gravel, and directing water to a sump pit. Interior wall membranes can also help by funnelling moisture into the drainage system.
In the Greater Toronto Area, the cost of these interior waterproofing systems ranges from CAD $70 to $200 per linear foot. Companies like Leaquida Waterproofing offer competitive pricing, typically between CAD $70 and $120 per linear foot, which includes drainage channels, sump pumps, and vapour barriers. Since these systems depend on a functioning pump, it’s wise to invest in a battery backup or a secondary pump to keep things running during power outages. Toronto homeowners might also qualify for the Basement Flooding Protection Subsidy Program, which can help offset the cost of sump pump and backwater valve installations in Toronto.
Crawl Space Protection
Interior waterproofing isn’t just for basements – it’s equally important for crawl spaces. The best approach here is full encapsulation, which involves sealing the crawl space entirely. A reinforced polyethylene liner (10 to 20 mil thick) is installed across the floor and up the walls. Seams are overlapped by 15 to 30 centimetres and sealed with waterproof tape. Foundation vents are also sealed to block humid outdoor air from entering and condensing on cooler surfaces inside.
“Crawl space encapsulation is the process of sealing your crawl space from moisture and outside air by installing a continuous vapor barrier across the floor and walls, insulating the space, and controlling humidity with a dehumidifier.” – Annette Hynes, Product Marketing Manager, Trusscore
To keep relative humidity below 60% – the level at which mould can grow within 24 to 48 hours – a crawl space dehumidifier is essential. If groundwater intrusion is an issue, adding a sump pump and interior drainage channels beneath the liner is recommended. The cost for professional full encapsulation typically falls between CAD $3,000 and $8,000, but a complete system with drainage and dehumidification can exceed CAD $15,000, depending on the space’s size and condition.
Dealing with Plumbing Issues
Plumbing problems – like burst pipes or hidden leaks – are a common and expensive concern for Canadian homeowners throughout the year. Tackling these issues early helps safeguard your home from water damage.
Preventing Burst Pipes in Winter
Pipes are at risk of freezing when temperatures dip below -6°C for six or more hours. Pipes in unheated areas like crawl spaces, attics, exterior walls, and basements are especially vulnerable. When a pipe freezes, the pressure can build quickly, and even a small crack can unleash hundreds of gallons of water.
To protect your pipes, insulation is key. Use materials like tubular foam, pipe wrap, or heat cables to keep exposed pipes warm. Also, seal gaps around electrical wiring, vents, or wall cracks to block cold air from reaching your plumbing. Caulk or weatherstripping can help with this.
Another essential step is maintaining a consistent indoor temperature. Never let your thermostat drop below 12.78°C (55°F), even overnight or during trips. If you notice reduced water flow during a cold spell, act fast – it could mean a pipe is starting to freeze. In such cases, apply heat to the pipe starting near the faucet and keep the tap open to relieve pressure.
Protecting Against Leaks
“A sudden rise in your water bill without increased usage is a strong indicator of a hidden leak.” – Harris Plumbing Inc.
Hidden leaks can go unnoticed for months, but there are warning signs: unexpected spikes in your water bill, discoloured stains, musty smells, or rusty pipes. Installing water sensors or leak detectors in high-risk areas like near water heaters, washing machines, or sump pumps can alert you to problems before they worsen. And don’t forget the basics – make sure everyone in your household knows where the main water shut-off valve is located. This knowledge can save you from major damage if a pipe bursts.
Sewer backups are another plumbing issue that requires special attention.
Sewer Backup Prevention
Sewer backups happen when heavy rain or rapid snowmelt overwhelms the municipal sewer system, causing wastewater to flow back into your home through floor drains or toilets. Installing a backwater valve on your main sewer line is an effective way to stop this from happening.
Many Canadian cities offer rebate programmes to help with the cost of backwater valve installations. For instance, Toronto’s Basement Flooding Protection Subsidy Program covers part of the expense. Similar programmes are available in cities like Mississauga, Ottawa, and Calgary, so it’s worth checking with your local municipality for financial assistance.
Taking steps to address plumbing issues works hand-in-hand with other waterproofing measures, offering more complete protection against water damage.
Role of Gutters and Downspouts
When it rains, your roof channels a surprising amount of water toward the ground. Without properly working gutters, all that water lands near your home’s foundation, where the disturbed soil absorbs it quickly. Over time, this pooling water can create hydrostatic pressure, which pushes moisture through tiny cracks in concrete or mortar joints. A well-maintained gutter and downspout system is a simple yet effective way to prevent this pressure from building. Let’s dive into how to keep gutters clear, position downspouts effectively, and deal with winter-specific challenges.
Keeping Gutters Clear
Gutters can only do their job if water flows through them without obstruction. To keep them functioning, clean your gutters twice a year – once in late fall and again in late spring – to remove debris like leaves, seeds, and other buildup from winter. Use a plastic scoop or garden trowel, as metal tools can scratch gutters and lead to rust. After cleaning, flush the system with a garden hose to ensure water drains smoothly through the downspouts.
If you find yourself cleaning out gutters more often – especially in areas with dense tree cover – consider installing micro-mesh leaf guards. These guards are excellent for filtering out fine debris like pine needles and maple keys, which are common in Ontario, and they reduce how often you’ll need to climb a ladder. Once your gutters are clear, the next step is to make sure water is being directed away from your home’s foundation.
Downspout Placement and Discharge
Clear gutters are only part of the equation; the placement of your downspouts is equally important. Water needs to be discharged far enough away to avoid pooling near your foundation. Ideally, downspouts should direct water 1.8 to 3 metres (6 to 10 feet) from the house, though the minimum recommendation is 1.2 to 1.8 metres (4 to 6 feet). If your downspouts currently release water right next to your home, adding an extension is a simple and affordable solution.
“A $15 to $40 extension is an extraordinary value compared to a $5,000 to $30,000 foundation waterproofing or repair job.” – Devon Moore, Operations Lead, D&D Home Services
For a long-term fix, underground PVC drainage systems can carry water even farther – 3 to 6 metres (10 to 20 feet) away from your home. In Ontario, these pipes must be buried below the frost line, which is typically 1 to 1.2 metres (3.5 to 4 feet) deep, to prevent freezing and spring backups. Professional installation costs range from $500 to $1,500. No matter which method you choose, ensure the water is directed toward a swale, rain garden, or open lawn – never toward driveways or neighbouring properties.
Managing Gutters in Winter
Once your gutters are clear and downspouts are properly placed, it’s time to address winter-specific issues. Ice dams are a common problem in Canada, and clogged gutters can make them worse. Ice dams form when heat from the attic melts snow on the roof, which then refreezes at the colder edge of the gutter. If the gutters are clogged, the meltwater has nowhere to go, leading to leaks and even structural damage.
The best long-term solution is to tackle the source of the problem: attic insulation and ventilation. Sealing air leaks around chimneys, plumbing vents, and attic hatches, combined with proper insulation, keeps the roof deck evenly cold. This prevents uneven snowmelt in the first place.
“The most reliable way to prevent ice dams is to maintain an even roof temperature from top to bottom.” – Bruce Adam Hulse, CEO, Clear Ottawa Windows
To manage snow buildup, use a roof rake to safely remove snow from the eaves. If ice has already formed in the gutters, avoid rock salt, which can corrode shingles and metal. Instead, use calcium chloride – it’s effective in low temperatures and won’t damage your gutters or roof.
Waterproofing Basements and Crawl Spaces
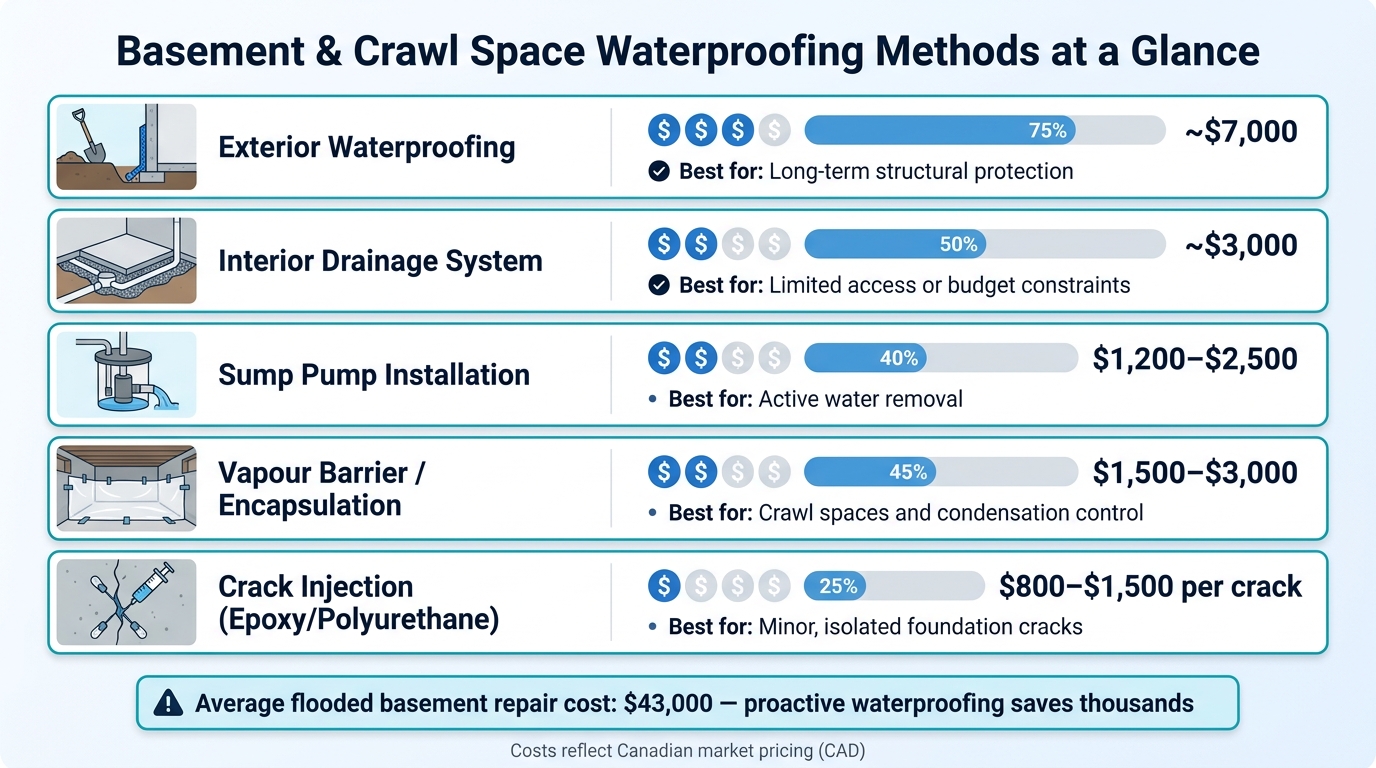
Basement & Crawl Space Waterproofing Methods: Cost & Use Case Comparison
Keeping your basement and crawl space dry is about more than just managing surface water – it’s about safeguarding your home’s foundation. In Canadian homes, these areas are particularly prone to moisture issues, and proper waterproofing can save you from costly repairs down the road.
Identifying Moisture Problems
Basement moisture generally stems from two sources: condensation or seepage.
Condensation happens when warm, humid air meets a cool surface, forming water droplets. This is often linked to ventilation or insulation problems. Seepage, however, involves water being forced through the foundation due to hydrostatic pressure, which occurs when saturated soil presses moisture through cracks and pores in the concrete.
Here are some common warning signs to watch for:
- White, chalky residue (efflorescence) on walls
- Musty smells
- Stains near the base of walls
- Cracks wider than 6 millimetres (¼ inch)
Horizontal cracks or stair-step patterns in block walls are particularly concerning and should be evaluated by a professional immediately.
“In Ontario, our unique climate and soil conditions create specific challenges for foundations. Freeze-thaw cycles, clay soil expansion and contraction, and high water tables all contribute to the stress placed on residential foundations.” – Ontario Foundations
Once you understand the source of the problem, you can decide between exterior and interior waterproofing methods.
Exterior Waterproofing Solutions
Exterior waterproofing tackles the issue at its source, stopping water before it reaches your foundation walls. This involves excavating the soil around your home’s foundation, applying a waterproof membrane to the walls, and installing a drainage system like a French drain or weeping tile to redirect water. Gravel is then used to backfill the area, improving drainage.
In areas with clay-heavy soil, spring thaws can increase water retention, raising hydrostatic pressure. While this method is disruptive and typically costs around $7,000, it’s the most effective long-term solution.
“Exterior waterproofing is generally considered the superior method because it stops water at the source, preventing it from seeping into and damaging your basement walls.” – Lawrence Bonk, Contributing Writer, Angi
For smaller cracks that don’t require full-scale excavation, polyurethane or epoxy injection can seal them from the inside. These injections cost between $800 and $1,500 per crack and create a waterproof barrier without the need for digging.
If exterior work isn’t an option, interior waterproofing can help manage water that has already entered your home.
Interior Waterproofing Solutions
When exterior excavation isn’t possible – due to landscaping, limited access, or cost – interior waterproofing offers a practical alternative. Instead of blocking water at its source, this method channels water inside the foundation into a drainage system, which is then pumped out.
A typical interior system includes:
- A perimeter drainage channel
- A sump pump for water removal
- A vapour barrier on walls and floors
The average cost for an interior waterproofing system is about $3,000, significantly less than exterior waterproofing. Installing a sump pump alone costs between $1,200 and $2,500.
“Interior waterproofing methods like sealants and vapor barriers help control moisture levels but don’t address the root cause.” – Tim O’Shea, The Build Pros
For crawl spaces, encapsulation is the most effective solution. This involves sealing a heavy-duty polyethylene vapour barrier across the floor and walls, preventing ground moisture from entering the living space. Encapsulation projects typically cost between $1,500 and $3,000. In Toronto and nearby areas, companies like Leaquida Waterproofing offer tailored crawlspace solutions to address specific moisture issues.
| Method | Average Cost | Best For |
|---|---|---|
| Exterior waterproofing | ~$7,000 | Long-term structural protection |
| Interior drainage system | ~$3,000 | Limited access or budget issues |
| Sump pump installation | $1,200–$2,500 | Active water removal |
| Vapour barrier / encapsulation | $1,500–$3,000 | Crawl spaces, condensation control |
| Crack injection (epoxy/polyurethane) | $800–$1,500 per crack | Minor, isolated foundation cracks |
Monitoring for Early Warning Signs
After implementing exterior and interior waterproofing measures, keeping an eye out for early warning signs is essential. Catching small issues before they escalate can save you from costly repairs down the line. In Canada, where freeze–thaw cycles and heavy spring rains frequently challenge homes, being vigilant about subtle changes is one of the smartest steps you can take.
Visual and Odour Checks
Some of the most obvious signs of trouble don’t require fancy tools – just a sharp eye and a sensitive nose. Yellowish or brown rings on ceilings are a telltale sign of a potential leak. Water often travels along structural elements like framing members or ceiling joists before showing up as a stain, meaning the source of the problem could be far from where it appears. As the HYDROPRO Team explains:
“The stain you see on the surface is typically not directly below or adjacent to the leak source – water travels along framing members, pipe chases, and ceiling joists before appearing.”
Other warning signs include warped floorboards or doors that suddenly stick, which may signal moisture affecting your home’s structure. Additionally, persistent musty or earthy smells could point to hidden mould growth. Toxic black mould (Stachybotrys) can develop within just 24 to 48 hours of constant moisture exposure, so quick action is crucial.
Using Detection Tools
While manual checks are a great starting point, a few affordable tools can help you catch hidden issues. Smart leak sensors are small, battery-powered devices that can be placed under sinks, near water heaters, or behind washing machines. These sensors alert you with an alarm or smartphone notification as soon as they detect standing water.
For broader coverage, whole-home flow monitors offer a more advanced solution. These systems connect directly to your main water line to track pressure and usage patterns. Unusual water consumption could indicate a hidden leak. Richard Handel, a test engineer at Consumer Reports, highlights their efficiency:
“The best systems use both flow sensors, to detect large and small leaks in water supply pipes, and remote wireless leak detectors.”
Whole-home monitoring systems typically cost between $350 and $700, while individual wireless sensors range from $50 to $70 each. In areas like basements or crawl spaces, a hygrometer (humidity sensor) can help you track moisture levels in the air, giving you the chance to address condensation issues before they become visible.
Tracking Changes Over Time
In addition to using advanced tools, maintaining detailed records is key to spotting problems early. A single photo or note might not seem significant, but a series of updates over time can reveal patterns. Take photos of visible cracks, stains, or moisture and date them for reference. Reviewing these records monthly can help you detect gradual changes, which can also support insurance claims if needed.
This is especially important because nearly 50% of home insurance claims in Canada are related to gradual neglect. Insurers often examine whether damage occurred suddenly or was the result of long-term issues. Keeping receipts for maintenance tasks like gutter cleaning, plumbing inspections, or waterproofing treatments shows a proactive approach that could make a big difference when filing a claim.
Emergency Preparedness and Damage Mitigation
Even with the best preventive measures, water intrusion can still happen. Being prepared for emergencies is a smart way to limit damage and protect your home when the unexpected occurs. A solid plan, combined with regular maintenance, can make all the difference.
Building an Emergency Kit
An emergency kit is your first line of defence when water intrusion happens. Stock it with essentials like a wet/dry vacuum, a portable sump pump, extra towels, plastic sheeting, and a basic tool kit (including a wrench, screwdrivers, and duct tape). For personal safety, have waterproof boots, gloves, N95 masks, and safety goggles ready. It’s also wise to include bleach or an antimicrobial cleaner to disinfect surfaces once the area is dry. If storms frequently cause power outages in your area, consider investing in a backup generator to keep your sump pump running.
What to Do During Water Intrusion
Before stepping into a flooded area, assess the space for dangers like sagging ceilings, unstable floors, or exposed electrical outlets. If it’s safe, turn off the main electrical breaker and the water shut-off valve from a secure location. Once safety is confirmed, identify the water source and its type:
- Category 1 (Clean Water): Comes from sources like a burst pipe and poses minimal health risk.
- Category 2 (Grey Water): From appliances like dishwashers or washing machines, this water carries moderate health risks.
- Category 3 (Black Water): Highly hazardous water from sources like sewer backups requires full protective gear and professional help.
Contain the water spread using towels, buckets, or tarps, and remove standing water with a wet/dry vacuum or portable pump. If water bubbles form behind your ceiling, carefully relieve the pressure to prevent further damage. Ventilate the space by opening windows, running fans, and using a dehumidifier to dry the area quickly – mould can begin to grow in as little as 48 hours.
Don’t forget to document the damage thoroughly with photos and videos before starting major cleanup. This documentation will be critical if you need to file an insurance claim.
If the situation escalates beyond what you can handle, it’s time to call in the professionals.
When to Contact Leaquida Waterproofing
If your efforts aren’t enough to stop the damage, or you’re facing serious issues like Category 3 black water, visible cracks in your foundation, or ongoing moisture seeping through walls or floors, it’s time to contact Leaquida Waterproofing. Their team specializes in addressing the root causes of water intrusion with services like sump pump installation, backwater valve fitting, exterior waterproofing membranes, and drainage system upgrades.
When reaching out, provide as much detail as possible: describe the water source, its category, share photo documentation, and include any records of past maintenance. This information helps their team evaluate the situation and recommend the most effective solution for your home.
These emergency steps serve as an essential backup to your preventive measures, ensuring you’re ready to tackle water intrusion when it happens.
Conclusion: Keeping Your Home Protected Long Term
Protecting your home from water damage is an ongoing effort. In Canada, water damage makes up nearly 50% of all home insurance claims, with the average cost to repair a flooded basement sitting at around $43,000. Staying on top of regular maintenance can significantly reduce these risks.
A solid defence against water damage includes regular inspections, keeping gutters clear, maintaining reliable sump pumps, and using smart detection systems. For example, clean your gutters every spring and fall, make sure downspouts direct water at least two metres away from your home’s foundation, and test sump pumps and shut-off valves twice a year to ensure they’re functioning properly.
Adding smart leak detectors and humidity sensors to your home provides an extra layer of protection by offering early warnings alongside your routine checks. It’s also wise to review your insurance policy to ensure it covers sewer backup and overland flooding, as standard policies often exclude issues like gradual seepage or damage caused by neglect.
For persistent problems like foundation cracks, ongoing moisture, or drainage failures, professional help is essential. As mentioned earlier, addressing these issues promptly can prevent them from escalating. Companies like Leaquida Waterproofing provide targeted solutions, including exterior waterproofing membranes, backwater valve installations, and sump pump upgrades, tackling the root cause instead of just the symptoms.
Sticking to a consistent maintenance schedule and regularly reviewing your home’s systems can go a long way in keeping your property safe from water damage.


 CLOGGED OR BROKEN WEEPING TILE