Toronto homes face unique challenges when it comes to basement waterproofing. The city’s clay-heavy soil, high water table, freeze-thaw cycles, and aging drainage systems contribute to common issues like moisture, foundation cracks, and flooding. Nearly half of Toronto homes were built before modern waterproofing standards, leaving many properties vulnerable.
Key takeaways for protecting your basement:
- Inspect regularly: Check for cracks, damp spots, and signs of water intrusion during or after heavy rain.
- Maintain drainage systems: Clean gutters, extend downspouts, and ensure proper grading around your home.
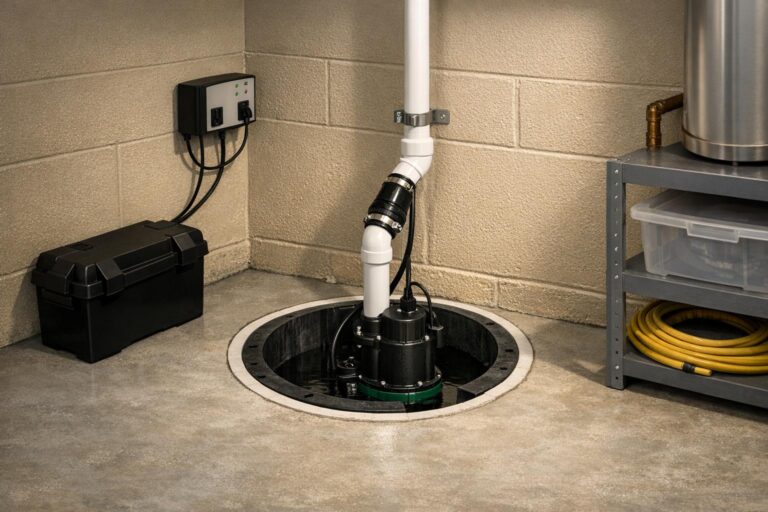
- Test sump pumps: Verify functionality every 3–4 months, especially before spring thaw or major storms.
- Seal cracks: Use hydraulic cement or epoxy to prevent water seepage.
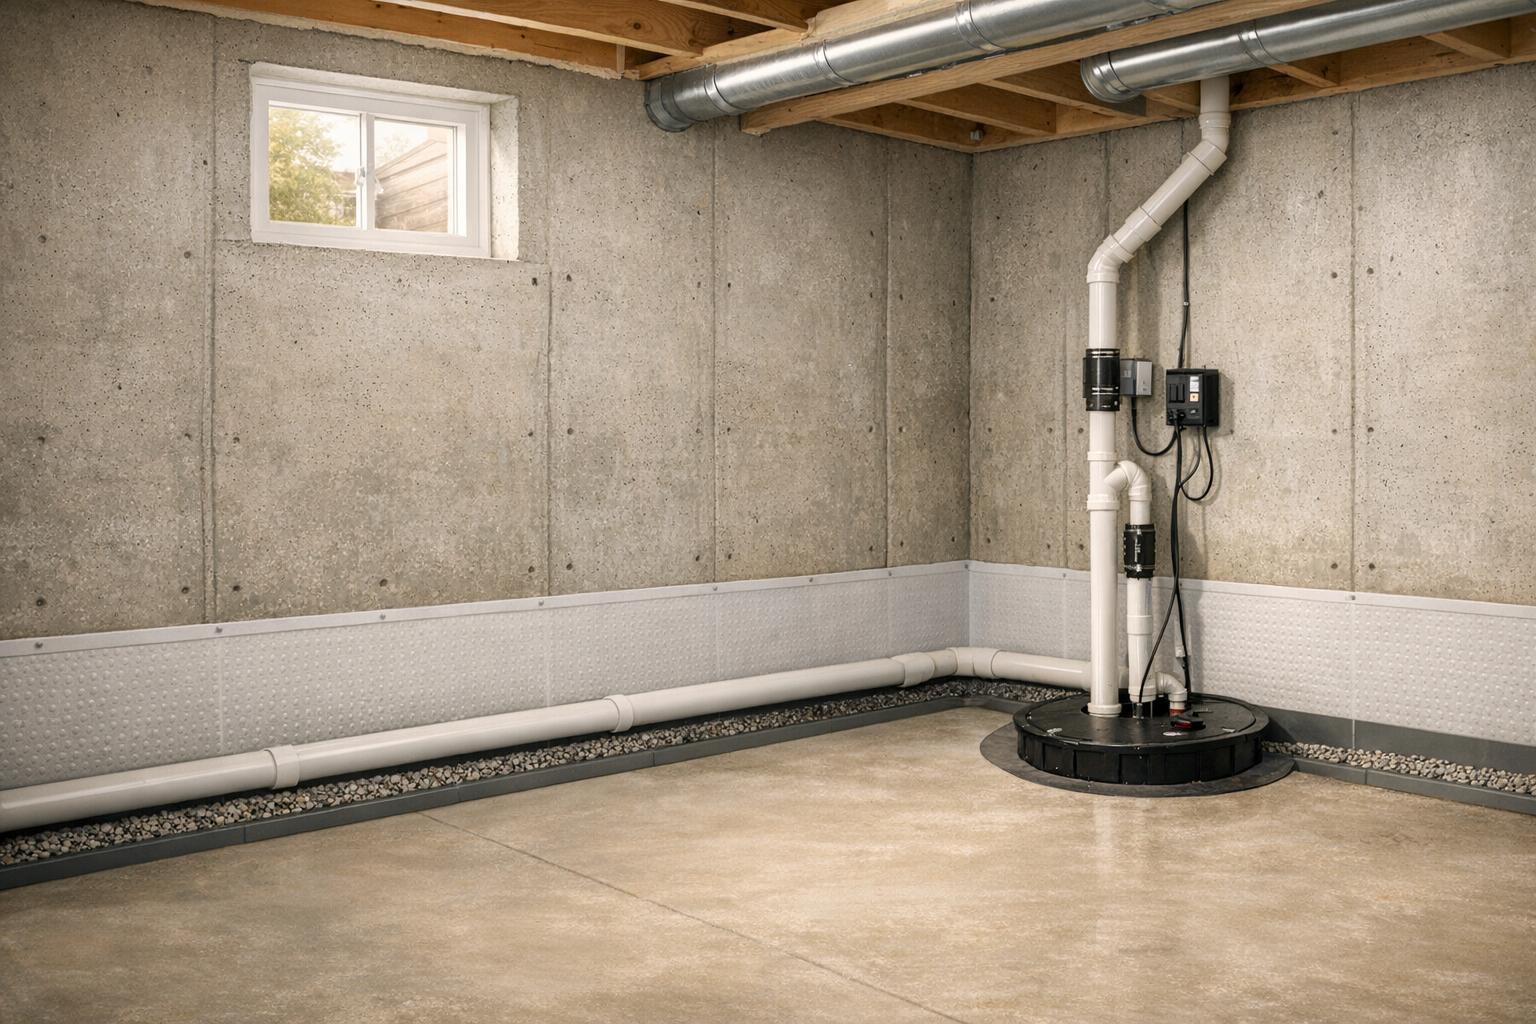
- Invest in exterior waterproofing: Apply waterproof membranes and install weeping tiles for long-term protection.
- Control humidity: Use dehumidifiers and monitor moisture levels to prevent mould.
Ignoring water issues can lead to costly repairs, health risks, and reduced property value. A dry basement not only protects your home but can also increase its value by over $50,000. With proactive maintenance and proper waterproofing, you can safeguard your investment and avoid structural damage.
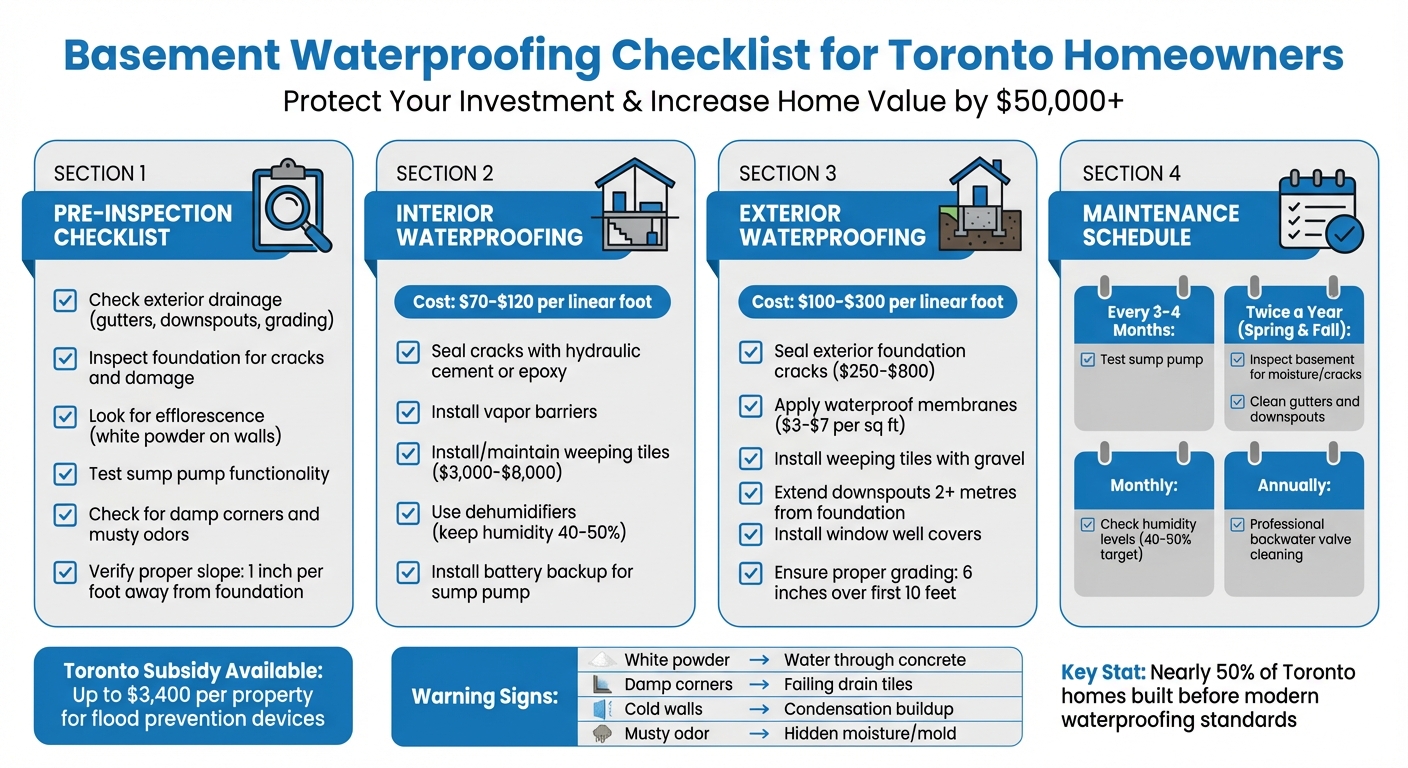
Complete Basement Waterproofing Checklist for Toronto Homeowners
Process of Basement Waterproofing in Toronto and GTA
sbb-itb-5761e20
Pre-Waterproofing Inspection Checklist
Before starting any waterproofing project, it’s crucial to uncover hidden issues. The ideal time to inspect is during or right after heavy rain when water problems are easiest to spot. Begin by assessing both the exterior and interior of your foundation.
Start with a perimeter walk around your property. Examine eavestroughs and downspouts for blockages like leaves or debris that could obstruct water flow. Ensure the ground slopes away from the foundation at a gradient of about 1 inch per foot. Look for soft or shifting soil near the walls, as this could indicate poor drainage. Pooled water after rainfall is another major warning sign.
Check Exterior Drainage Systems
Your gutters and downspouts are your first defence against water intrusion. If eavestroughs are clogged, water can overflow and collect against your foundation. During a rainstorm, watch for overflow as a clear indicator of blockages. Also, inspect nearby roadside catch basins – if they’re clogged with debris, stormwater may back up toward your home rather than flowing into the sewer system.
If possible, disconnect downspouts from the city sewer system to reduce the risk of basement flooding during heavy rains. Redirect water onto a permeable surface at least 2 metres from your foundation. Additionally, check that drainage swales (shallow ditches between properties) are clear and functioning properly.
Look for Foundation and Basement Damage
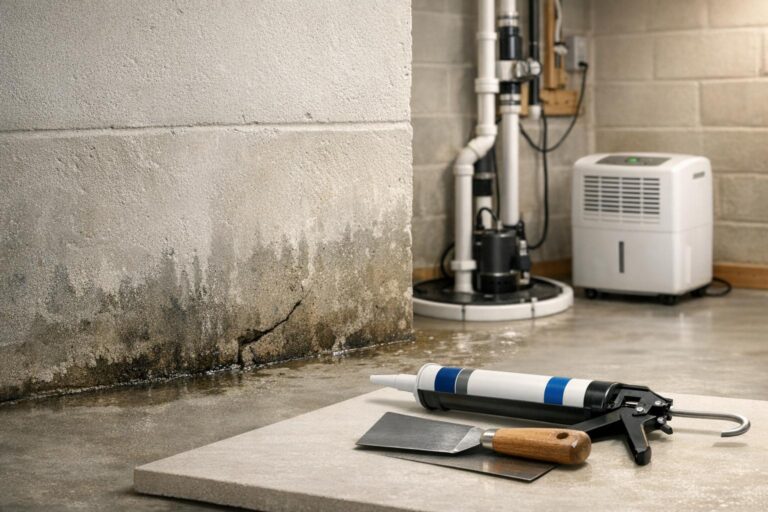
Take a close look at your basement walls, floors, and corners. Start by cleaning the walls to reveal any hidden cracks that might be concealed by dirt or dust. Pay attention to foundation cracks, especially around windows, doors, or within the concrete. Even tiny cracks can allow water to seep in. If you notice efflorescence – a white, powdery substance on the walls – it’s a sign that water is moving through the concrete and leaving mineral deposits behind.
Other warning signs include water stains, peeling wallpaper, or blistering paint. Run your hand along the walls; cold surfaces often indicate condensation problems. A musty smell could suggest hidden moisture or mould. If basement corners feel damp underfoot, this might point to a failing drain tile system. The table below outlines key warning signs and their potential causes:
| Warning Sign | What It Indicates |
|---|---|
| White powder (efflorescence) | Water moving through concrete |
| Damp basement corners | Failing drain tile system |
| Cold walls | Condensation and moisture buildup |
| Visible cracks | Direct water entry points |
| Musty odour | Hidden moisture or mould growth |
“Even the smallest of cracks in the foundation and non-structural cracks can cause a leak in your basement, so don’t ignore them.” – DrainWorks Plumbing
Once you’ve checked for structural damage, ensure your sump pump is functioning properly to manage excess water.
Test Your Sump Pump
A working sump pump is essential during Toronto’s frequent storms and power outages. To test it, pour water directly into the sump pump basin until the float switch activates. The pump should immediately start and quickly remove the water. Make sure the discharge pipe directs water at least 2 metres away from your foundation.
Don’t forget to test the battery backup system to confirm the pump will operate during a power outage. Clear any debris from the basin. According to basement flood expert Eugene Kushmarak, you should test your sump pump every 3–4 months, particularly before the spring thaw or major rainfall. If the pump fails during testing, replace it right away.
Interior Waterproofing Measures
Once you’ve inspected for moisture issues inside, it’s time to take action. Interior waterproofing typically costs between $70 and $120 per linear foot and is most effective when combined with solid exterior drainage systems. Addressing structural weaknesses inside your home is the next step.
Seal Cracks and Install Vapour Barriers
Start by cleaning your walls thoroughly to ensure the sealant adheres properly. For small cracks, hydraulic cement does the job, but for deeper cracks or areas with persistent seepage, polyurethane or epoxy resin injections are better options.
After sealing, apply a vapour barrier. This can be done using liquid membranes, plastic sheeting, or dimpled drainage membranes. For extra durability, you can reinforce these barriers with open-weave glass fabric. The goal is to guide moisture into your drainage system rather than just blocking it.
“A small leak can turn into a full-blown waterlogging, which causes significant damage not only to the property but also to the health of the occupants.” – Leaquida
Install or Maintain Interior Drainage Systems
Once cracks are sealed, install weeping tiles to channel water toward your sump pump. This process usually takes 2–3 days and costs between $3,000 and $8,000. If you’re in Toronto, you might qualify for the city’s Basement Flooding Protection Subsidy, which offers up to $3,400 per property for eligible installations like sump pumps and backwater valves.
Make sure your sump pump has a working battery backup system. Regularly check basement corners for signs of dampness or wet spots – these could indicate clogged or failing weeping tiles. Additionally, clean your backwater valves annually using the clean-out ports to keep them clear of debris.
Control Humidity Levels
Dehumidifiers are only effective once leaks are sealed and drainage is in place. First, address the root issues by sealing cracks and installing proper drainage. Then, use a self-draining, energy-efficient dehumidifier to maintain humidity and prevent mould from forming on freshly treated surfaces.
To further control moisture, insulate cold surfaces and install smart humidity sensors that can alert you to rising moisture levels. Given Toronto’s clay soil and high water tables, ongoing monitoring is crucial to keeping your basement dry.
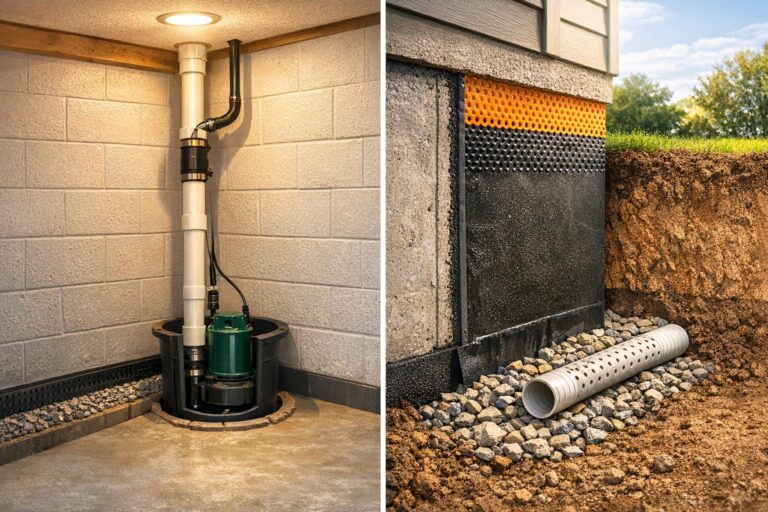
Exterior Waterproofing Measures
Exterior waterproofing is all about keeping water away from your foundation walls. While this method involves more work – excavation alone can take up to 24 hours – it provides long-term protection. In Toronto, the cost for exterior waterproofing ranges from $100 to $300 per linear foot, but this investment can save you from costly structural damage and wall deterioration. Here’s a breakdown of the process to seal, protect, and improve drainage around your foundation.
Seal Exterior Foundation Cracks
The first step is to excavate the soil to fully expose your foundation walls. Once exposed, clean any cracks to remove debris. For smaller cracks, hydraulic cement is a great option as it expands to fill gaps effectively. For deeper or more complex cracks, epoxy injections work better because they remain flexible, which is especially useful in Toronto’s freeze-thaw weather cycles. Sealing minor cracks can cost between $250 and $800.
“Summer’s warm, dry conditions are ideal for sealing cracks in concrete and masonry. Use high-quality sealants to block water intrusion and strengthen your foundation.” – Leaquida Waterproofing
After sealing cracks, apply a waterproof membrane across the entire foundation surface. Options include rubberized asphalt, liquid membranes, or bentonite sheets, which expand when they come into contact with water. To strengthen the membrane, consider embedding a poly-fibre mesh like Yellow-Jacket into the coating. When backfilling, use clay-based soil instead of sandy soil, as it offers better water resistance.
Install Waterproof Membranes and Improve Drainage
A solid exterior waterproofing system relies on multiple layers of defence. Start with a primary waterproof coating. You can choose a liquid membrane, which requires multiple coats and costs $3–$6 per square foot, or a sheet membrane, which needs just one layer and costs $3–$7 per square foot. After applying the coating, add a drainage layer such as Delta-MS dimple board. This creates a gap that channels water down to your weeping tiles.
At the base of the foundation, install perforated 4‑inch plastic pipes wrapped in filter cloth. Cover these weeping tiles with a layer of 3/4-inch clear gravel to ensure smooth water flow. Secure the drainage membrane using a termination bar to keep debris out. Additionally, make sure your yard slopes away from the foundation at a rate of at least 6 inches over the first 10 feet. This grading is especially important in Toronto, where clay-rich soil retains water and increases pressure on foundation walls.
Extend Downspouts and Protect Window Wells
Toronto regulations require homeowners to disconnect downspouts from the city’s sewer system. Extend your downspouts using elbows and pipe extensions, finishing with a splash pad to direct water at least 2 metres away from your foundation walls. Avoid routing downspouts across walkways or doorways to prevent tripping hazards and ice buildup in winter.
For window wells, install covers to keep out water and debris during heavy rains. At the base of the well, add a drainage system – either a gravel layer or a dedicated drainage tray that connects to your main footing weeping tiles. Regular maintenance is key: clean your eavestroughs and check downspout outlets for debris at least twice a year, ideally in spring and fall. In winter, replace rain barrels with standard downspout extensions to prevent freezing. Finally, if you’ve disconnected your downspouts, remember to cap the remaining sewer standpipe with a rubber or PVC cap to keep out debris and animals.
Regular Maintenance Checklist
Once you’ve taken the initial steps to waterproof your basement, staying on top of regular maintenance is key to keeping it dry. Toronto’s freeze–thaw cycles and clay-heavy soil can put pressure on your foundation, making routine checks essential to catch potential problems early – before they turn into expensive repairs. Here’s how to protect your basement throughout the year.
Perform Regular Inspections
Make it a habit to inspect your basement twice a year – once in the spring and again in the fall. Look for any new signs of moisture, such as damp patches, darker stains on walls or floors, or visible cracks. Keep an eye out for efflorescence, which appears as a white, powdery residue and signals water movement through the foundation walls. Be alert to musty smells, visible moisture in the air, or water pooling on the floor. Wooden fixtures should also be checked for rot, which can show up as dark, spongy patches.
Maintain Drainage and Sump Pump Systems
Your sump pump is your first line of defence against water accumulation, so test it every three to four months by pouring water into the pit to ensure it activates properly. This is especially important before spring thaw or during heavy rain. Don’t forget to test battery backups for the sump pump regularly.
Gutters and downspouts also play a critical role in keeping water away from your foundation. Clean your gutters twice a year – spring and fall – to remove debris that could cause overflow. After heavy rainfall, confirm that downspout extensions are securely in place and directing water at least 2 metres away from your home. Additionally, schedule an annual professional cleaning of your backwater valve using its clean-out ports to prevent clogs. To manage basement humidity, use a hygrometer to check levels monthly, aiming to keep them between 40% and 50% to discourage mould growth.
| Task | Frequency | Key Action |
|---|---|---|
| Sump Pump Test | Every 3–4 Months | Pour water into the pit to ensure the pump triggers and clears the basin. |
| Gutter Cleaning | Twice a Year (Spring & Fall) | Remove leaves and debris to prevent overflow near the foundation. |
| Humidity Check | Monthly | Use a hygrometer to ensure levels stay between 40%–50%. |
| Foundation Scan | Twice a Year | Look for new cracks, efflorescence, or peeling paint. |
| Backwater Valve Cleaning | Annually | Have the valve professionally cleaned via clean-out ports. |
Adjust for Seasonal Changes
Each season brings its own challenges, so make adjustments accordingly. In spring, check the soil grading around your home to ensure it slopes away from the foundation. Aim for at least a 1-inch drop for every foot away from the house. In winter, clear snow and ice from window wells to stop meltwater from seeping in through the frames.
During the summer months, use dehumidifiers to control condensation caused by warm, humid air hitting cold basement walls. Also, clear debris from roadside catch basins to help water flow freely into the city’s storm sewer system.
Lastly, take advantage of the City of Toronto’s Basement Flooding Protection Subsidy, which offers up to $3,400 per property to help cover the cost of installing flood prevention devices like sump pumps and backwater valves. By making these seasonal adjustments, you’ll not only protect your foundation but also extend the lifespan of your waterproofing efforts.
Conclusion
Keeping your Toronto basement dry takes a combination of smart initial steps and regular upkeep. From sealing foundation cracks and checking your sump pump to clearing out gutters and managing snow melt during the winter, each task plays a role in protecting your home from the challenges of Toronto’s clay soils, freeze-thaw cycles, and ever-changing weather.
Regular maintenance isn’t just about avoiding costly repairs – it’s also about preserving your home’s value. A damp basement can reduce your property value by up to 10%, while effective waterproofing can increase it by over $50,000. Plus, it helps prevent mould, which is a serious health hazard. Beyond the financial perks, staying on top of waterproofing ensures your home’s foundation remains strong and secure for years to come. This checklist ties everything together, from the first inspection to ongoing maintenance, into a solid waterproofing plan.
As Canada Waterproofers wisely said:
“The best waterproofing happens before damage. Just like fire alarms, not fire extinguishers.”
While routine maintenance might cost a few hundred dollars a year, investing in professional waterproofing services can provide long-term peace of mind. Advanced drainage systems, durable membranes, and transferable 25-year warranties are well worth the expense. Plus, local subsidies might help offset the costs.
Whether you’re tackling the basics on your own or hiring professionals, every action you take today helps ensure your basement stays dry tomorrow. Considering that nearly 50% of Toronto homes were built before modern waterproofing standards, staying vigilant and seeking expert advice is key to protecting one of your most valuable investments.
FAQs
What are the early signs of water problems in your basement?
The first signs of water problems in your basement can be easy to miss but are crucial to address early. Keep an eye out for discoloured stains on walls or floors, particularly where they meet. A musty or damp smell often hints at hidden moisture, which could eventually lead to mould growth if ignored.
You might also spot visible mould or mildew, damp patches, or notice the air feels unusually humid and clammy. Outside, check if the soil around your foundation stays wet or if water tends to pool near the walls. In more serious cases, you could even find rotting wood in joists or columns. These warning signs often show up long before actual flooding, so tackling them early can save you from expensive repairs.
How often should I check my sump pump in Toronto?
In Toronto’s weather, with its mix of heavy rain and snowmelt, it’s smart to check your sump pump every three months. These regular inspections help ensure your pump is ready to tackle unexpected water build-up.
For extra assurance, test it before spring thaw and after significant rainfall. Just pour water into the sump pit to see if the pump kicks in and drains the water as it should. If anything seems off, deal with it right away to prevent flooding headaches.
What are the costs and advantages of exterior basement waterproofing in Toronto?
Exterior basement waterproofing for a typical Toronto home generally ranges from $5,000 to $6,000 CAD, with the average cost landing around $5,228 CAD. The final price depends on factors like the size of your foundation, the level of existing damage, and the drainage system you choose – whether it’s weeping tiles or French drains. There’s also good news for homeowners: you might qualify for rebates, such as Toronto’s Basement Flooding Protection Program, which offers up to $3,400 CAD when combined with a sump pump or backwater valve installation.
The advantages of exterior waterproofing are hard to overstate. By sealing cracks, applying a waterproof membrane, and improving drainage, this method stops water before it even reaches your basement walls. This is particularly important in Toronto, where heavy rainfall and freeze-thaw cycles can wreak havoc on homes. A dry basement not only helps prevent flooding, mould, and structural damage but also boosts your property’s value, cuts down on future repair costs, and gives you peace of mind for the long haul.
 CLOGGED OR BROKEN WEEPING TILE