
Want a dry basement that lasts? Proper preparation is key. Before waterproofing, inspect for cracks, water damage, and drainage issues. Clean surfaces thoroughly, remove obstructions, and ensure everything is dry. Choose between interior waterproofing (manages water inside) or exterior waterproofing (blocks water outside). Each has different waterproofing costs, timelines, and benefits. For severe issues, professional help may save you from costly mistakes. Regular maintenance, like checking drainage and sump pumps, ensures long-term success. A well-prepared basement keeps your home safe and increases its value.
How to Waterproof a Basement | This Old House

sbb-itb-5761e20
Inspecting Your Basement Before Waterproofing
A thorough inspection can make the difference between a quick fix and a long-term solution. Identifying where water enters is crucial before deciding on a waterproofing approach.
Checking for Cracks and Water Damage
Start by closely inspecting the walls and floors of your basement. Use good lighting to spot cracks, water stains, damp areas, and efflorescence – that chalky white residue left behind when moisture seeps through masonry and evaporates. Pay extra attention to the cold seam (where the floor meets the wall), as this is a frequent entry point for groundwater due to hydrostatic pressure.
“Efflorescence is typically a sign that moisture is moving through masonry and leaving salts behind as it evaporates.” – Homeowner.ca
Not sure if a damp wall is due to seepage or indoor condensation? Try the plastic sheet test: tape plastic over the area for 24 hours. If moisture appears on the wall side, it’s seepage; if it’s on the room side, it’s condensation.
For concrete floors, a calcium chloride test can help. Use a kit (about $25 CAD) over 72 hours to measure the moisture vapour emission rate (MVER). Results above 3 lb/1,000 sq. ft. suggest you’ll need a moisture vapour barrier coating.
Checking Drainage and Plumbing Systems
Once the structural surfaces are inspected, shift your attention to plumbing and drainage. Start with the sump pit – check for debris and confirm the pump activates and discharges correctly. A malfunctioning sump pump during heavy rainfall can compromise your waterproofing efforts.
Next, look at floor drains. Water or foul odours here often point to a sewer backwater issue, which calls for a backwater valve rather than a waterproofing membrane. Misdiagnosing the source could lead to unnecessary expenses and frustration.
| Visual Sign | Likely Source | Recommended Action |
|---|---|---|
| Wet wall-floor joint after rain or snowmelt | Hydrostatic pressure | Check perimeter drainage and sump pump |
| Wet spot at a specific wall crack | Localized seepage | Crack injection or targeted repair |
| Water or odours from floor drain | Sewer backwater | Backwater valve assessment |
| Dampness in summer with no link to rain | Indoor condensation | Dehumidification and air sealing |
Lastly, ensure your downspouts direct water at least 1.2–2 metres away from the foundation. Downspouts that discharge too close to the house can cause unnecessary water pressure against the walls – a simple adjustment that can significantly lower seepage risks.
Clearing and Cleaning Your Basement
After completing your inspection, the next critical step for effective waterproofing is clearing out and thoroughly cleaning your basement. Waterproofing products – whether you’re using sealants, membranes, or coatings – need to adhere directly to clean, dry masonry surfaces to work properly.
Removing Belongings and Obstructions
Start by removing all furniture, shelves, appliances, and boxes from the basement. This step is especially important because interior waterproofing often involves cutting a trench along the edges of the floor slab to install a drainage system. Contractors need full access to the perimeter, and clearing the space ensures the work area is free of obstructions. Plus, moving your belongings protects them from dust and debris created during the process.
Pay close attention to porous materials like carpets and drywall that may have been exposed to moisture. These items are difficult to salvage or disinfect once water-damaged, and keeping them around can trap moisture and encourage mould growth. If you notice damp or mouldy drywall near the base of your walls, plan to remove and dispose of it before waterproofing begins.
Cleaning Surfaces Before Waterproofing
Once the space is cleared, it’s time to clean and prepare the surfaces. Sweep, vacuum, and wash all walls and floors using a masonry cleaner. Treat any mould or mildew with an antifungal solution or diluted bleach, and make sure to wear the proper protective gear while doing so.
Look out for efflorescence, the white, chalky residue left behind by minerals in the masonry. This must be removed before applying any waterproofing product. Use a stiff brush or a paint scraper to clear it away – stubborn deposits may require a muriatic acid scrub. If your walls were previously painted, you’ll need to strip off the old paint as well. Waterproofing products like silicate-based sealers need to penetrate directly into the concrete, so they won’t adhere properly to painted surfaces.
After cleaning, allow all surfaces to dry completely before applying any waterproofing materials. Depending on how much moisture is in your basement, drying could take several days. Using fans and a dehumidifier can help speed up the process. If waterproofing is applied to damp surfaces, it could trap moisture, leading to structural damage or premature failure of the system.
Once your basement is clear, clean, and dry, you’re ready to move on to choosing the best waterproofing solution for your needs.
Choosing the Right Waterproofing Method
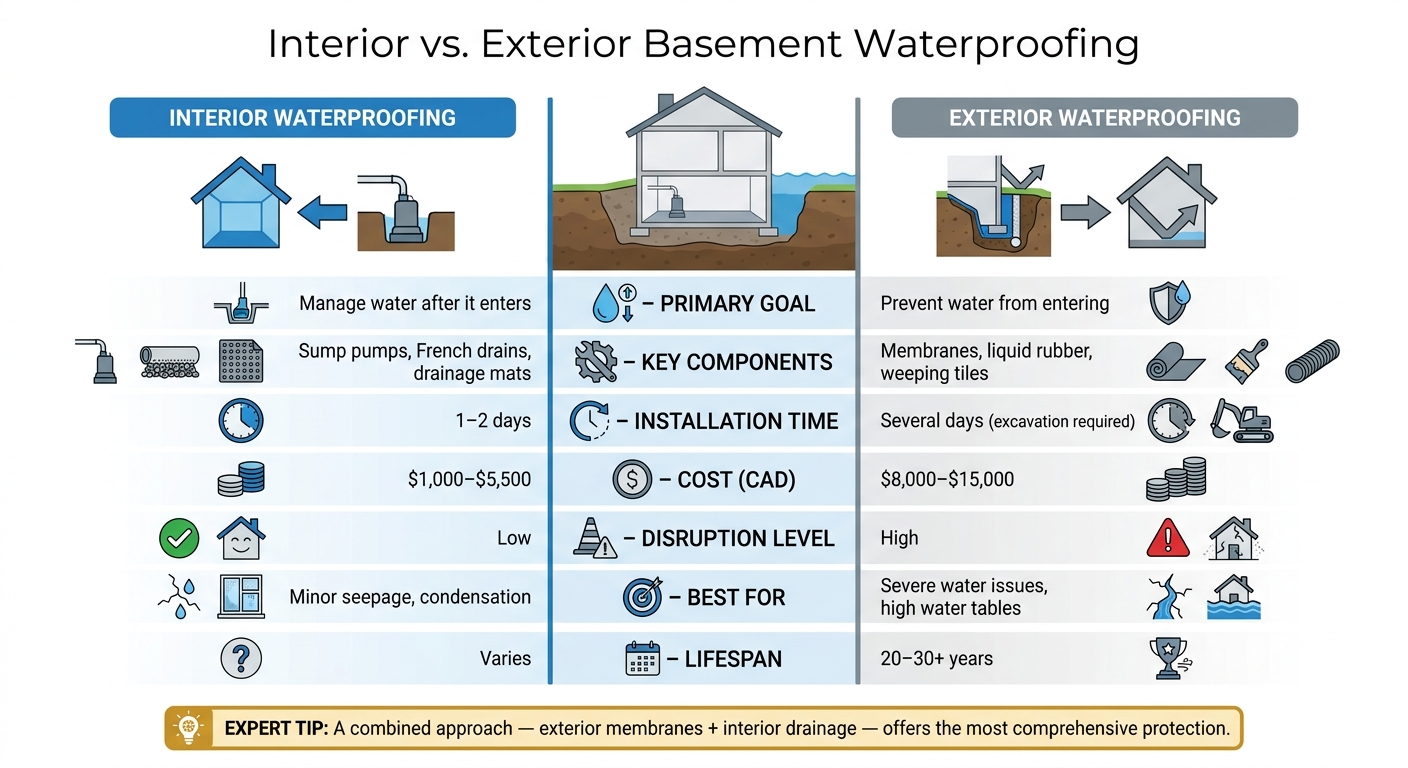
Interior vs. Exterior Basement Waterproofing: Side-by-Side Comparison
Picking the best waterproofing method for your basement is crucial. It impacts the materials used, the level of disruption involved, and how long the protection will last.
Interior vs. Exterior Waterproofing
The key difference lies in where the water is managed. Interior waterproofing handles water that has already entered your basement. This often involves installing a drainage system, such as a French drain, around the floor slab’s perimeter. The water is then directed to a sump pump for removal. This method is less invasive, can be completed in one to two days, and typically costs between $1,000–$5,500 CAD. It’s a practical choice for minor issues like seepage or condensation, especially if you’re working within a tight budget.
Exterior waterproofing, on the other hand, prevents water from ever reaching your foundation. This process requires excavating the soil around your home, applying waterproof membranes or liquid rubber to the exterior walls, and installing drainage systems like weeping tiles. While this method is far more disruptive – often affecting landscaping and driveways – it provides long-term protection. Costs range from $8,000–$15,000 CAD, but the system can last 20 to 30 years or more. This makes it a smart investment for homes in areas prone to flooding or with high water tables.
Here’s a side-by-side comparison to make things clearer:
| Feature | Interior Waterproofing | Exterior Waterproofing |
|---|---|---|
| Primary Goal | Manage water after it enters | Prevent water from entering |
| Key Components | Sump pumps, French drains, drainage mats | Membranes, liquid rubber, weeping tiles |
| Installation Time | 1–2 days | Several days (excavation required) |
| Cost (CAD) | $1,000–$5,500 | $8,000–$15,000 |
| Disruption | Low | High |
| Best For | Minor seepage, condensation | Severe water issues, high water tables |
For the best results, many experts recommend a combined approach. Using exterior membranes to block most of the water, paired with an interior drainage system to manage any leftover moisture, can offer the most comprehensive protection.
Building a Preparation Plan for Your Chosen Method
Once you’ve decided on a method, tailor your preparation steps accordingly. For interior waterproofing, clear the perimeter of your basement floor to give contractors room to cut into the concrete slab and install drainage channels. Choose an ideal location for the sump pump, ensuring it will be installed in a sealed, waterproofed basin.
If you’re opting for exterior waterproofing, your preparation will focus outside. Clear the area around your home’s foundation by removing plants, garden beds, and any obstacles that might get in the way. Regardless of the method, all cracks should be filled with high-strength hydraulic cement before applying any membranes or sealants. This cement hardens quickly – within a few hours – and can be sanded smooth once cured. Avoid relying solely on waterproof paints or coatings; they don’t address hydrostatic pressure and are only a temporary fix.
Basement Preparation Mistakes to Avoid
Even top-notch waterproofing can fall short if the groundwork isn’t done right. Here are three common missteps homeowners often make before applying the first layer of sealant.
Skipping Structural Repairs
Cracks and gaps in foundation walls are like open invitations for water. Simply covering them with a waterproofing membrane doesn’t solve the problem – it just hides it. Over time, water will exploit these weak spots, and the membrane will eventually fail.
Before waterproofing, fix all cracks using the proper techniques and tools. Keep in mind, exterior waterproofing systems can last 30 to 50 years, but only if the walls are thoroughly cleaned and repaired all the way down to the footing before the membrane is applied.
Applying Waterproofing to Dirty or Damp Surfaces
Waterproofing materials need a clean, dry surface to stick properly. Dust, efflorescence (those white, powdery salt deposits caused by moisture moving through masonry), or dampness can prevent the material from bonding. When this happens, the coating may peel or bubble, leaving your basement exposed to leaks.
“One of the most expensive mistakes is treating interior condensation like exterior seepage (or vice versa).” – Ryan May, Founder, Homeowner.ca
This is a crucial point. If you apply waterproofing to a wall damp from condensation rather than seepage, you’re not solving the real issue. Be sure to scrub off any efflorescence, identify the true source of moisture, and let the surface dry completely before applying any product.
Neglecting Drainage Systems
Waterproofing a basement wall without addressing interior or exterior drainage systems is like trying to dry a floor while water keeps pouring in. Clogged gutters, poor lot drainage, or downspouts that release water too close to the foundation all increase hydrostatic pressure against your walls, making it harder for any waterproofing system to hold up.
Make sure downspouts direct water well away from your foundation. If you live in an older Canadian home, check for clay tile weeping tiles at the footing level. These outdated systems often fail over time, undermining even the best waterproofing efforts. Upgrading to modern perforated pipes surrounded by gravel is a relatively simple fix that can dramatically reduce water pressure on your foundation walls.
Taking care of these issues beforehand ensures your waterproofing efforts are built on a solid foundation.
When to Call a Professional Waterproofing Service
After understanding the common pitfalls in preparation, it’s crucial to recognize when it’s time to bring in a professional. Some basement moisture issues are too complex for a DIY approach, and knowing when to get expert help can prevent costly errors in the long run.
Tackling Serious Basement Issues
Certain problems, like horizontal cracks in the foundation, ongoing humidity levels above 60%, or water pooling after heavy rain, indicate more severe concerns that need expert evaluation. The presence of visible mould – regardless of its colour – also requires professional remediation. Mould removal can cost anywhere from $500 to $3,500 CAD, while major underpinning projects can exceed $25,000 CAD, underscoring the importance of addressing these issues early.
“Interior waterproofing methods like sealants and vapor barriers help control moisture levels but don’t address the root cause. Exterior waterproofing, such as waterproof coatings and French drainage systems, are often more effective in preventing water from entering the basement.” – Tim O’Shea, The Build Pros
Lack of Tools or Expertise
Exterior waterproofing is no small task – it often involves heavy machinery, shoring, and permits, which can range from $75 to $500 CAD. Precision work, such as epoxy injection for foundation cracks (costing $800–$1,500 per crack) or installing French drains (approximately $10–$100 per linear foot), requires a level of expertise that professionals bring to the table. They also take into account local factors, like the heavy clay soils found in parts of Ontario, which can significantly impact drainage solutions.
These complexities make hiring professionals the most practical choice for many homeowners.
Why Choose Leaquida Waterproofing
Leaquida Waterproofing provides tailored interior and exterior solutions for homeowners in Toronto and surrounding areas. Their services include foundation crack repairs, sump pump installations, French drain systems, and backwater valve installations, all supported by transparent pricing and comprehensive warranties.
Pricing for interior waterproofing starts at $70–$120 per linear foot, while exterior waterproofing ranges from $100–$250 per linear foot, depending on factors like soil conditions and project scope. Foundation crack repairs are priced between $500 and $1,200 per crack. With clear estimates and no hidden costs, Leaquida ensures homeowners know exactly what to expect before any work begins.
Keeping Your Basement in Good Shape After Waterproofing
Waterproofing your basement is a big step, but it’s not a one-and-done deal. To keep it effective, you’ll need to stay on top of regular maintenance. Here’s how you can ensure your basement stays dry and protected.
Scheduling Regular Inspections
Once your basement is waterproofed, regular inspections are key to spotting potential problems early. Look out for efflorescence – the white, powdery residue that can signal water intrusion. Also, check for condensation on pipes, windows, or ductwork. High humidity levels can lead to mould growth, so catching it early is crucial.
You can try a simple foil test to assess moisture issues. Tape a 30 cm x 30 cm piece of aluminium foil to a wall and leave it for 24 hours. If moisture appears on the room-facing side, it’s a humidity issue. If it’s on the wall side, there’s seepage. Additionally, keep an eye out for structural changes like horizontal cracks or vertical cracks wider than 3 mm (about 1/8 inch). These could indicate hydrostatic pressure or foundation movement, and they’re worth having a professional evaluate.
Keeping Drainage Systems in Good Working Order
Your drainage systems play a huge role in keeping your basement dry. Start by ensuring gutters, downspouts, and exterior grading are all directing water away from your foundation. Clean your gutters and downspouts at least twice a year – clogs can cause water to overflow and pool near your home, which is a recipe for trouble. If you notice areas where water tends to collect, add soil to create a slope that moves water away from the foundation. Lastly, don’t forget to test your sump pump regularly to make sure it’s working when you need it most.
Conclusion
Getting basement waterproofing right starts with careful preparation – this includes inspecting for issues, cleaning the area, making necessary repairs, and ensuring proper drainage. As Leaquida Waterproofing states, “A dry, structurally sound basement is one of the most important factors in maintaining your property’s safety, comfort, and value.”
Understanding how water is entering – whether it’s surface runoff, groundwater seepage, or condensation – is crucial. Without an accurate diagnosis, any waterproofing efforts could lead to expensive repairs later on. Taking a thorough approach ensures that the waterproofing work will hold up over time.
When all the initial steps – from inspection to repairs – are done properly, the waterproofing system works as intended. For basements with major cracks, ongoing leaks, or complex drainage challenges, calling in a professional can make a big difference. Companies like Leaquida Waterproofing follow a transparent five-stage process, covering everything from consultation and custom solution design to site preparation, installation, and a final inspection. This ensures you’re informed every step of the way. Additionally, homeowners in some areas may qualify for financial support. For example, the City of Toronto’s Basement Flooding Protection Subsidy Program offers eligible residents rebates of up to $6,650 for installing measures like sump pumps and backwater valves.
A well-waterproofed basement not only improves safety and comfort but also boosts the value of your property. The effort you put into preparation sets the stage for a solution that lasts.


 CLOGGED OR BROKEN WEEPING TILE