Yes, leaky basements can often be repaired from the inside, but the effectiveness depends on the cause and severity of the issue. Interior solutions focus on managing water after it enters, using methods like crack injections, drainage systems, and sump pumps. These approaches work well for seepage, hydrostatic pressure, or small foundation cracks, especially when exterior access is limited. However, severe structural damage, bowing walls, or major drainage failures usually require exterior repairs to address the root cause. Interior fixes are quicker and more affordable but don’t stop water at its source. For long-term results, it’s essential to identify the problem accurately and choose the right method.
REPAIRING INTERIOR BASEMENT wall cracks and waterproofing our basement!
sbb-itb-5761e20
Common Causes of Basement Leaks
Water doesn’t just end up in your basement without a reason. In Toronto and the GTA, a few culprits tend to pop up repeatedly. Pinpointing the source of the leak is the first step to addressing the issue effectively.
Hydrostatic Pressure and Groundwater Build-up
The clay-heavy soil found across Southern Ontario is a key factor. This type of soil holds onto moisture, trapping water against your foundation. After heavy rain or during the spring thaw, the saturated ground has nowhere to drain, leading to hydrostatic pressure. This pressure pushes water through cracks in the foundation.
Adding to the problem, the GTA’s freeze-thaw cycles cause the soil to expand and contract. This constant shifting increases stress on foundation walls, which can create new cracks or make existing ones worse.
Foundation Cracks and Cold Joints
Even freshly poured concrete foundations aren’t completely watertight. As concrete cures, it shrinks slightly, leading to tiny cracks. Other weak points include tie-rod holes, which are gaps left behind by metal rods used during the construction process, and cold joints, where the foundation wall meets the floor slab. These areas never fully bond and often allow water to seep through.
Signs of trouble include efflorescence (white, chalky deposits), musty smells, and water stains near the bottom of the walls.
Failed or Inadequate Exterior Drainage
Poor drainage is another common cause of basement leaks. When water is directed toward your home instead of away from it, problems arise. For example, clogged eavestroughs and downspouts can lead to water pooling at the base of your foundation. Similarly, improper grading around your home can channel rainwater directly to the foundation walls.
Older homes in the GTA often rely on weeping tiles, perforated pipes installed around the footing to direct water away. Over time, these pipes can clog or collapse, leaving water with nowhere to go. In Toronto, homeowners are now required to disconnect downspouts from the sewer system to help reduce water volume that could overwhelm both municipal infrastructure and home foundations.
Understanding these causes highlights why some basement repair methods work better than others, depending on the situation.
Can Basement Leaks Be Fixed from the Inside?
Yes, but how well it works depends on what’s causing the leak and how severe it is. Interior waterproofing focuses on managing water by collecting and redirecting it to a controlled exit point, like a sump pump.
When Interior Repairs Work
Interior fixes are a solid option when water seeps in through the cove joint (where the wall meets the floor slab) or small cracks in poured concrete walls. These cracks can often be sealed permanently with injection methods. An interior perimeter drain can also help by intercepting water flow before it spreads. Interior solutions are especially practical if exterior access is limited by a deck, porch, tight property lines, or neighbouring structures.
Want to check if an interior system will work? Try this: tape plastic to the wall for 24–48 hours. If moisture collects on the wall side of the plastic, the issue is likely external seepage. If it’s on the room side, condensation is the likely culprit.
That said, interior solutions have their limits. When the problem goes beyond what these methods can handle, exterior repairs may be necessary.
When Exterior Repairs Are Needed
Interior repairs can’t stop foundation walls from staying wet. Prolonged saturation can lead to spalling, which causes the wall surface to deteriorate. If your foundation has large horizontal cracks, bowing walls, or signs of structural movement, exterior excavation is usually the only way to properly reinforce the wall.
For cinder block foundations, interior sealants often fall short because water can fill the hollow cores of the blocks. In these cases, only an exterior waterproof membrane can keep the wall dry.
Another red flag is severe efflorescence – those thick, white mineral deposits that can coat the inside of your walls. This level of water saturation usually points to a drainage failure outside, which needs to be addressed at the source. Interior fixes alone won’t cut it here.
Interior Basement Waterproofing Methods
When it comes to addressing water issues inside a basement, there are four primary methods. Each one tackles a specific cause or pathway of moisture, so choosing the right approach depends on the root of the problem.
Crack Injection
Crack injection is a precise solution for sealing cracks in basement walls. It involves injecting a liquid material into the crack under pressure, filling it completely from the inside out.
- Epoxy injection is ideal for structural cracks in poured concrete walls. Once cured, it creates a rigid bond that’s even stronger than the surrounding concrete, restoring the wall’s load-bearing strength.
- Polyurethane injection, on the other hand, is better for active leaks. It cures into a flexible foam that accommodates slight wall movements, making it effective for ongoing seepage.
Limitations: This method isn’t suitable for cracks in block foundations, horizontal cracks caused by wall movement, or cracks that are still shifting. In these cases, the material may re-crack, and a more comprehensive water management approach might be needed.
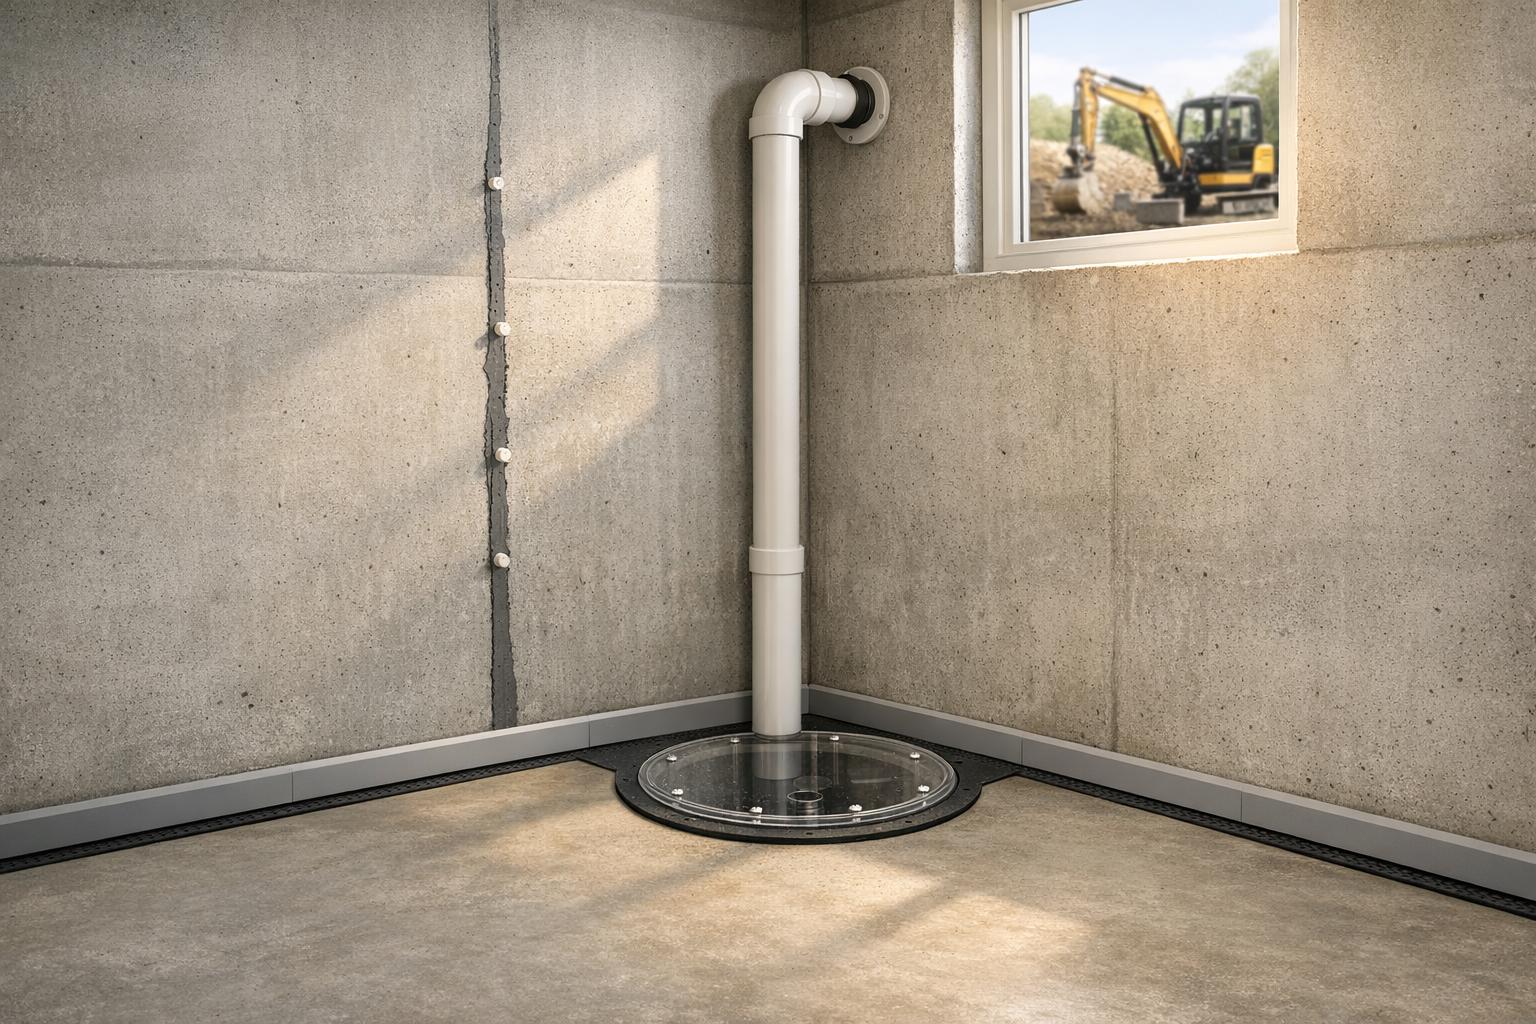
Interior Drainage Systems
Interior drainage systems, often referred to as French drains or weeping tiles, are installed along the basement’s perimeter. These systems divert water into a perforated pipe embedded in gravel, which is then covered with concrete. Any water entering through walls or the floor is channelled into this system and directed to a sump pit.
This approach doesn’t stop water from entering but prevents it from spreading across the basement floor, acting as a water management system rather than a full waterproofing solution. At Leaquida Waterproofing, the cost for these systems ranges from $70–$120 per linear foot, depending on the area size.
Sump Pump Installation
Sump pumps work hand-in-hand with drainage systems to remove collected water. A sump pit is dug at the lowest point of the basement floor, where water gathers. When the water level rises, a float switch activates the pump, which pushes the water out through a discharge pipe, directing it away from the foundation.
Submersible pumps with 1/3 to 1/2 horsepower can handle between 2,000 and 4,000 gallons of water per hour. For Canadian homes, two key features are worth considering:
- A freeze guard, which provides an alternative escape route for water if the main discharge line freezes during winter.
- A battery backup pump, ensuring the system keeps working during power outages, which often accompany heavy storms.
Professional installation, including excavation, the sump pit, pump, and plumbing, typically costs $1,500–$3,500 CAD. The pump itself is priced between $250–$600 CAD. Ensure that the discharge pipe extends at least 3–6 metres from the foundation and slopes downward to prevent water from flowing back toward the house.
Waterproof Sealants and Coatings
Waterproof coatings are used to seal concrete or block walls, reducing moisture transmission. Products like hydraulic cement and crystalline waterproofing compounds penetrate the surface to block capillary pores.
The application is straightforward: clean the wall, repair any loose or crumbling material, and apply the coating in two or more layers as directed by the manufacturer. These coatings are most effective for minor dampness or condensation issues. However, they aren’t designed to hold back active water seepage. If water is visibly pooling or seeping through, a drainage system will be needed to manage the excess moisture first.
When combined with crack injection, drainage systems, and sump pumps, these sealants play a supporting role in a broader waterproofing strategy, which will be discussed further in later sections.
Pros and Cons of Inside Basement Repairs

Interior vs. Exterior Basement Waterproofing: Cost, Time & Performance Compared
When it comes to interior waterproofing, there’s no one-size-fits-all solution. Each method has its benefits and drawbacks, and understanding them can help you make an informed decision.
One major benefit is cost. Interior repairs are typically more affordable and quicker to complete. Crews can often install a drainage system and sump pump in just one to two days, and since no excavation is required, your landscaping, driveway, and deck remain untouched.
"In most cases, interior waterproofing is more effective and efficient than exterior excavation, wall repair, and replacing soil, utility lines, drainage systems, decks, and landscaping." – Basement Masters Waterproofing
However, there’s a trade-off: interior repairs don’t stop water at its source. Instead, they focus on managing water that has already entered. This approach means relying on a sump pump, which can be a concern during power outages – especially without a backup battery. Another factor to consider is the potential cost of removing and rebuilding finished walls, shelving, or other permanent interior features in your basement.
Here’s a quick comparison of interior and exterior repair methods:
| Feature | Interior Repair | Exterior Repair |
|---|---|---|
| Average cost | $75–$100/lin. ft. | $100–$250/lin. ft. |
| Installation time | 1–2 days | Several days (excavation required) |
| Weather dependency | Year-round | Ground must be dry and unfrozen |
| Landscape impact | None | Significant – soil, decks, plants removed |
| Stops water at source | No; manages water after contact | Yes – blocks water before it contacts the foundation |
| Best for | Hydrostatic pressure, seepage, budget constraints | Structural damage, bowed walls, grading issues |
For Canadian homeowners dealing with seepage or groundwater pressure, interior waterproofing is often a practical choice. But for structural issues or severe grading problems, exterior repairs are necessary to address the root cause.
When Interior Repairs Are Not Enough
Interior waterproofing works well for many Canadian homeowners, but it has its limits. While these systems manage water after it enters the home, they don’t shield foundation walls from ongoing moisture damage. There are clear signs that interior solutions won’t cut it, and exterior repairs become essential.
One major indicator is water seeping mid-wall, which often points to foundation failure. In this case, interior drainage systems can’t address the root problem. Similarly, efflorescence – that chalky residue left by migrating moisture – shows that no interior coating can offer a permanent fix.
Bowing or leaning walls are a major concern. If walls deflect by more than 2.5–5 centimetres, it’s usually due to excessive soil pressure. At this point, you’re looking at a structural issue, not just a water management problem. Horizontal cracks midway up the wall are another telltale sign of soil pressure causing damage.
"If the foundation walls become saturated with water and then freeze the concrete or concrete block will become weakened and cause major structural problems on top of all the mould problems that you may have." – Herbert, Bert’ll Do It
Failed weeping tiles are another culprit. When these tiles no longer function, they compromise the foundation’s integrity, making exterior excavation necessary to replace them. While exterior waterproofing is more invasive and comes with a hefty price tag – ranging from CAD $150 to over $300 per linear foot, sometimes totalling more than $30,000 – it offers long-term protection. This method keeps foundation walls dry for 30–50 years, which is crucial in Canada’s harsh freeze-thaw climate. Without this protection, cracks can worsen with each freeze cycle.
Identifying these warning signs early can help you decide whether it’s time to invest in more extensive repairs, which are explored in the next cost analysis.
Cost of Interior Basement Waterproofing
When it comes to waterproofing your basement, interior methods are often a more budget-friendly option compared to exterior excavation. For most Canadian homes, the cost typically ranges between CAD $3,000 and $8,000, depending on the specific method and the scope of work involved.
Here’s a breakdown of common interior waterproofing methods and their estimated costs:
| Waterproofing Method | Estimated Cost (CAD) | Best For |
|---|---|---|
| Basic interior sealants | $3,000 – $4,000 | Minor moisture and dampness |
| Perimeter drainage system & sump pump | $4,000 – $7,000 | Active seepage in 800–1,200 sq. ft. basements |
| Membrane & full-height wall treatment | $6,000 – $8,000 | Extensive moisture issues and high water pressure |
| Foundation crack repair | $350 – $1,200 per crack | Isolated cracks in poured concrete walls |
| Sump pump installation | $1,000 – $3,000 | Managing groundwater effectively |
Keep in mind, these numbers can vary depending on your home’s unique conditions. For more expert advice, explore our waterproofing articles.
Key Factors That Affect Costs
Several variables can influence the total cost of interior waterproofing. For instance, the size of your basement plays a big role, with interior drainage systems costing CAD $70–$120 per linear foot on average. If your basement is finished, expect additional expenses, as walls and flooring may need to be removed and later restored to access the foundation. Homes built before the 1950s might also present hidden challenges, such as deteriorating materials or outdated construction practices, that could lead to unexpected costs.
Soil type and access conditions also impact the price. For example, areas with heavy clay soil, which is common in Ontario, often require more robust drainage solutions due to the increased water pressure. Added features, like a battery backup pump (CAD $500–$1,500) or a backwater valve (CAD $800–$2,500), can further ensure your system remains reliable. These upgrades are especially important for Canadian homeowners, as power outages during spring thaws are frequent, and having a backup can make all the difference in preventing basement flooding.
DIY vs. Professional Repair
Some basement moisture problems can be tackled by homeowners. Simple tasks like clearing eavestroughs, extending downspouts to discharge at least 1.2–2 metres from the foundation, improving soil grading, and using a dehumidifier to manage interior condensation are well within the scope of DIY work.
However, more complex repairs often require professional expertise. Cutting into a concrete slab, installing a sump pit, or performing high-pressure crack injection involves specialized equipment and skills that most homeowners don’t have. Without the right tools and experience, these repairs can fall short, leaving water to seep through walls or floor-wall joints.
A failed DIY attempt can lead to hidden expenses, including mould growth, damaged drywall, and ruined flooring. Professional repairs, on the other hand, often come with written warranties of 25 years or more, along with liability and workers’ compensation coverage. These safeguards help prevent costly surprises down the road. Additionally, some projects may qualify for municipal subsidies. For instance, the City of Toronto’s Basement Flooding Protection Subsidy Program offers eligible homeowners rebates of up to CAD $6,650 for certain flood protection measures.
Leaquida Waterproofing provides comprehensive professional services, including foundation crack injection, interior drainage system installation, sump pump setup, and backwater valve installation. They even handle building permits as part of their process. These services ensure long-term reliability and peace of mind. Customers often highlight their seamless experience:
"Leaquida Waterproofing was prompt, courteous and thorough… I called Sunday, got a quote Monday, had the work done the following Monday (including issuing of building permit)." – Trisha Grant
"Quick, professional and at very reasonable cost. No hidden costs." – Lev, Whitby
Preventing Future Basement Leaks
Once you’ve tackled interior repairs, the next step is making sure your basement stays dry for the long haul. The key? Keeping water away from your foundation in the first place. By limiting water exposure, you reduce stress on your drainage systems and extend the lifespan of any repairs you’ve made.
Grading and surface drainage play a crucial role here. The soil around your home’s foundation should slope away from the house to direct water elsewhere. Any low spots near the foundation need to be filled in, and surfaces like driveways, walkways, and patios should also angle away from the house. These exterior measures work hand in hand with interior waterproofing to keep water at bay.
"A lot of ‘basement waterproofing’ success comes from reducing how much water ever reaches the foundation." – Homeowner.ca
Don’t forget to service your sump pump regularly. Before storm season hits, pour water into the sump pit to ensure it activates and drains properly. Make sure the discharge line is positioned to avoid freezing in winter or causing drainage issues. Investing in a battery backup is a smart move since power outages often occur during heavy storms – exactly when your pump is working overtime.
Window wells are another potential trouble spot. If they’re clogged with debris, water can pool and eventually seep into your basement. Cleaning them out each season helps prevent this.
Finally, keep an eye on your basement walls and joints. Look for cracks, damp spots, or efflorescence (that white, powdery residue). If you notice any moisture, a quick diagnostic test can help pinpoint the source.
Maintenance Checklist
| Maintenance Task | What to Do | When |
|---|---|---|
| Eavestroughs & Downspouts | Clear debris; ensure water discharges 1.2–2 m from the foundation | Spring and fall |
| Lot Grading | Fill low spots; confirm soil slopes away from the house | Annually |
| Sump Pump | Test its operation; check discharge lines for freeze risks | Before spring thaw and fall storms |
| Window Wells | Remove debris; verify proper drainage | Spring and fall |
| Foundation Walls | Inspect for cracks, dampness, or efflorescence | Annually or after heavy rain |
| Backwater Valve | Schedule a professional inspection | Annually |
Taking these steps will help keep your basement dry and your repair efforts lasting for years to come.
Conclusion
Interior basement waterproofing can be a practical solution for many Canadian homeowners, provided its limitations are clearly understood. Methods like crack injection, interior drainage systems, and sump pumps are designed to manage water once it enters the basement. However, they are not a one-size-fits-all remedy. Significant structural damage or major exterior drainage issues often require more extensive repairs. The best approach depends on identifying the exact source of the problem, and a professional inspection is crucial to determine whether interior solutions are sufficient or if exterior measures are necessary.
If you notice signs of moisture in your basement – such as visible water, damp smells, or white mineral deposits (efflorescence) on the walls – don’t wait for the problem to get worse. Leaquida Waterproofing offers services in Toronto and nearby areas, including tailored solutions for both interior and exterior waterproofing, foundation and floor crack repairs, sump pump installations, and more. Their team can evaluate your home’s specific needs and provide a long-lasting solution that works for your space and budget.
FAQs
How do I tell if my basement moisture is a leak or condensation?
To figure out whether basement moisture is caused by a leak or condensation, pay close attention to how it behaves. Leaks typically show up as dripping water, pooling, or wet areas that get worse during rain or snowmelt. On the other hand, condensation looks like misty moisture forming on cold surfaces when warm, humid air comes into contact with cooler walls or floors. Look for signs like water stains or active seepage, and observe the area under various weather conditions to pinpoint the source.
Will an interior drainage system work with a finished basement?
Yes, an interior drainage system can work well in a finished basement. Options like perimeter drains and sump pumps are designed to handle groundwater and reduce the risk of flooding, even in completed living spaces. These systems are typically less invasive and more affordable compared to exterior methods, making them a practical choice for Canadian homes. They can be installed discreetly to ensure your finished basement stays dry and usable.
Do I need a battery backup for my sump pump?
Yes, having a battery backup for your sump pump is a smart choice. It ensures your pump stays operational during power outages, which often happen during storms or heavy rain – precisely when flooding risks are at their peak. Most battery backups need to be replaced every 3–5 years to maintain reliability. This simple precaution can help you avoid basement flooding and expensive repairs, especially during severe weather when power failures are most likely.
 CLOGGED OR BROKEN WEEPING TILE