Drainage tiles, also known as weeping tiles or French drains, are systems designed to protect your home’s foundation by redirecting groundwater. They consist of perforated pipes placed around the foundation, either outside or beneath the basement floor, to reduce water pressure and prevent damage like cracks or leaks. Here’s what you need to know:
- Purpose: Prevent water damage by managing groundwater around the foundation.
- Types: Interior (beneath basement floors) or exterior (around the foundation’s perimeter).
- Components: Perforated pipes, gravel, filtration materials, and discharge points (e.g., sump pumps or gravity-fed outlets).
- Common Issues: Clogs, pipe damage, improper slope, and sump pump failures.
- Maintenance: Regular inspections, cleaning out debris, and testing sump pumps.
- DIY vs. Professional: DIY is cheaper but riskier; professionals ensure long-lasting results with warranties.
Drainage tiles are especially critical in areas with clay soils or high water tables, like many parts of Canada. A well-installed system can last decades and save you from costly repairs.
How Does A Drain Tile System Work
sbb-itb-5761e20
What Are Drainage Tiles?
Drainage tiles are perforated pipes designed to collect and redirect groundwater away from a home’s foundation, protecting it from water damage. Despite the name “tiles”, this term originates from the days when clay pipes were commonly used for this purpose.
“A drain tile system, also called a French Drain, is designed to collect and redirect water seepage away from the house.” – RCC Waterproofing
These systems are often referred to as French Drains for their water management function.
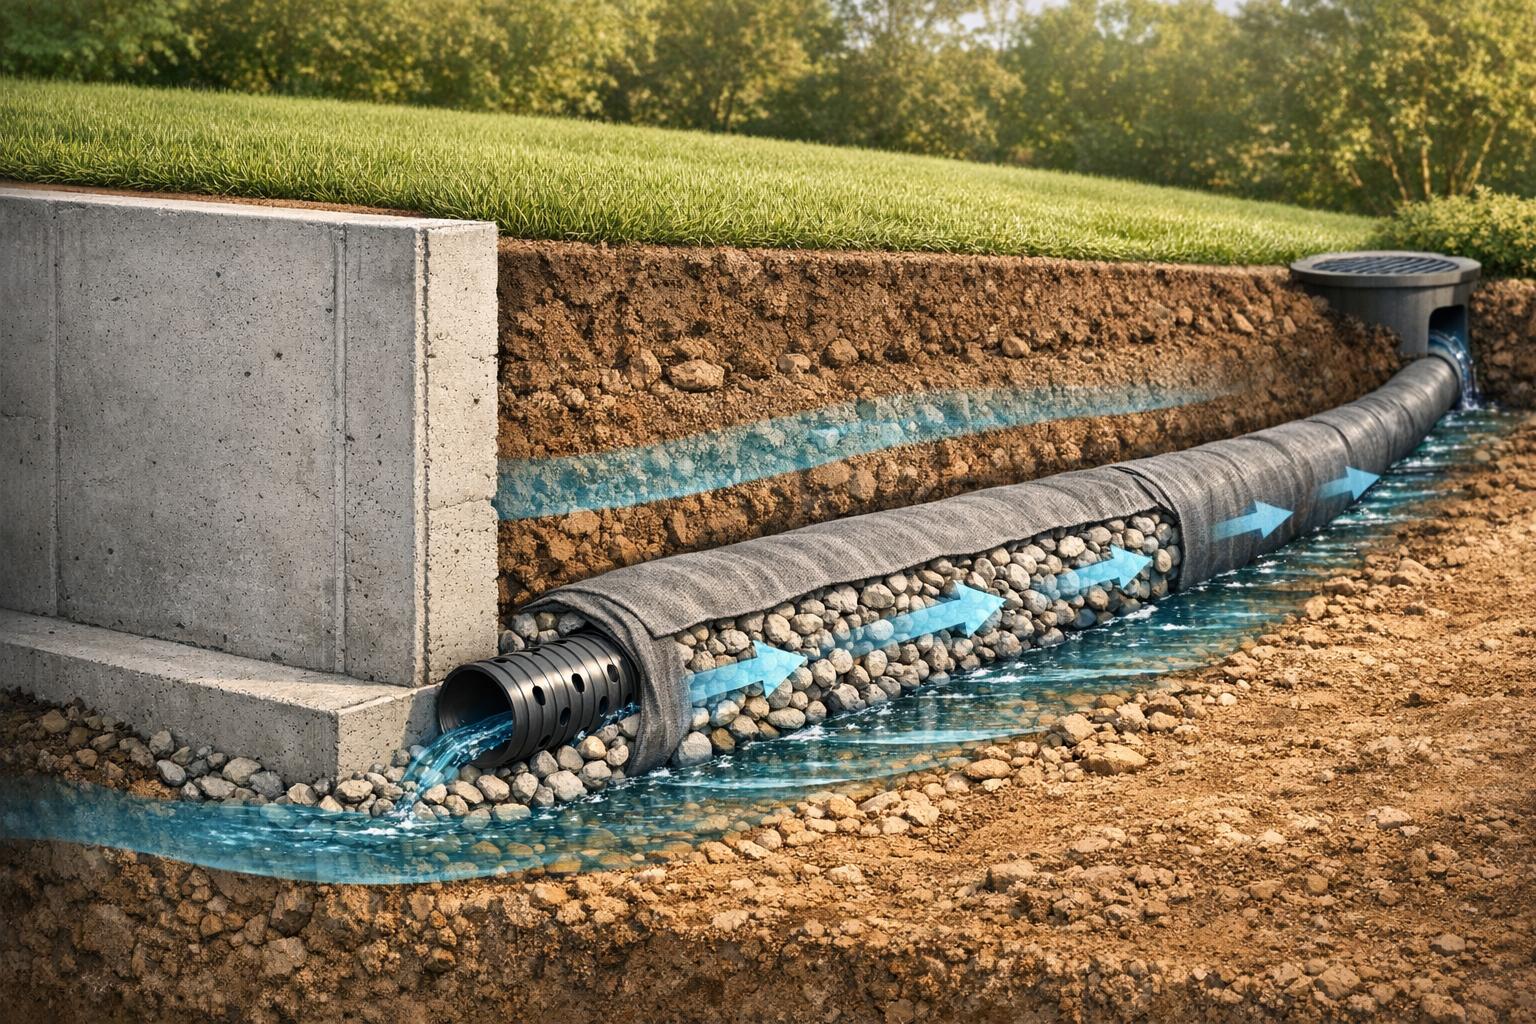
Before the 1950s, drainage tiles were made of red or orange clay pipes. These pipes were joined with small 6-millimetre (¼-inch) gaps, allowing water to seep through the unsealed joints. Modern systems have replaced these older designs with more efficient materials like perforated PVC or flexible plastic pipes. To prevent soil from clogging the system, these pipes are often wrapped in a nylon filter sock. Tiny weep holes in the pipes allow groundwater to enter from all directions. Manufacturers now produce drainage pipes in various shapes – round, rectangular, square, and oblong – to handle different water flow requirements.
Once water enters the pipe, it is directed to a sump pump or a gravity-fed discharge point. This process reduces hydrostatic pressure on foundation walls, helping to prevent cracks and water seepage. Depending on the needs of the home, drainage tiles can be installed along the exterior perimeter of the foundation or beneath the basement floor slab on the interior.
Next, we’ll take a closer look at the different drainage tile system configurations commonly found in Canadian homes.
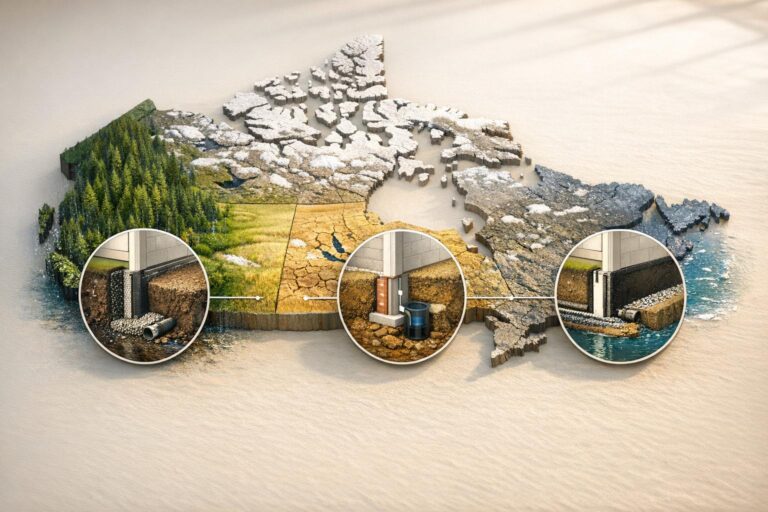
Types of Drainage Tile Systems
Now that we’ve covered what drainage tiles are, let’s dive into how their configurations tackle water management. Drainage tile systems fall into two main categories: interior and exterior. Deciding between these depends largely on whether the property is already built or still under construction.
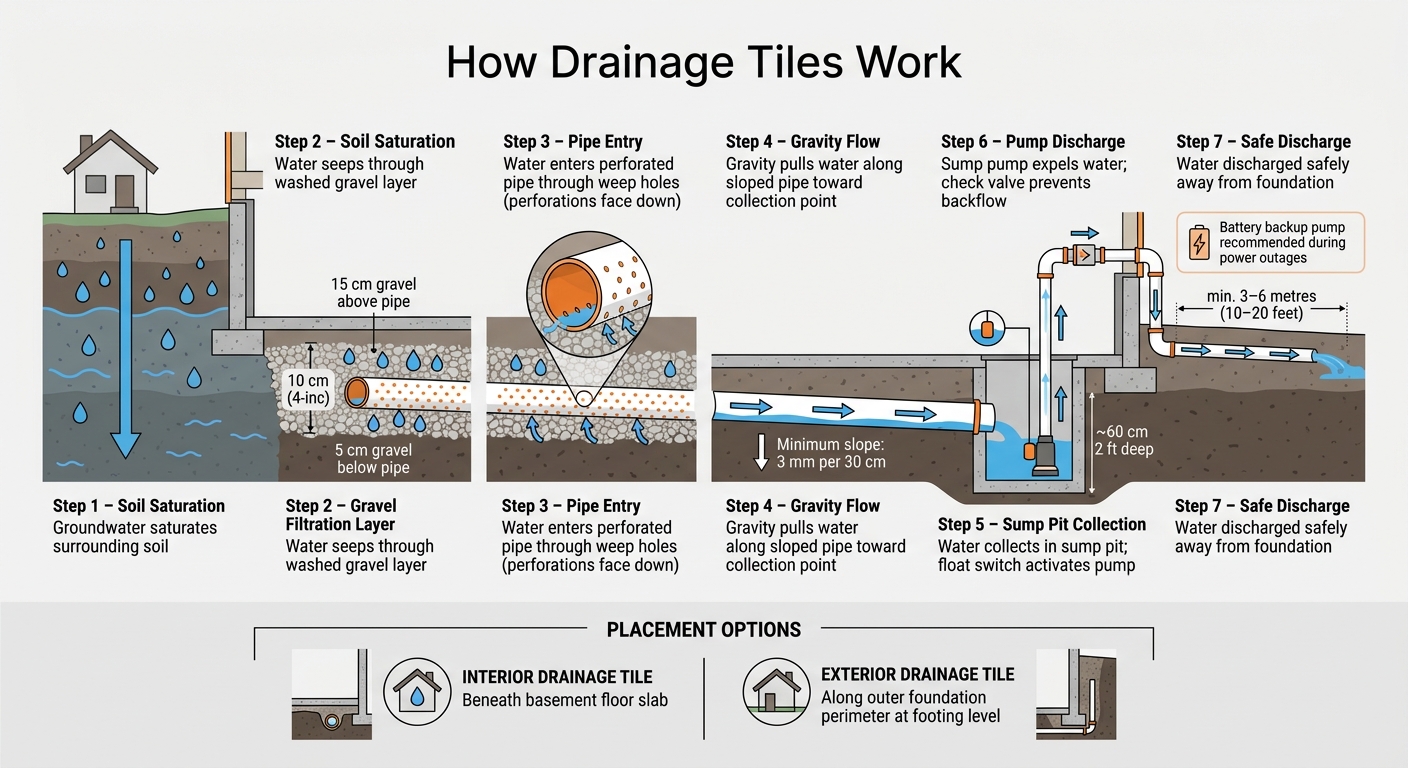
Interior Drainage Tile Systems
Interior drainage tile systems are installed beneath the basement floor slab. To set one up, contractors remove 30–60 centimetres (12–24 inches) of concrete along the perimeter, dig trenches, and lay perforated pipes surrounded by washed gravel. These pipes direct water to a sump pump for removal.
This system works well for existing homes because it avoids the need to dig up the yard, preserving landscaping and driveways. While interior systems won’t stop water from entering through foundation walls, they effectively manage it once inside. By doing so, they relieve hydrostatic pressure that could otherwise cause structural damage.
Exterior Drainage Tile Systems
Exterior systems, also called footing drains, are installed along the outer perimeter of the foundation at the footing level. These systems intercept groundwater before it reaches the foundation, providing a proactive solution to water management.
However, exterior systems come with higher costs and more disruption. Installing one in an existing home requires extensive excavation around the foundation, removing soil, disrupting landscaping, and occasionally affecting nearby structures. For this reason, exterior systems are better suited for new builds, where the foundation is already exposed.
To gain a clearer picture of water management, it’s also important to understand the difference between surface and subsurface drainage.
Surface Drainage vs. Subsurface Drainage
While drainage tile systems handle subsurface water, surface drainage offers additional protection by managing water at ground level. Surface drainage involves techniques like grading, ditches, or shallow channels to remove excess water from the soil’s surface. Subsurface drainage, including tile drain systems, deals with water that has already seeped into the soil or is pressing against the foundation.
These two methods work hand in hand. Effective surface drainage can reduce the workload on subsurface systems, potentially lowering installation and maintenance costs.
| Feature | Surface Drainage | Subsurface Drainage (Tiles) |
|---|---|---|
| Primary Goal | Divert water from the surface | Control groundwater and soil saturation |
| Cost | Lower (grading, ditches) | Higher (trenching, pipes, backfill) |
| Performance in Clay Soils | Manages runoff but doesn’t resolve saturation | Needs closer pipe spacing for effectiveness |
| Maintenance | Clearing debris from ditches and channels | Inspecting outfalls and sump pumps regularly |
| Best Scenario | Heavy rain causing surface pooling | High water table or foundation leaks |
Main Components of a Drainage Tile System
A drainage tile system depends on three main elements: perforated pipes, gravel and filtration materials, and discharge points. Understanding how these components function is key to proper installation and troubleshooting.
Perforated Pipes
Perforated pipes form the core of any drainage tile setup. For residential systems, these pipes are usually around 10 centimetres (4 inches) in diameter, made from PVC or similar materials, and feature small slots along their length. These openings allow groundwater to enter the pipe and be carried away by gravity.
“The perforations allow any surface or ground water that reaches the footing to flow into the drain tile and be carried away rather than pooling along the foundation wall.” – Building America Solution Center
To ensure proper function, the perforations should face downward, capturing rising groundwater efficiently. Additionally, the pipe must maintain a steady downward slope toward the discharge point. This prevents water from stagnating and keeps the system flowing smoothly.
Gravel and Filtration Materials
Perforated pipes require proper support to function effectively. A layer of washed gravel – typically 5 centimetres below and 15 centimetres above the pipe – creates a permeable zone. This allows water to flow freely into the pipe while blocking fine particles that could clog the system.
Modern systems often include a geotextile or nylon filter sock around the pipe. This filter acts as a barrier, letting water pass through while keeping sediment out. With proper filtration, modern PVC drainage systems can last over 50 years, compared to the 25–40 years expected from older clay-based systems.
In some parts of Canada, homeowners may encounter iron ochre – a bacterial sludge that can clog even well-filtered systems. In such cases, a specialist might suggest a modified design or a more rigorous maintenance plan to prevent system failure.
Discharge Points
After water is collected, it needs to be directed away from the foundation. Many residential systems rely on a sump pump to actively remove water from the collection area. Alternatively, systems with a natural slope can use gravity-fed outlets to direct water toward a storm drain or a discharge point located at least 3 metres (10 feet) away from the foundation.
For gravity-based outlets, it’s crucial to position them lower than the drainage tiles to avoid backflow. In flat areas – such as parts of the Canadian Prairies – where slopes are minimal, a sump pump becomes indispensable. Together, these components ensure efficient water management, a process further explained in the upcoming section on How Drainage Tiles Work.
How Drainage Tiles Work
How Drainage Tiles Work: Step-by-Step Water Management
Gravel, perforated pipes, and discharge points all play a key role in how drainage tiles operate. Here’s a breakdown of the process: water saturates the soil, seeps through the gravel, and flows into the perforated pipe. From there, gravity takes over, guiding the water through the system.
As the water moves, it follows the sloped pipe toward a collection point. If the natural slope isn’t enough, the pipe directs the water to a sump pit. This pit, typically about 60 cm (2 ft) deep, collects water until it triggers a float switch. At that point, the sump pump kicks in, pushing the water out through a discharge pipe. A check valve on this pipe ensures water doesn’t flow back into the system once the pump stops.
“The drain tile consists of a perforated pipe that directs the flow of water to the sump pump pit. The pit holds the water until it reaches a level that can be safely pumped out of the home.”
The final step is releasing the water. Discharge happens at a safe distance from the foundation to avoid re-saturating the soil. For properties with a natural slope, exterior systems can release water at a lower point on the property. Interior systems, however, are usually positioned below the floor slab and depend on a sump pump for water removal.
Since the pump runs on electricity, having a battery-powered backup is a smart precaution. During a power outage – often when heavy rainstorms hit – a backup pump ensures water continues to flow out of the pit. This setup prevents water from pooling around your foundation, protecting it from potential damage. Knowing how this system works also helps you spot inefficiencies early, so you can address issues before they escalate.
Signs You May Need Drainage Tiles
Drainage issues often creep up over time, making it essential to catch the warning signs early to avoid serious water damage.
Inside your home, persistent dampness or a musty smell in the basement can be early indicators of moisture build-up, which may lead to mould growth if left unchecked. Keep an eye out for white, powdery deposits known as efflorescence, as well as new or widening cracks in the foundation. These are signs of water penetration and rising hydrostatic pressure. Since drainage tiles are designed to alleviate this pressure, such issues could point to a failing or inadequate system.
Outside, standing water, consistently soggy soil, or water pooling in window wells are all red flags that groundwater isn’t being redirected properly.
Another clue is the behaviour of your sump pump. If it runs excessively during heavy rain, it might indicate that the system is overwhelmed. On the other hand, if the pump stays inactive during wet conditions, there could be a blockage. This issue is especially noticeable during spring snowmelt when drainage systems face their toughest test. A system that’s partially blocked – say, 50% to 60% – might manage during dry spells but fail under heavier demands.
“The challenge with weeping tile failure is that it develops over years or decades rather than suddenly.” – DKI Burlington
Finally, if your home was built before the 1970s, it’s worth noting that older properties often have clay weeping tiles. These typically have a lifespan of 25 to 40 years, meaning they may already be due for replacement. Spotting these issues early can save you from bigger headaches down the line.
Benefits of Installing Drainage Tiles
If you’re dealing with water drainage problems, installing drainage tiles can make a big difference in protecting your home and property.
These tiles work by redirecting excess groundwater away from your foundation, which helps reduce hydrostatic pressure. This prevents cracks in your foundation and keeps moisture from seeping inside. On top of that, they help stabilise the surrounding soil, preserving its natural porosity. This is especially useful for maintaining landscaping, driveways, and nearby structures like sheds or garages. The benefits aren’t just structural – they can save you a lot of money in the long run.
Water damage can lead to expensive repairs, including fixing foundation cracks, replacing sump pumps, or dealing with mould. A properly installed drainage system, however, is built to last with minimal maintenance, making it a cost-effective solution over time.
“A subsurface drainage system is a significant financial investment. There is no better way to protect that investment than with regular and proper inspection and maintenance of the system.” – Ontario Ministry of Agriculture, Food and Agribusiness
Another smart move is to keep a detailed drainage plan with your property deed. This can be a valuable resource for future repairs or even increase your home’s value when it’s time to sell.
Common Drainage Tile Problems
Even the most well-designed drainage tile systems can run into trouble over time. Staying vigilant about potential issues can save you from expensive repairs down the line.
Clogs are the number one issue. They often result from one of four factors: tree roots, sediment buildup, iron ochre, or animal interference. Trees like willows, soft maples, elms, and poplars are notorious for their moisture-seeking roots, so it’s crucial to keep drainage tiles at least 30 m away from these species and at least 15 m from other types of trees. Another common issue is iron ochre, a reddish-orange bacterial slime that thrives in organic soils. If you notice this slime at your outfall pipe, it’s a red flag that the system may be heading toward a full blockage. Additionally, small animals like rodents or muskrats can enter outfall pipes and cause complete obstructions, making rodent guards essential for all pipe openings.
Pipe damage is another frequent problem. Older clay tiles are particularly vulnerable to cracking and collapsing over time. Modern plastic pipes, while more durable, can still be crushed by heavy machinery driven over unpaved drainage areas. Even a single pass with heavy equipment can deform the pipe enough to restrict water flow. A telltale sign of pipe damage? A strip of unusually green, lush grass in an otherwise dry lawn, which often indicates a leak or blockage causing water to pool just below the surface.
Improper slope can be a hidden but equally destructive issue. Drainage tiles rely entirely on gravity, so a consistent downward slope is critical. If the slope is uneven or if settling occurs, water can pool inside the pipe, leading to sediment buildup and eventually reducing the system’s capacity. Settling is most likely to happen in the first 2–3 years after installation, so it’s important to keep an eye on these areas during that period.
Finally, sump pump failures are a common concern for interior drainage systems. Whether it’s due to power outages, motor burnout, or a stuck float switch, a failing sump pump can quickly lead to basement flooding. Installing a backup power source or a secondary pump is a simple way to mitigate this risk.
Here’s a quick summary of these common drainage tile problems:
| Problem | Common Cause | Warning Sign |
|---|---|---|
| Clogs | Roots, sediment, iron ochre, animals | Slow drainage, wet spots, reddish slime at outfall |
| Pipe damage | Heavy equipment, aging clay tiles | Sinkholes, unusually lush grass strips |
| Improper slope | Poor installation, soil settlement | Persistent pooling, uneven lawn drying |
| Sump pump failure | Power loss, mechanical wear | Water backup in basement during rain |
Drainage Tile Maintenance Tips
Keeping your drainage system in good shape ensures it lasts longer and operates efficiently. Proper maintenance builds on understanding how your system works and its key components.
As the Ontario Ministry of Agriculture, Food and Agribusiness notes:
“Even a well-designed and constructed system, built to last a lifetime, must be carefully maintained.”
For new systems, frequent checks during the first 2–3 years are essential. Look for soil settling or weak areas. After this initial period, an annual inspection is usually enough. Spring or late fall is ideal for this, as the soil is wet and water is actively running through the drains.
Sump Pump Care
Your sump pump plays a major role in keeping the system running smoothly. Test it every season by pouring about 19 litres (5 gallons) of water into the sump pit. Make sure the float switch cycles on and off at least twice, and listen for unusual noises. Check that the discharge line has a working check valve, which prevents water from flowing back into the sump pit. Without it, your pump will overwork and wear out faster. Also, ensure the discharge water exits at least 6 metres (20 feet) away from your foundation to avoid water seeping back into your home. For added peace of mind, consider a battery-powered backup pump for power outages.
Outfalls and Surface Inlets
Inspect outfalls and surface inlets twice a year, in spring and fall. Clear away debris, plant material, and sediment, and confirm that rodent guards are in place. If you notice iron ochre deposits inside the pipes, flush them with a high volume of water at low pressure (around 480 kPa) to clean them out.
Watch for Surface Issues
Small holes or depressions above drain lines, known as “blowouts”, often signal a broken pipe. These need immediate attention. Tim Brook, Drainage Programme Coordinator at OMAFA, stresses:
“Repair any surface hole immediately to prevent sediment from reducing system capacity.”
Maintenance Overview
Here’s a quick reference for key tasks and when to perform them:
| Component | Task | Frequency |
|---|---|---|
| New system | Inspect for settling and weak spots | Regularly for first 2–3 years |
| Surface inlets & outfalls | Clear debris, check rodent guards | Twice a year (spring/fall) |
| Silt boxes/catch basins | Inspect and clean out sediment | Annually |
| Sump pump | Test pump, check valve, verify float switch | Each wet season |
| Entire system | General inspection for ponding or wet spots | Annually or after heavy rain |
Drainage Tile Installation Process
When it comes to installing drainage tiles, whether inside or outside, the process follows a structured sequence. Every step demands precision. As Gord Unger from Advanced Drainage Systems puts it:
“You only get one shot at doing this, because you can’t dig it out and redo it.”
For exterior installations, the job starts with excavating around the entire foundation down to the footing level. This is when any old or damaged clay tiles are removed. After that, a waterproofing membrane is applied to the exterior foundation walls. Next, a 4-inch perforated PVC pipe, wrapped in filter fabric to keep out sediment, is placed in a clean gravel bed. This pipe connects to either a sump pump or a gravity-fed discharge point. The trench is then backfilled with granular material, ensuring at least the first 40 centimetres (16 inches) next to the wall is filled to create a capillary break. This prevents moisture from wicking back toward the foundation. Finally, the ground is graded to slope away from the house for about 3 metres (10 feet), redirecting surface water away from the structure.
Interior installations are less invasive. A 30–45 cm (12–18 in) wide channel is cut into the concrete floor along the basement’s perimeter. The soil underneath is dug out, and a perforated pipe is placed in a gravel bed. This system connects to a sump pit and pump. Once installed, the concrete floor is patched, and a vapour barrier is often added to the walls for extra moisture protection.
Several small but crucial details can determine the success of the installation. The pipe must maintain a minimum slope of 3 mm per 30 cm (1/8 in per ft) toward the discharge to ensure water flows continuously. Opt for Schedule 40 rigid PVC instead of flexible corrugated pipe, as the latter can crush during backfilling and tends to trap debris over time. When backfilling, compact the material in small lifts to avoid future settling, which could lead to cracked driveways or improper grading near the foundation. Proper slope and careful compaction are key to ensuring the system performs well over time.
It’s also important to check if permits are required. In Ontario, structural changes and drainage work often fall under the Ontario Building Code. Municipal permits for such work typically cost between $50 and $300.
For those in Toronto and nearby areas, Leaquida Waterproofing provides both interior and exterior drainage tile installations. They offer clear pricing and warranties to give you peace of mind.
DIY vs. Professional Installation
After reviewing the installation process, the next big decision is whether to tackle the project yourself or hire a professional. This choice largely depends on your comfort with risk and the scope of the work. Installing drainage tiles – especially interior systems – requires significant excavation, precise slope calculations, and proper integration with sump pumps and membranes. These technical challenges often make professional installation the safer and more reliable option. To help clarify, let’s break down the pros and cons of DIY versus professional installation.
DIY Installation
DIY installation works best for small, surface-level drainage projects. However, if the job involves foundation work or underpinning or digging into the basement floor, things get much more complicated. Interior drain tiles are typically installed deep underground, requiring heavy machinery and specialized tools that most homeowners don’t have. Beyond the equipment, getting the slope right without professional-grade instruments is tough. A poorly executed slope can lead to water pooling in the pipes instead of draining away. And there’s another downside: DIY projects don’t come with warranties, so if something goes wrong later, the repair costs fall entirely on you.
Professional Installation
Hiring professionals brings several advantages, including access to the right tools, expertise, and accountability. A professionally installed system is built to last 30–40 years, and most contractors offer warranties and performance guarantees. Professionals also handle the paperwork, including permit applications, which in Ontario typically cost between $50 and $300. While the upfront cost of professional installation ranges from $40 to $100 per linear foot, this investment protects your home’s structure and ensures the system performs reliably for decades.
Here’s a quick comparison of the two options:
| Feature | DIY | Professional |
|---|---|---|
| Upfront Cost | Lower (materials and tool rentals) | $40–$100 per linear foot |
| Time | Weeks; often longer than planned | A few days with a skilled crew |
| Durability | Varies based on execution | 30–40 years if done properly |
| Risk | High – potential for mistakes like poor slope or hitting utilities | Low – expertise reduces risks |
| Warranty | None | Usually includes performance guarantees |
“While the expense may feel steep, preventing water damage and preserving your home’s structural integrity can save you far more in the long run.” – Ware Landscaping
For homeowners in the Toronto area, Leaquida Waterproofing offers interior and exterior drainage tile installations with clear pricing and warranty coverage included.
Conclusion
Drainage tiles are a reliable way to intercept groundwater and protect your home’s foundation from water damage. Whether you’re dealing with water seeping through basement walls, fixing water leaks in the foundation, pooling around your footing, or overly saturated soil, a properly installed drainage tile system redirects water before it can cause harm.
The Ontario Ministry of Agriculture, Food and Agribusiness underscores this point:
“There is no better way to protect that investment than with regular and proper inspection and maintenance of the system.”
This highlights the importance of consistent upkeep. Inspecting your drainage system twice a year – ideally in the spring and late fall – can help extend its lifespan to 30–40 years, making it a cost-effective way to safeguard your home.
For more complex drainage projects, professional installation is a must. These jobs often require deep excavation, accurate slope adjustments, and integration with sump pumps – tasks that call for the right tools and expertise.
If you’re in the Toronto area and need help with a wet basement or foundation issues, Leaquida Waterproofing provides both interior and exterior drainage tile installations, offering clear pricing and warranty coverage for peace of mind.
 CLOGGED OR BROKEN WEEPING TILE