
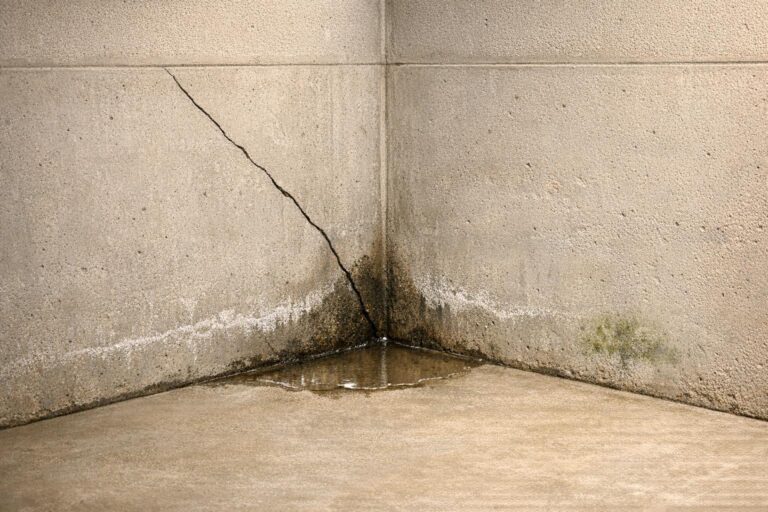
Perimeter drainage channels, also called weeping tiles or French drains, are an effective way to protect your basement from water damage. These systems collect groundwater beneath the basement floor and direct it to a sump pit, reducing hydrostatic pressure and preventing seepage into your foundation. Designed for Canada’s challenging conditions, such as heavy snowmelt and freeze-thaw cycles, interior perimeter channels are ideal for existing homes.
Key Points:
- What They Are: Below-ground systems that manage groundwater and prevent structural issues.
- Why They’re Needed: Address hydrostatic pressure, prevent mould, and save on costly foundation repairs ($5,000–$15,000).
- Cost Comparison: Interior systems cost $4,000–$15,000, while exterior systems range from $8,000–$18,000.
- DIY vs. Professional: DIY is cheaper but risky; professionals ensure proper installation and compliance with local codes.
This guide explains how to install these channels step-by-step, including preparation, tools, and common mistakes to avoid.
How to Install a Perimeter Drain | This Old House
sbb-itb-5761e20
What Are Perimeter Drainage Channels?
A perimeter drainage channel is a below-ground system designed to collect and redirect groundwater away from a home’s foundation. Installed around the base of the foundation, it reduces hydrostatic pressure and lowers the water table, preventing potential structural issues before they arise.
“A footing drain is a drainage system installed around the perimeter of a home’s foundation at the level of the footing… designed to intercept groundwater before it reaches the foundation walls.” – Lucas Bennett, Waterproofing Expert, Leaquida
The system is made up of four key components, each playing a specific role:
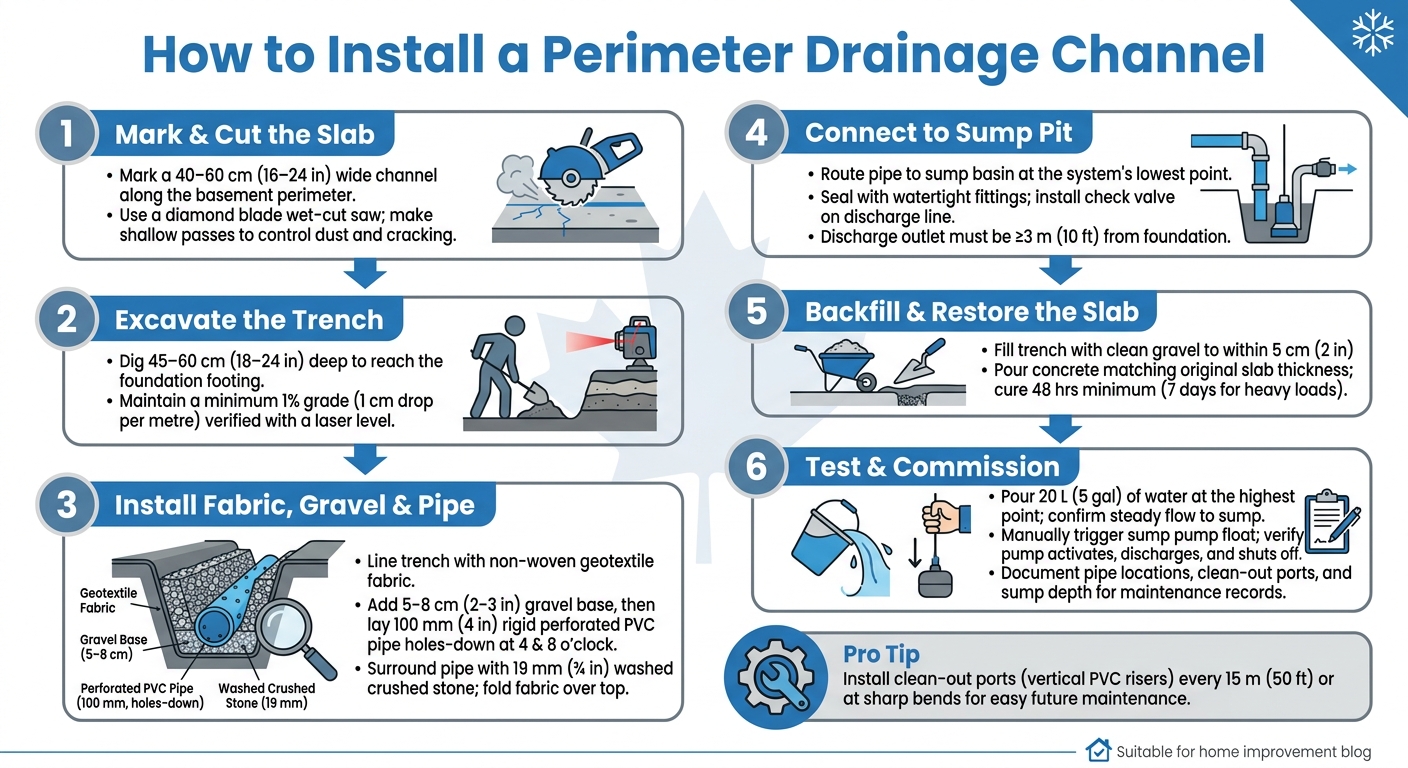
- Perforated pipe: A 100 mm (4-inch) PVC or corrugated polyethylene pipe with small holes positioned at 4 and 8 o’clock to reduce sediment buildup. It sits at the base of a sloped trench.
- Washed round gravel: Surrounding the pipe, 19 mm (¾ inch) gravel allows water to flow freely.
- Geotextile fabric: This non-woven fabric wraps around the pipe and gravel, filtering out fine silt and soil to prevent clogs.
- Sump pit and pump: Water collected by the system drains into a sump pit, where a submersible pump removes it if gravity alone isn’t enough.
Perimeter drainage channels differ from other drainage systems in both their placement and purpose. Surface drainage systems, such as gutters, downspouts, and yard swales, manage visible rainwater at ground level. Exterior footing drains, installed outside the foundation, are ideal for new builds. Interior perimeter channels, on the other hand, are installed beneath the basement floor slab, making them the go-to solution for existing homes across Canada.
| System Type | Location | Primary Purpose |
|---|---|---|
| Interior Perimeter Channel | Beneath the basement floor slab | Collects seepage and relieves hydrostatic pressure |
| Exterior Footing Drain | Outside at the foundation base | Prevents groundwater from contacting foundation walls |
| Surface Drainage | At or just below ground level | Manages rainwater runoff and yard pooling |
Water-related structural problems are a major concern, accounting for about 85% of residential foundation issues. In fact, 70% of wet basements are linked to inadequate subsurface drainage. Installing a proper system can save homeowners between $5,000 and $15,000 in foundation repairs, a critical consideration given Canada’s challenging freeze-thaw cycles and spring snowmelt.
Understanding how these systems work lays the groundwork for exploring the advantages of perimeter drainage installation.
Benefits of Installing Perimeter Drainage
A key advantage of a perimeter drainage system is its ability to reduce hydrostatic pressure – essentially, the force of groundwater pushing against your foundation. As Darin Garvey, Strategic Leader at Basement Waterproofing Scientists, explains:
“The root cause often lies with hydrostatic pressure… It’s a relentless force, always looking for a way in.”
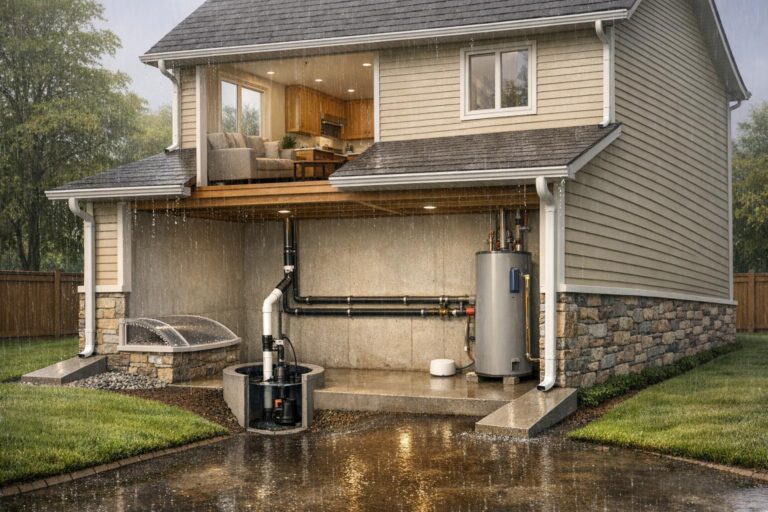
By directing water to a sump pit, these systems protect basement walls, floors, finishes, and stored items from moisture damage and mould. This is especially critical during Canada’s spring thaw, when melting snow and ice can overwhelm natural drainage paths.
Unlike exterior systems, interior drainage channels are housed within the home’s thermal envelope. This design ensures they remain operational through freeze-thaw cycles, offering year-round protection. During spring melts, when backfill soil becomes saturated, these systems prevent water from penetrating your foundation. Engineered interior channels typically last 20–30 years or more, while exterior systems often clog within 10–15 years.
Cost is another factor where interior systems stand out. Here’s a quick comparison:
| Factor | Interior Perimeter Drainage | Exterior Waterproofing System |
|---|---|---|
| Typical Cost | $4,000 – $15,000 | $8,000 – $18,000 |
| Disruption | Indoor work only; landscaping untouched | Requires excavation; affects landscaping and driveways |
| Suitability | Ideal for existing homes and retrofits | Best for new construction |
| Freeze-Thaw Performance | Protected within home’s thermal envelope | Must be buried below frost line; prone to clogging |
| Lifespan | 20–30+ years (engineered channels) | 10–15 years before clogging |
For Canadian homeowners dealing with poor natural drainage, interior systems present a practical, cost-effective option. They eliminate the need for disruptive yard excavation, preserving mature landscaping and driveways. Leaquida Waterproofing, for example, offers interior waterproofing services priced at $70–$120 per linear foot, covering drainage channels, sump pump installation, and vapour barriers.
Beyond protecting your foundation, a dry basement brings additional perks. Lower humidity reduces mould risks and improves indoor air quality, creating a healthier living space. Plus, a waterproofed basement offers usable square footage, which can significantly enhance your home’s long-term value.
Tools and Materials Needed
Before diving into the project, gather all the necessary tools and materials to ensure everything runs smoothly. For cutting through a concrete floor, you’ll need either an SDS hammer drill or a slab saw equipped with a diamond blade. A laser level is also crucial for maintaining the correct slope – about 1 cm per metre (roughly 1/8 inch per foot) – to ensure water flows naturally toward the sump pit without pooling in the trench. Understanding the purpose of each material can help you achieve the best drainage results.
For the drainage system, 4-inch (100 mm) rigid perforated PVC pipe is the preferred option in Canada. Unlike corrugated “Big-O” pipes, PVC pipes are sturdier under heavy loads, resist crushing, and can be cleaned with a sanitary snake in case of blockages. Surround the pipe with 3/4-inch (19 mm) stone, which creates the necessary bedding and void space for water to flow efficiently. Typically, 2–3 inches (5–7.5 cm) of stone is placed beneath the pipe, with an additional 6–12 inches (15–30 cm) packed around it to ensure proper drainage.
Another essential component is non-woven geotextile fabric, especially in areas with clay-heavy soil like the Fraser Valley or parts of Ontario. Fine particles in these soils can clog the pipe over time, but wrapping the gravel-and-pipe assembly in geotextile fabric prevents silt from entering while still allowing water to flow freely. As Mike Sutton, Owner of French Drain Man Canada, explains:
“Using quality materials is, first and foremost, our biggest tip. [We use] drainage tiles with more holes per linear foot, [and] we line the trench with non-woven geotextile fabric. This allows the water to get through to the pipe openings and keep dirt from entering the pipe.”
When using geotextile fabric, overlap the seams by at least 30 cm (12 inches) to prevent soil from seeping through gaps.
Here’s a quick reference table for the tools and materials:
| Tool / Material | Imperial | Metric | Purpose |
|---|---|---|---|
| Perforated PVC pipe | 4 in. diameter | 100 mm diameter | Collects and channels groundwater |
| Stone | 3/4 in. size | 19 mm size | Facilitates water flow; prevents clogging |
| Geotextile fabric overlap | 12 in. at seams | 30 cm at seams | Filters silt and sediment |
| Gravel bedding depth | 2–3 in. | 5–7.5 cm | Provides uniform pipe support |
| Minimum trench slope | 1/8 in. per foot | ~1 cm per metre | Ensures gravity-fed flow |
| Minimum trench depth | 18–24 in. | 45–60 cm | Keeps pipe below the frost line |
Lastly, ensure the rigid PVC pipe is installed below the local frost line – at least 45 cm (18 inches) – to avoid damage from freeze-thaw cycles. Skipping this step could lead to costly repairs down the road.
Preparation Before Installation
Getting your site ready is key to avoiding mistakes that could lead to expensive repairs later on.
Site Inspection
Start by examining the basement perimeter for any signs of moisture. Look for efflorescence, stains, musty odours, or cracks, and take photos of problem areas to help plan your drainage channel layout. Pay special attention to the cove joint – the spot where the wall meets the floor – as it’s responsible for about 70% of water seepage in basements.
Next, measure the thickness of the concrete slab. If it’s less than 4 inches (100 mm), you’ll need a low-profile drainage system. For homes built between 1950 and 1970 with a monolithic foundation, avoid cutting into the slab entirely to prevent compromising the structure.
“Choosing the wrong system type for your foundation is the most common source of interior drainage failures.” – The Basement Guide
You should also check the soil composition. Here’s a simple method: fill a mason jar halfway with soil from around your foundation, add water, shake it well, and let it settle for 24 hours. If a thick clay layer forms at the bottom, it indicates slower drainage. This means you’ll need a wider trench – around 18–24 inches (45–60 cm) – and possibly a larger 6-inch (150 mm) drainage pipe.
Planning the Layout
Mark the path for your drainage channel along the entire basement perimeter, ensuring it slopes toward the lowest point where the sump pit will be installed. Maintain a minimum 1% grade (1 cm per metre), though 1.2–1.5% is better for clay-heavy soils.
One important note: don’t connect roof downspouts directly to the perforated pipe. During heavy rain, the surge can overwhelm the system. Instead, use a solid pipe for downspouts and connect it to the drainage system only at the final discharge point. Plan for clean-out ports – vertical PVC risers – every 15 metres (50 feet) or at sharp bends. These ports make future inspections and maintenance easier without needing to tear up the floor.
Once your layout is marked, secure the area and get ready for a safe excavation process.
Safety Measures
Safety should be a top priority. Contact Ontario One Call or BC 1 Call at least 2–3 business days before you begin to have underground utility lines marked . For private lines, like irrigation systems or landscape lighting, you’ll need to locate those manually since utility services won’t flag them.
Equip yourself with the right protective gear: a respirator or N95 mask, safety glasses, hearing protection, steel-toe boots, and gloves . Since concrete cutting in a basement is considered confined-space work, ensure proper ventilation and have a second person on-site for safety. Keep a first-aid kit within easy reach and lay down plywood sheets along your work path to protect the floor and make cleanup easier.
If there’s standing water in the basement, pump it out first and use a dehumidifier for 48 hours before starting the installation.
Step-by-Step Installation Guide
How to Install a Perimeter Drainage Channel: Step-by-Step Guide
With your site inspected, layout marked, and safety measures in place, it’s time to start the physical installation. Each step builds on the last, so following the correct order is essential.
Marking and Cutting the Slab
Begin by marking both edges of the cut line along the basement perimeter. For most interior systems, you’ll need to mark a channel 40 to 60 cm (16 to 24 inches) wide. This allows space for both the drainage pipe and gravel bedding.
Use a diamond blade saw to cut the slab, making multiple shallow passes instead of a single deep cut. This approach reduces stress on the blade and gives you better control. If possible, use a wet-cut saw to minimise concrete dust. Seal doorways with plastic sheeting and use ventilation fans to contain debris. Avoid cutting too far into corners – stop just short and finish with a chisel to prevent cracking beyond the marked line. Once the cutting is complete, manually break and remove the slab sections to protect the surrounding areas.
After marking and cutting, you’re ready to excavate the trench for the drainage system.
Excavating the Trench
Excavate the trench to reach the base of the foundation footing, typically 45 to 60 cm (18 to 24 inches) deep. If your soil is clay-heavy, consider widening the trench to 45–60 cm to accommodate slower water movement. Ensure the trench bottom is squared off to create an even surface for the gravel bed.
Check the slope every 3 metres (10 feet) with a laser level. A minimum 1% grade (1 cm drop per metre) is critical for proper drainage. Place the excavated material on plywood to protect the floor and make cleanup easier. If water accumulates in the trench while you’re working, use a submersible pump to keep it clear.
“We dig a French drain 14 inches wide by 14 inches deep. When we build a system, we have a starting point which is higher in elevation, maybe 12 inches deep instead of 14 inches to create some slope.” – Mike Sutton, Owner, French Drain Man Canada
Installing Fabric, Gravel, and Channel
Line the trench with non-woven geotextile fabric, ensuring it overlaps the trench walls so it can fold back over the top later. This fabric is key to preventing soil particles from clogging the drainage system.
Add a 5 to 8 cm (2 to 3 inch) base layer of clean, washed 19 mm (¾ inch) crushed stone and lightly tamp it. Place a rigid PVC Schedule 40 perforated pipe on the gravel, with the holes facing downward at the 4 o’clock and 8 o’clock positions. This setup allows groundwater to rise into the pipe while keeping sediment out. Surround the pipe with gravel, filling the trench to about 8 cm (3 inches) from the top. Then, fold the fabric over the gravel to secure the drainage system.
Once the drainage components are in place, the next step is connecting the system to the sump pit.
Connecting to the Sump Pit
Position the sump basin at the system’s lowest point, where all drainage channels converge. Insert the drainage pipe into the basin using a watertight fitting sealed with rubber gaskets or PVC cement. This ensures no leaks that could compromise the foundation.
Install a check valve on the sump pump’s discharge line to prevent water from flowing back into the basin when the pump shuts off. Route the discharge line to an outdoor area, ideally into a municipal storm drain or a well-drained spot at least 3 metres (10 feet) away from the foundation. In Canada, where freezing temperatures are common, protect the discharge outlet from ice blockages with a freeze-resistant cover and ensure the pipe exits above the snow line.
Backfilling and Restoring the Slab
After folding the fabric over the gravel and securing the pipe, fill the trench with clean gravel, leaving about 5 cm (2 inches) of space below the original slab level. Avoid using excavated soil as backfill, as it compacts unevenly and may shift over time.
Replace the slab with concrete matching the original thickness. Smooth the surface with a trowel and allow it to cure for at least 48 hours before use, or 7 days for heavy loads. In warm, dry conditions, lightly mist the surface during curing to prevent cracking.
Testing and Commissioning
To test the system, slowly pour about 20 litres (5 gallons) of water into the channel at its highest point. Check for steady flow toward the sump pit. If water pools or doesn’t move as expected, recheck the slope before sealing the trench.
Manually trigger the sump pump by lifting the float to ensure it activates, pumps, and shuts off properly. Confirm that the check valve is functioning and that no water flows back into the basin. This final testing ensures the drainage system works as intended and integrates with your basement’s waterproofing setup.
Document the system layout, noting pipe locations, clean-out ports, and sump pit depth. Keep this record with your home maintenance files. Plan to visually inspect the system every spring and fall, especially after heavy rain or snowmelt, to ensure it continues to perform effectively.
Common Installation Mistakes to Avoid
When it comes to installation, even small oversights can lead to big problems. To ensure your project stands the test of time, it’s crucial to avoid common mistakes that can undermine your efforts. Below, we’ll break down the most frequent errors and how to steer clear of them.
Slope issues are the number one culprit. Without the right slope, water gets trapped, creating hydrostatic pressure that can damage foundations. To avoid this, ensure a minimum 1% grade – about 1 cm drop per metre (or 1/4 inch per foot). Use a laser level to double-check the slope before you start backfilling.
Material selection is equally important. Using outdated materials like clay or concrete tiles can lead to blockages and eventual collapse under soil pressure. Corrugated plastic pipes also pose issues, as their ridges trap sediment and restrict water flow. The best option? Rigid PVC pipes (Schedule 40 or SDR 35). They’re smooth inside, durable, and easy to inspect or clean if needed. Pair these with 19 mm (3/4 inch) washed crushed stone to prevent clogging.
Don’t skip the geotextile fabric. In areas with heavy clay – such as much of Ontario and British Columbia – fine particles can infiltrate even compacted gravel, leading to clogs. Wrapping both the gravel and pipe in non-woven geotextile fabric is essential to keep silt and clay out of the system.
Another common oversight is failing to provide a proper discharge point. If water has nowhere to go, it can saturate the soil around your foundation, potentially flooding basements or crawlspaces during heavy rains or spring thaws. Always connect your system to a sump pit, storm sewer, or daylight outlet.
Finally, proper backfilling is non-negotiable. Skipping compaction or using the wrong materials can result in pipe displacement or surface settling over time. Compact gravel in layers and, where needed, use the correct grade of concrete for added stability.
Here’s a quick reference to the most critical mistakes and how to avoid them:
| Mistake | Consequence | Prevention |
|---|---|---|
| Inadequate slope | Water pools; foundation cracks from hydrostatic pressure | Maintain a minimum 1% grade using a laser level |
| Wrong pipe material | Pipe collapse; impossible to clean | Use rigid PVC (Sch 40 or SDR 35) |
| Missing filter fabric | Full system clog; requires replacement | Wrap gravel and pipe in non-woven geotextile fabric |
| Unwashed gravel | Premature system failure | Use only 19 mm (3/4″) washed crushed stone |
| No discharge point | Water backs up into basement or crawlspace | Connect to a sump pit, storm sewer, or daylight outlet |
| Improper backfilling | Pipe displacement or surface settling | Compact gravel in layers; use proper-grade concrete for surrounds |
Professional Installation vs. DIY
When it comes to installing a perimeter drainage channel, deciding between doing it yourself or hiring a professional is a big deal. This type of work is no walk in the park. It involves digging trenches 45 to 60 cm deep, maintaining a precise slope, cutting through concrete, and steering clear of underground utility lines. While a skilled DIY enthusiast might take on the challenge, the room for error is slim, and mistakes can lead to hefty repair bills – or even starting over from scratch.
Comparing Costs
If you’re thinking about saving money by going the DIY route, materials alone typically cost between $100 and $500. On the other hand, hiring a professional can set you back $2,100 to $6,700 CAD for a complete system, or about $213 to $262 per linear metre. However, a botched DIY attempt can easily spiral into five-figure expenses if a full redo becomes necessary.
“Many people build systems with no discharge point and simply lay the pipe in the ground hoping for the ground to absorb the water eventually. That works over longer periods of time, yet can lead to issues when heavy rains and snowmelts occur.” – Mike Sutton, Owner, French Drain Man Canada
This common oversight highlights the risks of going it alone. Without proper planning and execution, even minor mistakes can lead to major water management problems.
Beyond Costs: Why Professional Installation Makes Sense
Aside from the technical challenges, there are other reasons to consider professional installation. For starters, many Canadian municipalities require permits for drainage work. A poorly graded system could unintentionally direct water onto neighbouring properties, creating legal headaches most homeowners would rather avoid. Professional contractors handle the entire process – from obtaining permits to ensuring compliance with local building codes. They also manage inspections and use specialized tools like industrial excavators and laser levels to get the job done right.
Here’s a quick comparison of DIY vs. professional installation:
| Factor | DIY (Materials Only) | Professional (Leaquida Waterproofing) |
|---|---|---|
| Upfront Cost | $100–$500 | $2,100–$6,700 CAD |
| Permits & Code Compliance | Homeowner’s responsibility | Managed by the contractor |
| Equipment | Basic hand tools and rented trenchers | Specialized equipment (e.g., industrial excavators, laser levels, diamond-blade saws) |
| Risk | High – slope errors, utility strikes, clogs | Low – insured services by experienced crews |
| Warranty | None | Installation and service warranties provided |
| System Lifespan | Variable | 30+ years with proper maintenance |
The Professional Advantage
Companies like Leaquida Waterproofing bring expertise to the table, tackling challenges like hydrostatic pressure, seepage at floor-wall joints, and water discharge routing. These are issues that often derail DIY efforts. Professional installation ensures not only a properly functioning system but also long-term protection against water damage. For homeowners with landscaped yards, tight spaces, or ongoing basement moisture problems, hiring a professional is often the smarter, safer choice.
Conclusion
Installing a perimeter drainage channel is a practical way to shield a Canadian home from water damage. When done right, it helps reduce hydrostatic pressure, manage heavy rainfall and spring snowmelt, and keeps the home dry for decades – often exceeding 30 years.
The process hinges on a few key steps: conducting a thorough site assessment, precise excavation, achieving proper grading, using high-quality materials, and ensuring a dependable connection to a discharge point. Skipping any of these steps can compromise the entire system’s effectiveness. By following these steps, as outlined earlier, you can ensure consistent water management and a drainage system that stands the test of time.
Not only does this system help protect your home’s structural integrity, but it also improves indoor air quality and safeguards property value – key benefits highlighted throughout this guide.
“A foundation drainage system – whether interior, exterior, or French-style – is one of the most effective and lasting ways to protect your home from water damage.” – Lucas Bennett, Leaquida Waterproofing
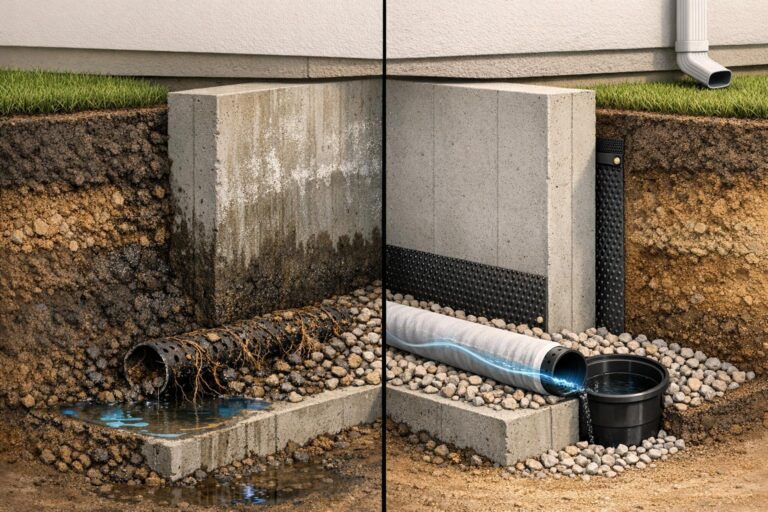
 CLOGGED OR BROKEN WEEPING TILE