Wet basements are a common issue for Canadian homeowners, with over 60% of basements experiencing moisture problems. Ignoring these issues can lead to costly repairs (averaging $43,000 per flood), mould growth within 24 hours, and long-term structural damage. The main causes include:
- Foundation Cracks: Small cracks allow water to seep in, especially at the wall-floor joint.
- Poor Exterior Drainage: Blocked gutters, short downspouts, or improper grading direct water toward your home.
- Hydrostatic Pressure: Water-saturated soil pushes moisture through cracks and porous concrete.
- Sewer Backups: Overwhelmed systems or blockages can cause flooding.
- Interior Moisture Sources: High humidity, condensation, or leaks from appliances.
Solutions:
- Seal Foundation Cracks: Use polyurethane or epoxy injections for effective repairs.
- Improve Drainage: Clean gutters, extend downspouts, and regrade soil around the home.
- Install Sump Pumps: Manage groundwater with a reliable pump system.
- Prevent Sewer Backups: Install backwater valves and maintain sewer lines.
- Control Indoor Humidity: Use dehumidifiers, insulate pipes, and ensure proper ventilation.
For long-term protection, consider interior waterproofing (French drain systems) or exterior waterproofing (membranes and drainage tiles). Both methods have pros and cons, but combining them offers the best defence. Regular maintenance, like cleaning gutters and testing sump pumps, is key to keeping your basement dry year-round.
4 Solutions to fix a wet basement plus Noob Mistakes
What Causes Wet Basements
Understanding why water seeps into your basement is crucial to addressing the problem. Canadian homes face unique challenges, from spring snowmelt to heavy rainfall, which can put added strain on foundations. Here’s a closer look at the most common reasons behind basement moisture and how to identify them.
Foundation Cracks
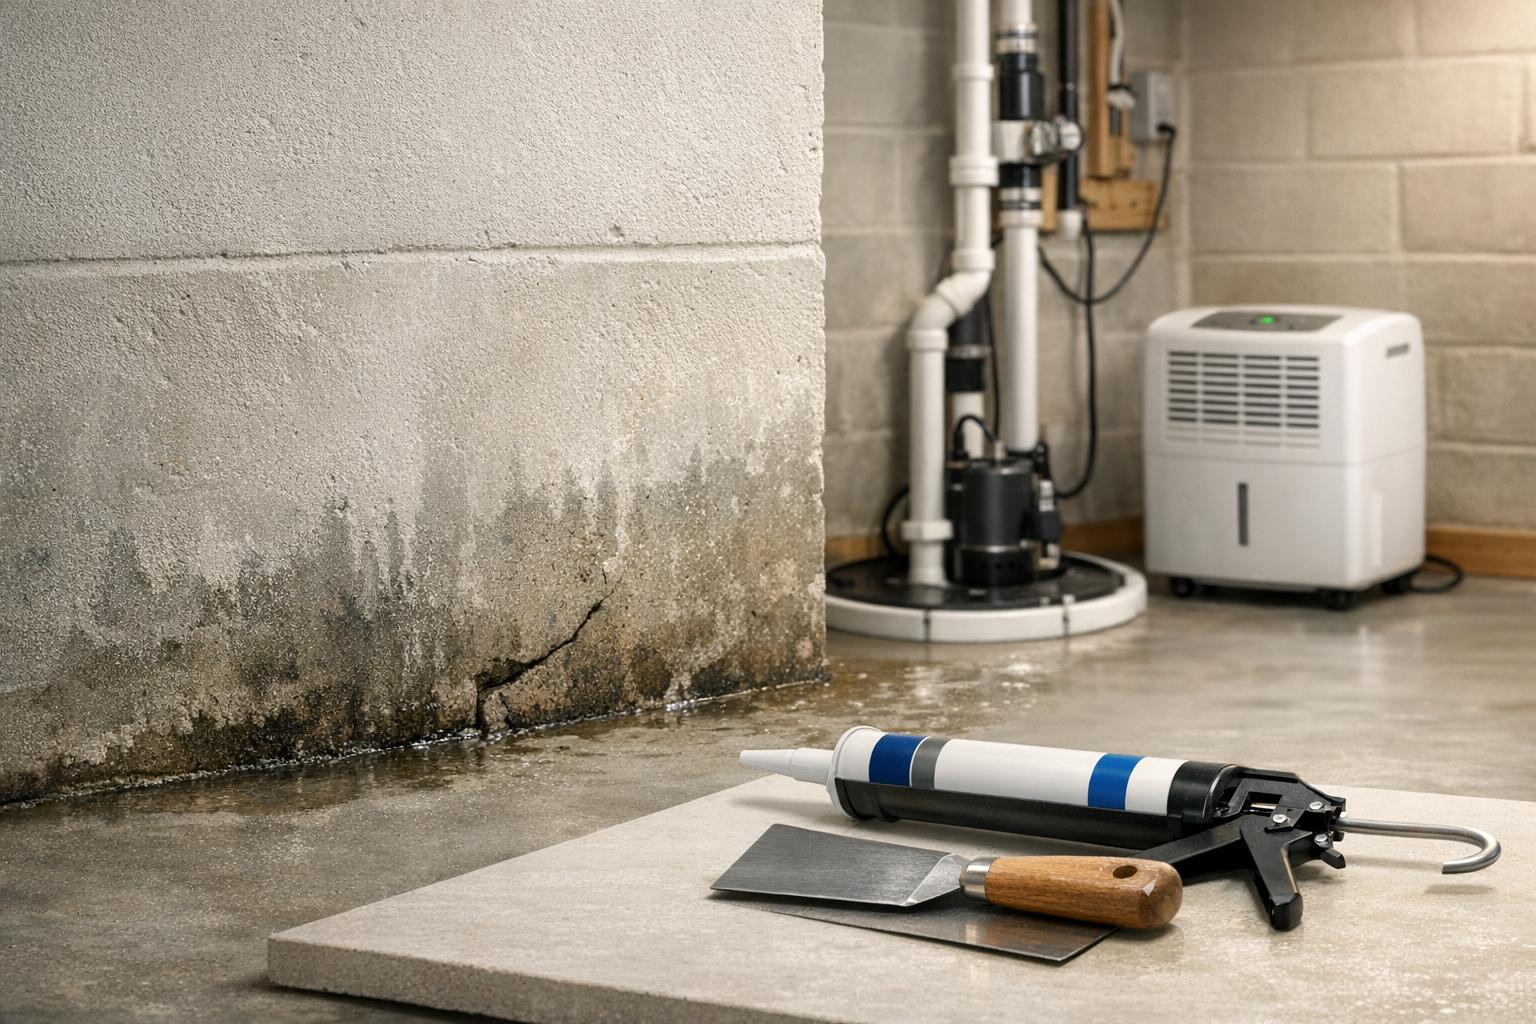
Cracks in your foundation act like open doors for water to enter. These cracks can form naturally as the house settles or when the surrounding soil shifts. Even tiny hairline cracks can allow a surprising amount of moisture to get through. One particularly vulnerable spot is the cove joint – the area where the basement wall meets the floor. This joint is prone to water intrusion because the walls and floor are poured separately during construction.
"As hydrostatic pressure builds up against a basement wall, it will enter the home through any weak point it can find. This includes wall cracks, floor cracks, and, most commonly, through the wall-floor joint." – Basement Systems
Look for telltale signs like brown streaks, rusty patches, or white, powdery deposits (efflorescence) on walls. A musty odour can also signal moisture issues.
Poor Exterior Drainage
Water pooling around your foundation is often the result of poor exterior drainage. Blocked gutters, downspouts that are too short, or grading that directs water toward the house can all lead to problems. The backfilled soil around a foundation tends to be looser and more porous than undisturbed soil, creating a "clay bowl effect" that traps water against your basement walls. After a heavy rain, check for water pooling near your foundation or downspouts emptying too close to the base. Inside, you might notice damp spots, peeling paint, or warped flooring.
Hydrostatic Pressure and Groundwater
Saturated soil around your foundation creates hydrostatic pressure, which pushes water through cracks and porous concrete. This is especially common at the cove joint. Clay soils, which hold water more effectively, can make the problem worse. In some cases, water can even be drawn upward through the concrete by capillary action, reaching heights of 12 to 20 feet in clay-heavy soils. Homes near high water tables or in areas prone to rapid spring snowmelt are particularly susceptible, as the ground can’t absorb water fast enough. This constant pressure can weaken your basement and lead to persistent moisture problems.
Sewer Backups
Sewer backups are another common cause of basement flooding. These can happen due to blocked pipes, tree roots infiltrating the system, or overwhelmed municipal systems during heavy rain. In Canada, 30,000 to 40,000 basement flooding incidents are reported annually, with each costing an average of $3,000 to $5,000 in damage. Warning signs include sewage odours, slow drains, or water backing up through floor drains during storms.
Interior Moisture Sources
Not all basement moisture comes from outside. Everyday activities like cooking, showering, or running an unvented clothes dryer can increase indoor humidity. When warm, humid air meets cool basement walls or pipes, condensation forms. A leaking water heater – most often occurring after about seven years – or a burst washing machine hose, which can release up to 650 gallons of water, can also cause significant issues. Additionally, the stack effect, where warm air rises and creates negative pressure in the basement, can pull in moist air through cracks or open sump pits. To prevent mould, aim to keep indoor humidity levels between 30% and 50%, as mould can start growing within 48 hours of excess moisture.
How to Fix Wet Basement Problems
Now that we’ve pinpointed common causes, let’s dive into actionable solutions. Here’s how you can tackle each issue effectively.
Fixing Foundation Cracks
For minor, non-structural cracks, you can often handle repairs yourself. Polyurethane foam injection is a great option. This foam expands up to 35 times its original size, sealing cracks even on damp surfaces. DIY kits for cracks between 3–6 metres long typically cost $154.00 to $279.00. However, if the crack affects the foundation’s structural integrity, epoxy injection is a better choice since it restores the wall’s strength. For active leaks where water is under pressure, hydraulic cement can create a rigid seal in just 3 to 5 minutes.
Before applying any repair material, clean the crack thoroughly with a wire brush to remove debris, old paint, or efflorescence. For a long-term solution, consider an exterior waterproofing membrane. These membranes provide up to 40 years of protection but may require extensive excavation, which can cost tens of thousands of dollars. Interior fixes, on the other hand, usually range from a few hundred to a few thousand dollars.
| Repair Method | Best For | Key Advantage |
|---|---|---|
| Polyurethane Injection | Non-structural cracks in poured concrete | Expands to fill voids, even on wet surfaces |
| Epoxy Injection | Structural cracks needing reinforcement | Restores structural integrity |
| Hydraulic Cement | Active leaks and large holes | Sets quickly under water pressure |
| Exterior Membrane | Long-term, comprehensive protection | Prevents water from entering the foundation |
Improving Exterior Drainage
Proper exterior drainage is crucial to keeping water away from your foundation. Start by checking the slope around your home – the ground should drop at least 2.5 centimetres for every 30 centimetres (1 inch per foot) over a distance of 1.8 metres (6 feet). You can use a four-foot level to verify this. If the air bubble isn’t centred when the far end is 10 centimetres off the ground, regrading is necessary.
"Many wet basements aren’t caused by a foundational issue. Instead… many basement leaks can be cured with a weekend of work and a few hundred dollars’ worth of dirt and plastic." – Robert Vassallo, Owner, Complete Building Solutions
Ensure your gutters are clear and install at least one downspout for every 15 metres (50 feet) of roof eave. Extend downspouts 1.2 to 1.8 metres (4 to 6 feet) away from your home to keep water from pooling near the foundation. If regrading is required, you can rent a gas-powered compactor for about $60 for a half-day or $80 for a full day.
Installing and Maintaining Sump Pumps
Sump pumps are essential for managing groundwater and hydrostatic pressure. These systems include a sump pit, a pump, and a discharge hose. The pit should be placed at the lowest point in your basement, ideally in an unfinished area where water naturally collects. Most sump basins are 76 centimetres (30 inches) deep, but if your drainage system runs longer than 36 metres (120 feet), opt for a 91-centimetre (36-inch) model.
Choose a submersible pump with a vertical float switch for reliability. Use a dedicated electrical outlet to avoid overloading circuits, and make sure the sump pit has an airtight, childproof cover to block radon gas and moisture. Discharge pipes should drain onto your property, such as a lawn or flowerbed, to allow water absorption. In colder regions, keep discharge pipes within 20 centimetres (8 inches) of your siding to prevent freezing.
Test your sump pump every spring by pouring water into the pit to ensure it activates. Clean the intake screen annually and flush the pit with fresh water if you notice musty odours. Professional contractors charge $5,000 to $8,000 for a standard drainage job (about 36 metres or 120 feet of drain tile), but DIY installations can cost under $1,500 for materials and tool rentals.
Preventing Sewer Backups
Sewer backups can lead to extensive damage, so prevention is key. Installing a backwater valve is one of the best defences. This device allows sewage to flow out but blocks it from reentering during heavy rain or system overloads. Interior backwater valves cost $2,000 to $2,600, while exterior models range from $2,500 to $4,200. Many Canadian municipalities offer subsidies for these upgrades. For example, the City of Toronto provides up to $3,400 per property for eligible projects, and Halton Region offers up to $5,000 for sump pump installations and weeping tile disconnections.
It’s also smart to inspect sewer lines periodically to catch blockages or tree root intrusions before they cause a backup.
Controlling Indoor Humidity
Managing indoor humidity is essential to prevent condensation and mould. Keep humidity levels between 30% and 50%, as mould can begin to grow within 48 hours in overly moist conditions. A dehumidifier is a must-have for basements. Use it during humid summer months and either empty the collection bucket regularly or set up a continuous drain if possible.
Other steps include insulating cold water pipes to stop condensation, improving ventilation by running exhaust fans in bathrooms and kitchens, and ensuring clothes dryers vent to the outside instead of into the basement. These measures can go a long way in maintaining a dry, healthy space.
sbb-itb-5761e20
Complete Waterproofing Methods
Interior vs Exterior Basement Waterproofing Methods Comparison
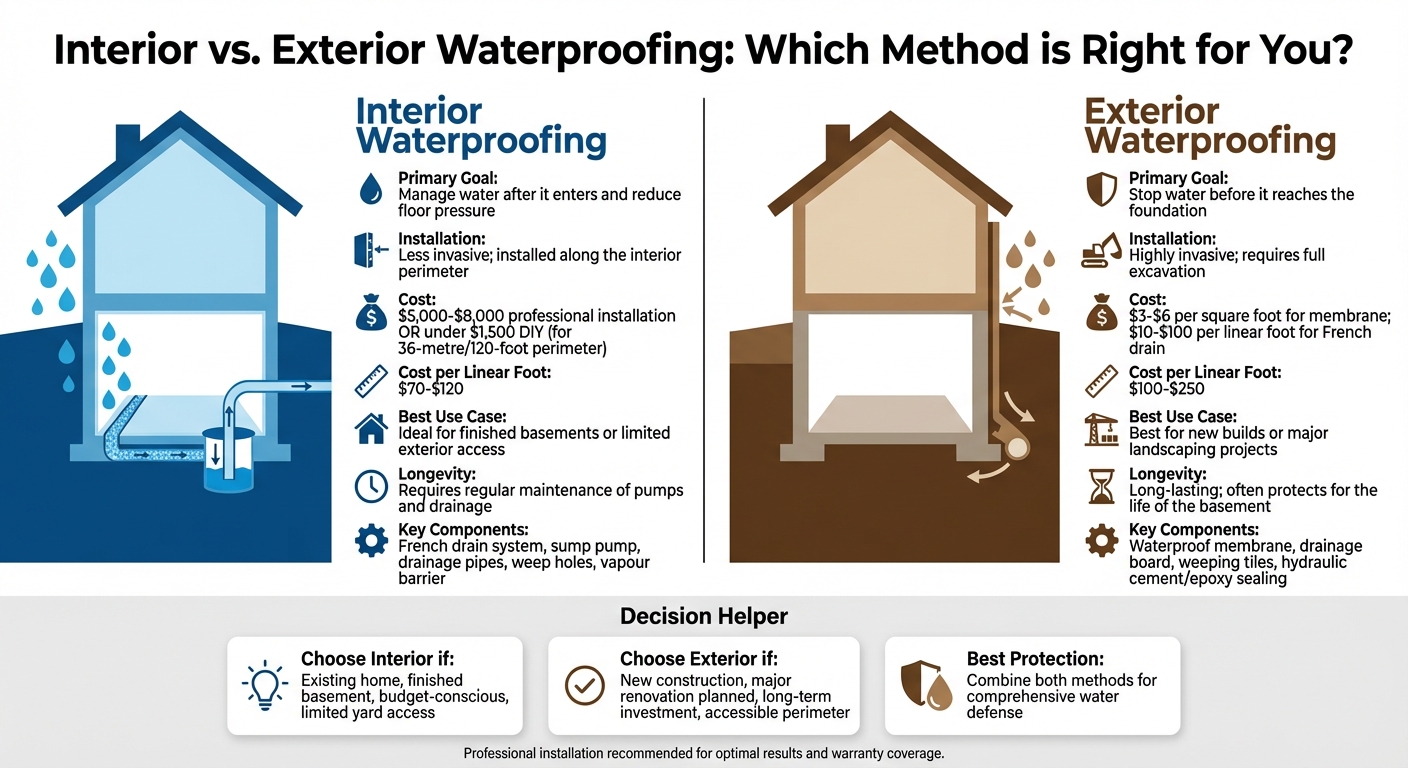
A solid waterproofing strategy involves two key components: exterior defences to block water at its source and interior systems to manage any moisture that gets through, reducing the pressure beneath the floor.
Interior Waterproofing Methods
Interior waterproofing focuses on managing water that has already entered or is seeping through the foundation. At its core is an interior drainage system, often referred to as a French drain, which runs along the basement’s perimeter. This system collects water at the cove joint – the spot where the wall meets the floor – where hydrostatic pressure often forces water through [29, 30].
To install this system, the concrete floor is cut about 40–45 cm from the wall, and a trench is dug down to the footing. Perforated drainage pipes are then placed on a bed of washed river rock within the trench [28, 35]. These pipes are sloped toward a sump pump basin, which is positioned at the lowest point to collect and remove water. For concrete block foundations, 2.5-centimetre (1-inch) weep holes are drilled into the bottom of the blocks to release trapped water. A dimpled drainage membrane is added to the interior walls to guide seepage into the trench, and a 6-mil plastic vapour barrier is laid over the gravel before the concrete floor is restored [28, 35].
Professionally installed interior systems typically cost between $5,000 and $8,000 for a standard 36-metre (120-foot) perimeter. For those tackling it as a DIY project, material and tool rental costs can be under $1,500. This method is less disruptive to landscaping and is particularly useful for finished basements where digging outside isn’t feasible.
On the other hand, exterior waterproofing tackles the problem before water even reaches the foundation.
Exterior Waterproofing Methods
Exterior waterproofing aims to prevent water from ever touching your foundation walls. This approach involves excavating the soil around the home’s perimeter down to the footings, making it a common choice for new builds or major renovations.
Once the foundation is exposed, the walls are cleaned, and any cracks are sealed with hydraulic cement or epoxy. A waterproof membrane or polymer sealant is applied to the exterior surface, followed by a drainage board to protect the coating during backfilling and to help direct water away. Additionally, weeping tiles are installed at the footing level to divert groundwater.
The cost of applying an exterior liquid membrane ranges from $3 to $6 per square foot, while French drain installation can vary from $10 to $100 per linear foot, depending on soil conditions and accessibility. While this method is more expensive and invasive than interior waterproofing, it offers long-term protection – often lasting the lifetime of the basement – by addressing the root cause of water intrusion.
Interior vs. Exterior Waterproofing
| Feature | Interior Waterproofing | Exterior Waterproofing |
|---|---|---|
| Primary Goal | Manage water after it enters and reduce floor pressure | Stop water before it reaches the foundation |
| Installation | Less invasive; installed along the interior perimeter | Highly invasive; requires full excavation |
| Cost | More affordable and quicker to install | Higher due to labour and use of heavy equipment |
| Best Use Case | Ideal for finished basements or limited exterior access | Best for new builds or major landscaping projects |
| Longevity | Requires regular maintenance of pumps and drainage | Long-lasting; often protects for the life of the basement |
This comparison helps homeowners decide which method suits their needs. For most existing homes, interior waterproofing provides a practical and cost-effective solution, especially when exterior excavation could disrupt mature gardens or paved areas. However, for new constructions or when extensive yard work is already planned, exterior waterproofing offers a more enduring option. In some cases, combining both methods – using exterior membranes alongside interior drainage and sump systems – provides the most comprehensive protection against water intrusion.
Maintaining a Dry Basement
Even the most reliable waterproofing systems need regular care to stay effective. Skipping maintenance can turn small issues into expensive repairs. Staying on top of things not only safeguards your investment but also keeps water problems from resurfacing.
Regular Inspections and Repairs
Routine inspections are essential for keeping your waterproofing systems in good shape and stopping minor problems from becoming major headaches.
Start with your gutters – clean them out every season and ensure downspout extensions direct water at least 1.2 to 1.8 metres away from your home. For proper drainage, plan for one downspout for every 15 metres (50 linear feet) of roof eave.
Check your foundation walls and floors twice a year, looking for any cracks, even tiny ones, as these can let moisture seep in. Once a year, inspect the grading around your home. The soil should slope away from the foundation at a rate of at least 2.5 centimetres per 30 centimetres (1 inch per foot) for a distance of 1.8 metres (6 feet). If you notice any settling, add and compact more soil to restore the slope. Also, maintain a gap of at least 15 centimetres (6 inches) between the soil and your siding to prevent rot and keep pests at bay.
Before any heavy rain, test your sump pump to ensure it activates properly. Clean backwater valves annually through their designated ports to avoid sewer backups. Be mindful of what goes down your drains – avoid pouring fats, oils, or grease, as these can cause clogs that lead to costly plumbing issues.
Monitoring Humidity Levels
High humidity in the basement can cause condensation on cold surfaces, which may lead to mould growth and musty smells. Use a hygrometer to monitor moisture levels and run a dehumidifier if there are no active leaks.
In summer, keep basement windows closed to block warm, humid air from entering and condensing on cooler walls. If outdoor humidity exceeds 70%, rely on a dehumidifier instead of ventilation. During winter, brief ventilation – opening two windows for just two to three minutes – can help reduce indoor moisture without making the space too cold. Make sure your clothes dryer vents properly to the outdoors using foil tape, as duct tape can degrade and leak humid air. Also, insulate cold-water pipes with foam sleeves to prevent condensation and dripping.
These steps help manage humidity and complement other seasonal measures to keep your basement dry throughout the year.
Seasonal Maintenance
Each season brings its own set of challenges, so adjust your approach accordingly.
In winter, keep snow cleared away from the foundation and insulate exposed pipes. Ensure sump pump discharge lines don’t extend more than 20 centimetres (8 inches) past the siding to prevent freezing. Come spring, check for new cracks caused by freeze-thaw cycles and clear gutters of any debris left from winter to prepare for heavy rain and melting snow. Summer calls for watching for condensation and inspecting the roof after storms. During fall, remove leaves from gutters and seal any new gaps in windows, doors, or foundations before the cold weather sets in.
Sticking to a regular maintenance routine strengthens your waterproofing system and helps keep your basement dry for the long haul.
| Maintenance Task | Frequency | Primary Goal |
|---|---|---|
| Gutter & Downspout Cleaning | Seasonally (Spring/Fall) | Prevent roof runoff from pooling at the foundation |
| Sump Pump Testing | Before rainy seasons | Ensure mechanical readiness for heavy water |
| Backwater Valve Cleaning | Annually | Prevent sewage backups into the basement |
| Grading Inspection | Annually | Ensure soil hasn’t settled toward the house |
| Foundation Crack Check | Bi-annually | Identify new entry points for moisture |
Conclusion
A wet basement can lead to structural damage, encourage mould growth, and even decrease your property value by more than 10%. The upside? Most moisture problems are tied to common, fixable issues, as outlined earlier. Addressing these concerns not only protects your home but also ensures a healthier living environment.
The strategies discussed earlier are most effective when used together. Start by tackling exterior issues to stop water from reaching your foundation. Then, focus on managing interior moisture through proper drainage and humidity control. These steps work hand in hand to create a strong barrier against basement dampness.
While some fixes, like cleaning gutters or sealing small cracks, are straightforward DIY tasks, more complex problems call for professional help. Leaquida Waterproofing provides a range of services, from interior drainage systems (costing $70–$120 per linear foot) to complete exterior waterproofing (ranging from $100–$250 per linear foot). These services come with warranties and clear pricing, ensuring precise installation and long-term results that DIY solutions often fall short of delivering. Pairing routine DIY maintenance with professional waterproofing is the best way to safeguard your home for the long haul.
Don’t wait for water damage to become a bigger issue. Regular inspections, seasonal maintenance, and timely repairs are key to keeping your basement dry throughout the year. Combining professional expertise with consistent upkeep will protect your home’s value and ensure a dry, secure basement for years to come.
FAQs
What are the signs of moisture problems in my basement?
It’s not always obvious when your basement has moisture issues, but there are some telltale signs to watch for:
- A persistent musty odour that lingers, no matter how much you air out the space.
- Mould or mildew growth on walls, floors, or stored items, often showing up as black, green, or white spots.
- Efflorescence, which looks like a powdery white residue on concrete or brick surfaces.
- Damp or wet walls and floors, often accompanied by water stains or streaks after rain or snowmelt.
- Condensation forming on windows, pipes, or other metal surfaces due to high humidity levels.
- Foundation or floor cracks that may grow larger over time.
- Warped flooring, peeling paint, or bubbling plaster, all of which suggest long-term exposure to moisture.
Spotting these issues early is crucial. Left unchecked, they can lead to serious damage to your home and even pose health risks due to mould or mildew growth.
What’s the best way to decide between interior and exterior basement waterproofing?
Deciding on interior or exterior waterproofing comes down to the source of the water problem and how much you’re willing to spend.
Interior waterproofing is a practical choice when water seeps in through cracks, rises through the floor, or pools under the slab. Solutions like perimeter drains, sump pumps, and sealants work from the inside to manage moisture. These methods are generally less costly – around $10,000 CAD – and don’t require major disruption to your property. They’re especially effective for moderate moisture issues or when your foundation is still in solid shape. Plus, interior systems handle Canada’s freeze-thaw cycles well, as they prevent ice buildup against foundation walls.
On the other hand, exterior waterproofing is the way to go if your home faces high water pressure from the surrounding soil, cracked foundation walls, or poor drainage around the property. This approach involves digging around the foundation, applying a waterproof membrane, and installing exterior drains to stop water from reaching your home in the first place. While it can be more expensive – up to $20,000 CAD – and disruptive, it creates a long-term barrier against hydrostatic pressure. This is often the better option for older homes with outdated or failing drainage systems.
To choose the right solution, think about the severity of your water issue, the condition of your foundation, and how much you’re ready to invest. A professional inspection can pinpoint the source of the problem and guide you toward the most effective way to keep your basement dry and usable.
What maintenance can I do to keep my basement dry and prevent water issues?
Regular upkeep is essential to keep water out of your basement. Start by focusing on exterior drainage. Make sure your gutters and downspouts are free of debris, and direct water at least 1 m (about 3 ft) away from your foundation. You can redirect downspouts toward your garden or lawn, or even use rain barrels to minimize water collecting near your home. Also, check the grading around your house – ensure the soil slopes away from the foundation at a 2% incline (roughly a 2-cm drop per metre). This simple adjustment can prevent water from pooling near your walls.
Inside your home, take time to inspect your water-control systems during both spring and fall. Test your sump pump to confirm it’s working properly, and clean any screens or grates to avoid blockages. Examine interior drains, weeping tiles, and waterproofing membranes for signs of wear or clogs, as these can deteriorate over time. If you notice condensation forming on your basement walls, consider using a dehumidifier set to around 50% humidity to reduce moisture levels. These straightforward seasonal checks can help you address potential problems early and keep your basement dry and functional throughout the year.
 CLOGGED OR BROKEN WEEPING TILE