A sump pump is a must-have for Canadian homeowners to protect basements from water damage caused by heavy rain, snowmelt, or high water tables. With flooding repair costs averaging $43,000 in Canada, a sump pump is a smart investment to prevent costly damage. This guide breaks down everything you need to know about sump pump installation, from choosing the right pump to setting it up and maintaining it.
Key Takeaways:
- Why You Need One: Over 2 million Canadian homes are at high flood risk. A sump pump prevents flooding, lowers humidity, and protects your foundation.
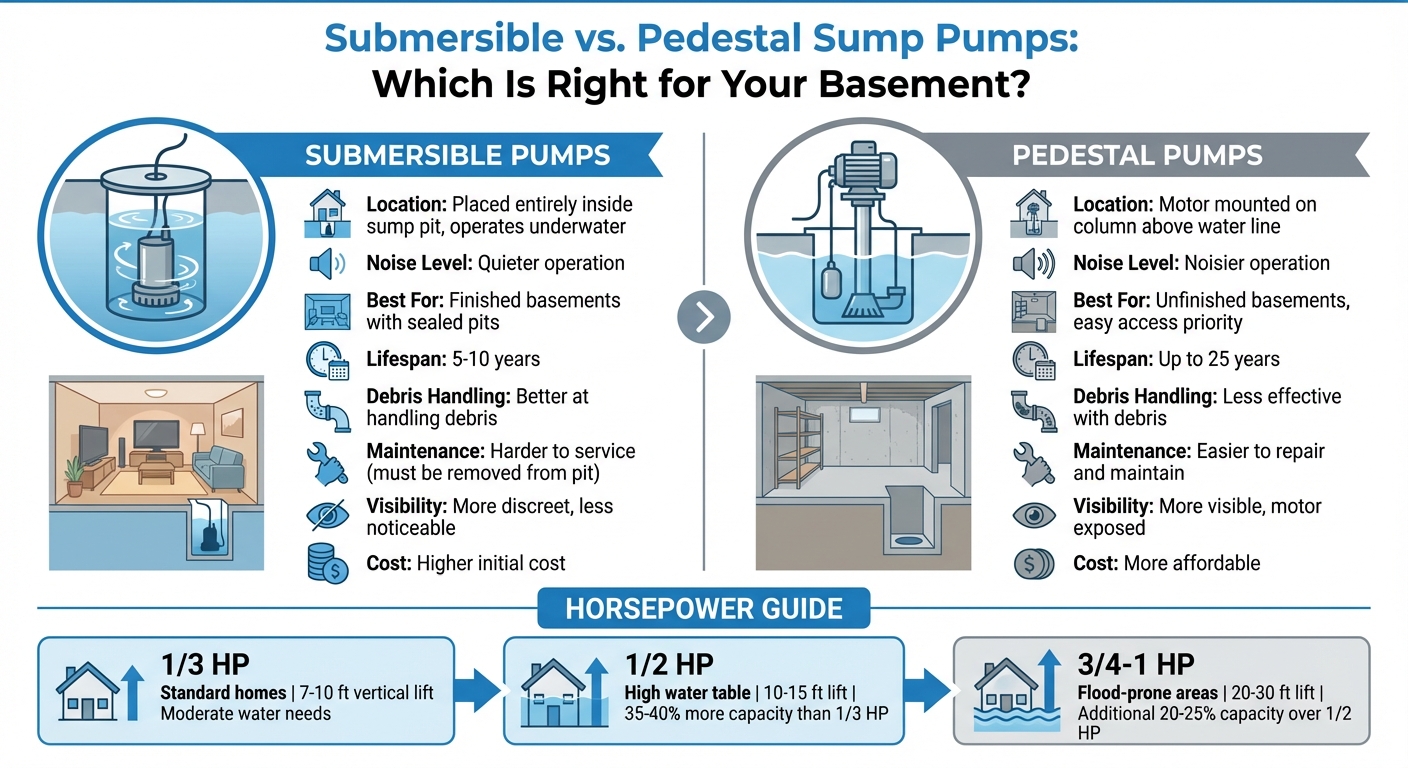
- Types of Pumps: Submersible pumps are quieter and better for finished basements, while pedestal pumps are easier to maintain and last longer.
- Costs: DIY material costs range from $325–$525, while professional installation can cost $1,000–$3,500.
- Backup Power: A battery backup or AC/DC combo pump ensures operation during power outages, common during storms.
- DIY or Professional: With the right tools (e.g., PVC pipes, gravel, and a sump pit liner), you can install it yourself. Otherwise, hire a professional.
Proper sizing, placement, and regular maintenance are essential for long-term performance. Testing the system every 3–6 months and preventing frozen discharge lines in winter are key to keeping your basement dry year-round.
How to Install a Sump Pump | This Old House

Choosing the Right Sump Pump for Your Basement
Submersible vs Pedestal Sump Pumps Comparison Chart
Submersible vs. Pedestal Sump Pumps
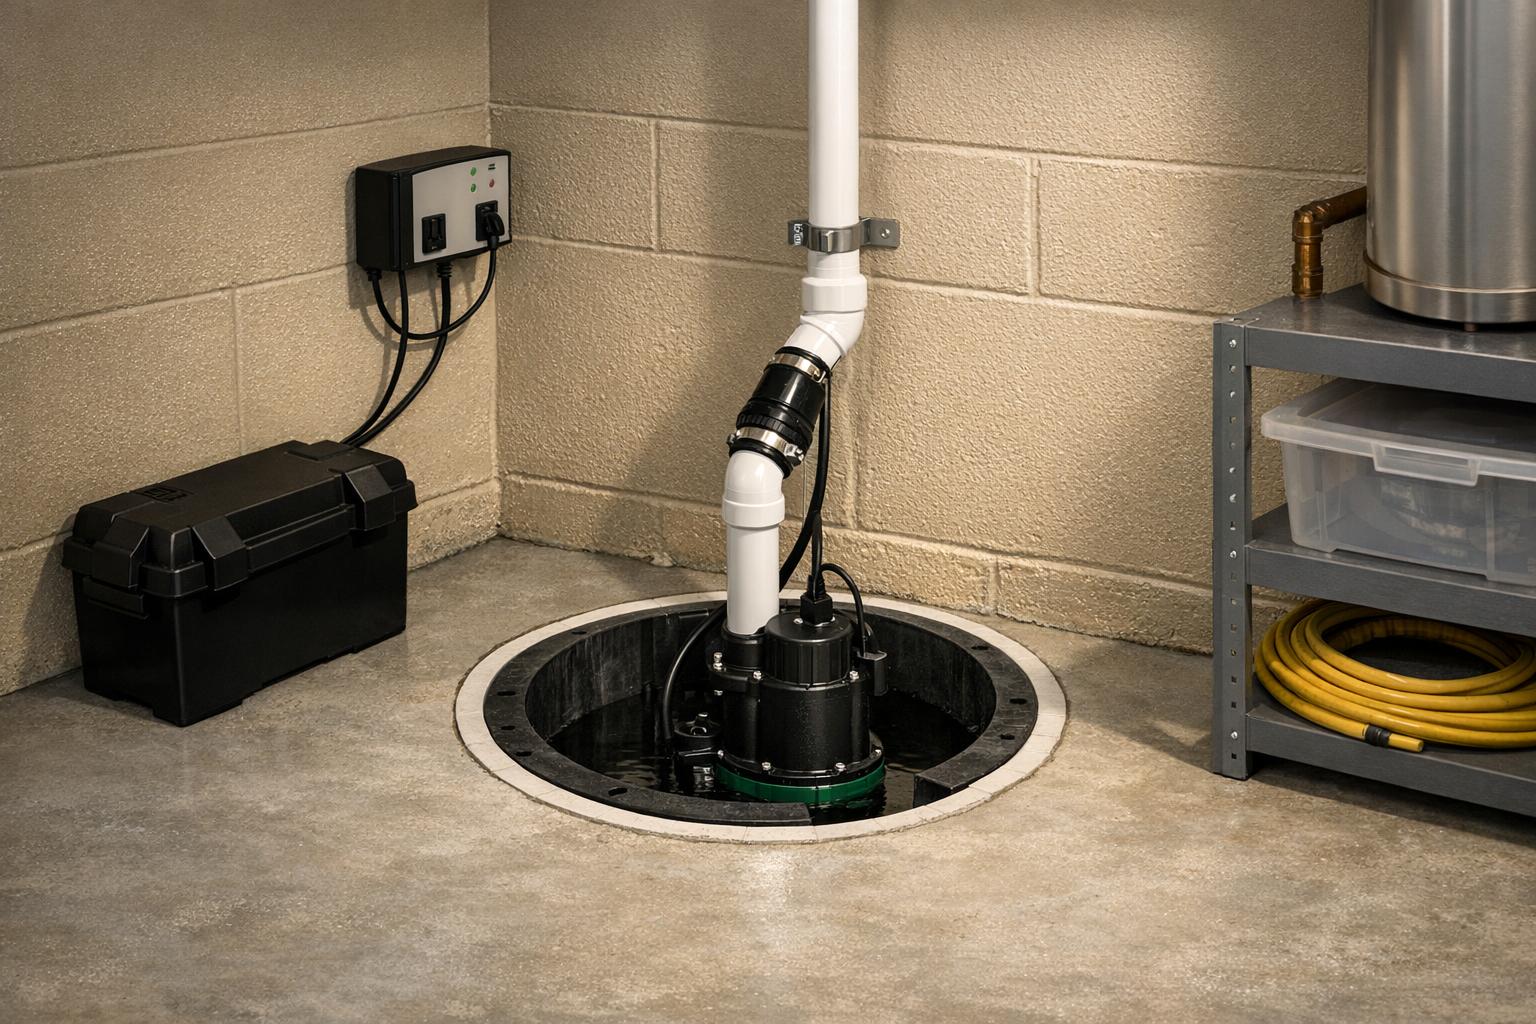
In Canadian homes, basements typically rely on either submersible or pedestal sump pumps, each with its own set of benefits. Submersible pumps are placed entirely inside the sump pit and operate underwater. This design makes them quieter and less noticeable – perfect for finished basements where the sump pit is often sealed with a flat lid.
“Submersible pumps are commonly used as they are designed to be placed directly in the sump pit and are more discreet.” – Nico Barbieri, Project Manager, Aquatech Waterproofing
On the other hand, pedestal pumps have their motor mounted on a column above the water line. While they are noisier, they are easier to repair and tend to last longer – up to 25 years compared to the 5–10 years typical for submersible models. Submersible pumps are better at handling debris but can be harder to service since they need to be removed from the pit. Pedestal pumps, being more affordable and easier to maintain, offer a practical trade-off for homeowners who prioritize accessibility over noise.
When deciding between these two types, consider the specific requirements of your basement and the pump’s capacity to handle water effectively.
What to Consider Before Buying
The right sump pump for your basement depends on several factors, with horsepower (HP) being one of the most important. For most homes with moderate water needs and vertical lifts between 7 to 10 feet, a standard 1/3 HP pump is usually sufficient. However, in areas with a high water table or where water needs to be pumped 10 to 15 feet vertically, a 1/2 HP pump can handle 35% to 40% more water than a 1/3 HP model. For homes prone to flooding or with deeper pits requiring a vertical lift of 20 to 30 feet, a 3/4 HP to 1 HP pump provides an additional 20% to 25% capacity over 1/2 HP models.
Choosing the right size is critical to avoid excessive cycling, which can lead to premature wear and tear.
Since power outages are a common concern in Canada, especially during severe storms, having a reliable backup system is essential. Battery backup systems or combination AC/DC pumps ensure that your sump pump continues working when the power goes out. Additionally, cold winter conditions can freeze discharge pipes, causing water to back up into the basement. To avoid this, look for pumps with antifreeze line compatibility or specially designed discharge systems that prevent ice blockages.
To determine your pump’s capacity, measure its flow rate over one minute and multiply by 1.5 to account for heavy storm conditions. For reference, in an 18-inch diameter pit, one inch of water equals one gallon, while in a 24-inch pit, one inch equals two gallons.
These considerations are essential whether you’re tackling the project yourself or hiring a professional.
Leaquida Waterproofing Recommendations

Leaquida Waterproofing offers sump pump installations priced between $70 and $120 per linear foot. Their services include drainage channels, sump pumps, and vapour barriers, ensuring your sump pump integrates seamlessly into your basement waterproofing system. Basic sump pump units range from $200 to $600, while professional installation typically costs between $1,000 and $3,000, depending on the complexity of the project.
Their team evaluates your basement’s size, water table level, and discharge requirements to recommend the ideal pump type and horsepower. They also install critical components like check valves to prevent backflow, weep holes to avoid airlocks, and discharge piping that slopes away from your foundation. This ensures a durable and efficient system that protects your basement for the long term.
Tools, Materials, and Preparation
Required Tools and Materials
Before diving into your sump pump installation, make sure to gather all the necessary tools and materials. This will save you from making multiple trips to the hardware store mid-project. You’ll need an electric drill (with 3/16″ and 1/4″ bits), a hacksaw or pipe cutter, an adjustable pipe wrench, a measuring tape, a level, a shovel, and a set of screwdrivers. If your basement has a concrete floor, a jackhammer may also be required to excavate the sump pit.
For materials, plan on using 1.5″ Schedule 40 PVC pipe (about 3.8 cm in diameter) for the discharge line. You’ll also need a sump pit liner or basin, typically 45 cm (18 inches) in diameter and 60 cm (24 inches) deep, along with PVC primer and cement, a check valve, a rubber coupling boot, and silicone sealant to weatherproof the setup. For the pit base, prepare 3/4″ clean gravel or stones, laid 7.5 to 15 cm (3 to 6 inches) deep, to ensure proper drainage and stability. Additional items include J-hooks for securing pipes and corrugated pipe for routing water outside. Each of these components is essential for a smooth installation process.
“It’s strongly advised not to use an extension cord for your sump pump. Extension cords can cause voltage drops and overheating, leading to pump failure. Always use a dedicated outlet.” – Nico Barbieri, Project Manager, Aquatech Waterproofing
These tools and materials are widely available at Canadian hardware stores like Home Depot or Rona. If you’re tackling this as a DIY project, expect material costs to range from $325 to $525. Additionally, some Canadian municipalities offer rebates for sump pump installations, with amounts reaching up to $3,400 in specific regions.
Preparing Your Installation Site
Start by locating the lowest point of your basement floor, as this is where water naturally pools during heavy rainfall or spring snowmelt. If it’s not immediately obvious, use a laser level to identify the exact spot. Make sure the chosen location is within reach of a dedicated GFCI (Ground Fault Circuit Interrupter) outlet, as the sump pump requires its own circuit to avoid electrical overloads.
Before digging, check your local building codes and call to confirm the location of underground utilities. The excavation should be about 10 inches (25 cm) wider and 6 inches (15 cm) deeper than the sump basin to allow room for drainage materials. Ensure the pit is at least 3 metres (10 feet) away from any walls to avoid interfering with the foundation footing. If the discharge pipe will exit through an exterior wall, consider adding foam insulation to prevent freezing and potential damage during the winter months.
Once your site is prepared, you’ll be ready to move forward with the step-by-step installation of your sump pump system.
sbb-itb-5761e20
Step-by-Step Installation Instructions
Installing the Sump Pit and Liner
Start by breaking the concrete at the lowest point you’ve identified using a jackhammer or sledgehammer. Then, dig a pit that’s 25 cm (10 inches) wider and 15 cm (6 inches) deeper than the sump basin. Aim for a depth of 56 to 76 cm (22 to 30 inches) and a width of 35 to 45 cm (14 to 18 inches) to ensure the basin fits properly and allows the float switch to operate without issues.
At the bottom of the pit, spread a 5 to 7.5 cm (2 to 3 inch) layer of clean gravel, river rock, or pea gravel. On top of this, place a concrete brick or paving stone to keep the pump elevated, protecting it from debris that might damage the impeller. If using a non-perforated liner, drill weep holes into it and wrap the outside with filter fabric. This helps block silt and debris from entering the system.
Position the liner so it’s level and flush with the floor. Fill the space around the liner with clean gravel or stone to filter sediment and keep mud out. Finally, seal the edge of the pit with fresh concrete, ensuring it’s even with the floor while leaving the lid accessible.
“Sump pits that are too large tend to go too deeply into the ground, pumping out water far below your home and causing unnecessary work and electricity usage.” – Basement Systems Toronto
Once the pit is ready, you can move on to positioning the pump and setting up the discharge system.
Setting Up the Pump and Discharge System
Place the pump on the brick inside the pit, ensuring it sits level and steady. Use the provided adapter to connect the pump to a 1.5-inch Schedule 40 PVC pipe. After cutting the PVC pipe to the required length, smooth out the edges with a utility knife to create clean, leak-free connections. Secure the connections using PVC cement.
Install a check valve vertically on the discharge pipe to stop water from flowing back into the pit when the pump shuts off. Between the pump and the check valve, drill a 3/16-inch weep hole at a 45-degree downward angle. This small hole prevents air-locks that could cause the pump to run dry.
Route the discharge pipe through your rim joist and extend it so that it directs water at least 1.2 metres (4 feet) away from your home. Ensure the ground slopes away from the foundation to prevent water from pooling back. Seal the gap where the pipe exits through the wall using waterproof silicone caulk. If you’re in a cold climate, consider insulating the exterior portion of the pipe with foam insulation to avoid ice blockages. Lastly, secure the pump and float switch power cords to the discharge pipe with zip ties, creating a “drip loop” below the outlet to stop water from running down the cords into the electrical socket.
“Drilling a weep hole is required to prevent damage caused by an air-lock in the pipe that causes the pump to run dry.” – Jim O., Sump Pump Expert, Sump Pumps Direct
With the pump and discharge system in place, it’s time to connect and test the setup.
Connecting and Testing Your System
Double-check all electrical connections to ensure they meet safety standards. Plug the pump into the dedicated GFCI outlet you prepared earlier. Most submersible pumps use a piggyback plug, where the pump cord plugs into the back of the float switch plug before connecting to the wall outlet. Make sure the float switch can move freely and isn’t obstructed by the pit walls, pump, or piping.
To test the system, pour about 19 litres (5 gallons) of water into the pit. Watch to ensure the float switch activates the pump and that water is pumped out efficiently. Check for leaks in the check valve and confirm that water flows out of the discharge pipe as expected. Once everything works smoothly, install an airtight sump lid with rubber grommets for pipes and wires. This will help keep odours, humidity, and debris out of the system.
| Component | Safety/Functionality Requirement |
|---|---|
| Power Source | Dedicated GFCI outlet; no extension cords |
| Discharge Pipe | Must include a 3/16-inch weep hole to prevent air-lock |
| Check Valve | Must be vertical and prevent water backflow into the pit |
| Electrical Cords | Secured with zip ties; must include a drip loop |
| Sump Lid | Airtight with rubber grommets for moisture and odour control |
Maintenance and Troubleshooting
Regular Maintenance Tasks
Keeping your sump pump in top shape is just as important as installing it correctly. Every 3–6 months, test the pump by pouring a bucket of water into the pit. This should trigger the float switch, causing the pump to activate, discharge the water, and shut off automatically when done. To stay ahead of potential issues, consider scheduling a professional inspection before the spring rains arrive.
Once a year, clean out the sump pit to remove debris and sediment that could clog the pump. Make sure to disconnect the power before taking the pump out for cleaning. Also, check that the discharge pipe slopes away from your home properly. During Canadian winters, particularly after cold snaps, inspect the discharge line to ensure it hasn’t frozen – ice blockages are a common cause of basement flooding in colder provinces like Ontario and Alberta.
Don’t forget to check the check valve to ensure it’s upright and not leaking. A faulty or missing check valve can cause a significant amount of water to flow back into the pit, forcing the pump to work harder than necessary. Replace backup batteries every 2–3 years to ensure they’re ready when needed.
If you notice any issues during these regular checks, use the troubleshooting tips below to resolve them.
Fixing Common Problems
If your sump pump isn’t starting, make sure the GFCI outlet hasn’t tripped and that the plug is securely connected. A stuck float switch could also be the problem – clear any debris from the pit and ensure the pump is properly centred so the float can move freely. If the pump runs but doesn’t pump water, debris might be clogging the impeller, or the discharge line could be frozen. Clean the pump and thaw the pipe as needed.
Here’s a quick reference guide to address common sump pump problems:
| Problem | Likely Cause | Solution |
|---|---|---|
| Pump won’t turn on | Tripped GFCI/breaker; stuck float | Reset the GFCI and remove any float obstructions |
| Runs constantly | Stuck float; broken check valve; undersized pump | Adjust the float, replace the check valve, or upgrade the pump’s capacity |
| Short cycling | Pit too small; faulty switch | Resize the basin or replace the switch |
| Grinding noises | Debris in the impeller; worn bearings | Clean the impeller or replace the bearings |
| Frozen discharge line | Water trapped in the pipe | Re-slope the pipe and clear any ice blockage |
Most sump pumps last around seven to ten years. If yours is making strange noises or running non-stop despite repairs, it might be time to replace it. In Canada, hiring a professional to replace your sump pump typically costs between $500 and $1,200.
Conclusion
Key Takeaways
This guide has covered the basics of sump pump installation, ensuring your home is well-protected from water damage. A properly installed sump pump is a critical safeguard for Canadian homes, especially during heavy rainfall or spring snowmelt. Start by selecting the right pump – either a submersible or pedestal model – based on your basement’s specific needs. Ensure you position it at the lowest point where water naturally collects, and make sure a dedicated GFCI outlet is nearby for safe operation.
The proper sizing of the sump pit is essential for optimal performance and drainage. Don’t overlook key components like the check valve and weep hole, which prevent backflow and air-locks. Additionally, make sure the discharge pipe directs water well away from your home’s foundation to avoid potential damage.
Regular maintenance is the key to keeping your sump pump in top shape. Test the system periodically and clean it annually to prevent costly water damage. After cold weather, inspect the discharge line to ensure it’s free of ice blockages. Considering that even a minor basement flood can cost about $2,000, while major flooding might run up to $25,000, routine care is a cost-effective way to protect your home and wallet.
By following these steps, you’ll have a sump pump system that’s built for reliability and long-term protection.
Why Trust Leaquida Waterproofing
Leaquida Waterproofing specializes in safeguarding Toronto-area homes from water damage with professional sump pump installations and comprehensive basement waterproofing services. Their team understands the unique challenges Canadian homeowners face, from spring thaw to heavy autumn rains, and tailors solutions to meet these specific seasonal demands.
With expert installations, competitive pricing, and a commitment to meeting local building codes, Leaquida Waterproofing ensures your home is equipped with a system that delivers lasting protection. Whether it’s a complete sump pump installation, foundation crack repair, or drainage system upgrade, their transparent approach and comprehensive warranties provide peace of mind for years to come.
FAQs
What’s the difference between a submersible and a pedestal sump pump, and how do I choose the right one for my basement?
The key distinction between a submersible sump pump and a pedestal sump pump lies in their structure and where they’re positioned. A submersible pump sits entirely inside the sump pit, with its motor sealed to prevent water damage. In contrast, a pedestal pump has its motor mounted on a stand above the pit, keeping it exposed to air.
Here are some factors to weigh when deciding between the two:
- Space considerations: Submersible pumps fit well in compact or deep pits, while pedestal pumps need more vertical room due to their stand.
- Noise levels: Submersible pumps operate more quietly since the water helps dampen the motor noise. Pedestal pumps, however, tend to be louder.
- Upfront cost: Pedestal pumps are generally cheaper initially, but submersible pumps often last longer and provide stronger performance.
- Ease of maintenance: Pedestal pumps are easier to access for repairs, whereas submersible pumps, with their sealed design, are less susceptible to rust and corrosion.
If you’re looking for a pump that handles large water volumes, operates quietly, and fits into a smaller pit, a submersible pump is a solid choice. On the other hand, if you’re working with a tighter budget and don’t mind some noise, a pedestal pump offers a more economical option.
What regular maintenance does my sump pump need to stay reliable year-round?
Keeping your sump pump in good working order is essential to prevent water damage in your home. Start by ensuring safety: unplug the pump or switch off its circuit breaker. Next, take a look inside the sump pit and remove any debris, such as silt or sand, that could interfere with the pump’s performance. Use a soft brush to clean the pump and float switch to keep everything running smoothly.
To test the pump, pour around 10 litres of water into the pit. This will help you confirm that it activates correctly and drains water as it should. Don’t forget to inspect the discharge pipe and valve for any blockages or leaks. If you have a backup system, check that the battery is fully charged and that the alarms are functioning properly.
Finally, it’s a good idea to have a professional inspect your sump pump once a year. They can catch any hidden issues or signs of wear that might go unnoticed. By following these steps, you can count on your sump pump to stay dependable all year round.
How can I stop my sump pump discharge line from freezing during winter in Canada?
To prevent your sump pump discharge line from freezing during the harsh Canadian winters, start by insulating the pipe. Use foam insulation or outdoor-rated heat tape to keep the line warm. If possible, bury the discharge line below the frost line – typically around 1.2 metres deep in most parts of Canada – where the ground temperature remains above freezing. For sections that can’t be buried, use insulated sleeves and ensure the outlet is positioned above ground, directing water away from your home.
Ensure the discharge line has a proper slope of at least 1 cm per metre (1%) to avoid water pooling, which can freeze and block the pipe. Adding a check valve with a vent can also help by releasing trapped air and reducing the risk of ice buildup. To keep the system functional during freezing temperatures, run the pump occasionally to maintain water flow. Finally, inspect the discharge line regularly and clear any debris before winter sets in to keep everything running smoothly.
 CLOGGED OR BROKEN WEEPING TILE