

Your sump pump is your basement’s best defence against flooding and water damage. For more expert advice, explore our waterproofing articles. Proper maintenance ensures it works when you need it most, especially during spring snowmelt, summer storms, and winter freezes. Here’s what you need to know:
- Monthly Tasks: Test your pump with water, inspect for wear, clean the inlet screen, and ensure the float switch moves freely.
- Seasonal Tips: Clear discharge lines in winter, check for clogs in summer, and prepare for heavy rain in spring.
- Annual Check-Up: Schedule a professional inspection to clean and lubricate the system and replace worn parts.
- Battery Backup: Test monthly during winter and replace every 2–3 years to avoid power outage failures.
- Replacement Timing: Most sump pumps last 7–10 years. Replace if it shows signs of failure or exceeds this lifespan.
A sump pump in good condition can save you from costly repairs – flooded basements in Canada can result in claims averaging $43,000. Investing in regular maintenance is a small effort compared to the potential damage it prevents.
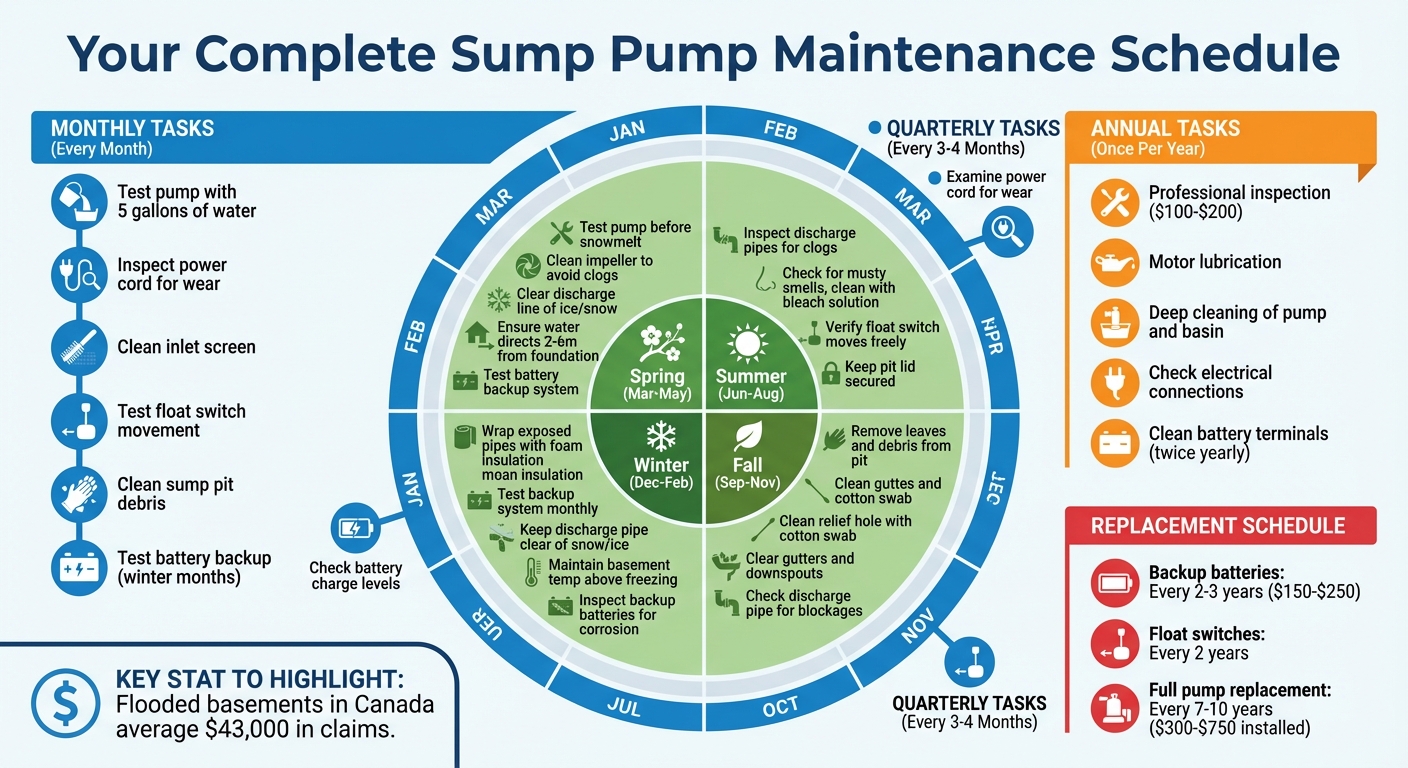
Sump Pump Maintenance Schedule: Monthly, Seasonal, and Annual Tasks
How to Maintain Your Sump Pump
sbb-itb-5761e20
How Often to Maintain Your Sump Pump
To keep your sump pump running smoothly, you’ll want to stay on top of regular maintenance. Start with a monthly test: pour a bucket of water into the sump pit and check if the pump activates and drains properly. During spring, when the pump gets more use, take a moment to clean the impeller to avoid clogs.
For more thorough upkeep, include a quarterly inspection. Every 3–4 months, examine the power cord for any signs of wear and make sure the float switch moves without obstruction.
An annual professional tune-up is a smart step, especially before the spring rains arrive. This service typically includes motor lubrication, a check of electrical connections, and deep cleaning of both the pump and the sump basin. After winter, cleaning the sump pit is also crucial to remove any soil or sand that may have accumulated.
As Chad Vanvari explains, "A well-functioning sump pump is key to keeping your basement dry all year long".
Don’t forget about long-term maintenance. Backup batteries should be replaced every 2–3 years, and if your pump is more than 7 years old, it’s time to consider a replacement.
Lastly, don’t let winter catch you off guard. Test your battery backup system monthly during the colder months to ensure it’s ready to handle power outages.
As Nico Barbieri puts it, "A well-maintained sump pump and backup system protect your home from flooding regardless of weather".
Monthly Sump Pump Maintenance Checklist
Taking 10 minutes each month to inspect your sump pump can help you spot problems before they escalate. Before starting, unplug the pump and turn off the circuit breaker for safety.
Begin by using a flashlight to check the power cord for any signs of wear, corrosion, or loose connections. Then, inspect the pump itself for rust, cracks, or leaking seals. Test the float switch by moving it up and down to ensure it operates smoothly without any obstructions. At the base of the pump, clean the inlet screen with a wire brush to remove any buildup – this step is crucial since a clogged screen can restrict water flow and strain the motor.
Next, perform an operational test. Slowly pour around 5 gallons of water into the sump pit and observe. The float should rise, triggering the pump to turn on. It should drain the water quickly and shut off once the float lowers. Check that water is being discharged properly through the pipe and directed away from your home’s foundation. If you hear grinding, rattling, or excessive vibrations, the impeller could be damaged or jammed.
Finally, clean the sump pit itself. Use a wet vac to remove sludge and standing water from the bottom, and scoop out any debris like stones or leaves with a slotted spoon. Clean the relief hole (located between the discharge pipe and the check valve) using a cotton swab to prevent airlocks. Ensure the pump is sitting level and stable on a solid surface – vibrations during use can cause it to shift, potentially interfering with the float switch.
Seasonal Sump Pump Maintenance Tips
Keeping your sump pump in top shape means adjusting your maintenance routine to match the challenges of Canada’s changing seasons. From spring’s snowmelt to winter’s freezing temperatures, each season brings its own set of demands.
Spring: Preparing for Heavy Rain and Snowmelt
Spring is a critical time for sump pump maintenance in Canada. Melting snow combined with heavy rains can overwhelm your system if it’s not ready. Start by testing your pump: slowly pour one to two buckets of clean water into the sump pit. Watch to ensure the pump activates, drains the water completely, and shuts off properly. After this, use a shop vac to clear out sediment and debris, and scrub the inlet screen with a wire brush to maintain proper water flow.
Check the discharge line next. Make sure it’s free of ice, snow, and debris, and ensure it directs water at least 2 to 6 metres away from your home’s foundation. Manually move the float switch to confirm it’s operating smoothly without catching on dirt or stones. Don’t forget to test your battery backup system by unplugging the main pump and pouring water into the pit. Backup batteries typically need replacement every 2 to 3 years. A firm "thunk" when the pump shuts off signals that the check valve is functioning correctly.
With spring sorted, it’s time to prepare for summer’s unpredictable storms.
Summer: Managing High Water Tables and Storms
Summer storms can hit hard and fast, so regular checks are essential. Inspect your discharge pipes for clogs caused by grass, soil, or insect nests. Confirm that the float switch moves freely – any sticking or hesitation could mean debris is interfering with its function. If you notice a musty smell coming from the sump pit, clean it with a bleach-water solution and cycle out any stagnant water. Keep the pit lid securely in place to block dust, insects, and other debris from entering.
As the leaves start to fall, your focus will shift to managing debris.
Fall: Preparing for Leaves and Debris
Autumn can be tough on sump pumps, with leaves, stems, and dirt potentially clogging the system. Use a flashlight to inspect the sump pit regularly. Remove larger debris by hand, scoop out smaller sediment with a slotted spoon, and ensure the float arm moves freely. Clean the relief hole between the pump discharge and the check valve using a cotton swab to prevent airlocks. Additionally, clear your gutters and downspouts to limit water flowing toward your foundation. Keep an eye on the discharge pipe to ensure it’s not blocked by fallen leaves.
As temperatures drop, winter prep becomes your next priority.
Winter: Preventing Freezing and Power Issues
Frozen discharge lines are a common cause of basement flooding in colder provinces like Ontario and Alberta. To avoid this, wrap exposed pipes with foam insulation or heat tape. However, don’t rely on space heaters near the pump, as they can pose fire hazards. Ensure the discharge pipe extends at least 2 metres from your foundation and isn’t buried under snow or blocked by ice.
"Regular winter maintenance ensures your sump pump and battery backup system function properly when needed most."
– Nico Barbieri, Estimator and Project Manager, Aquatech Waterproofing
Test your backup system monthly by simulating a power outage to ensure it activates properly. Inspect backup batteries for signs of corrosion, leakage, or reduced charge – deep-cycle batteries usually last 3 to 5 years under normal conditions. Keep your basement temperature above freezing in unheated areas, and regularly clear the exterior end of your discharge pipe to ensure water flows away from your home without obstruction.
How to Test Your Sump Pump
Testing your sump pump every 3–6 months is a smart way to ensure it’s ready when you need it most. Plan these checks in early spring, before the wet season, and again in early fall. Before you start, make safety a priority: wear waterproof gloves, goggles, and rubber-soled shoes or boots to minimise the risk of electrical shock in damp conditions.
Start by simulating a real-world scenario. Pour about 5 gallons of water into the sump pit to mimic rising groundwater. Watch closely to ensure the float moves freely and triggers the pump at the correct water level. Once activated, step outside to confirm that water is being discharged at least 2 to 6 metres away from your home’s foundation. Afterward, make sure the pump shuts off automatically as the water level drops – this indicates the check valve is functioning properly.
Next, check how well the pump operates. If the water isn’t triggering the pump, you can manually raise the float switch to start the motor. However, avoid letting the pump run dry for more than a few seconds, as this can harm the motor. For pumps with dual cords, unplug both cords, then plug in only the pump cord. If the motor runs when you do this, the pump itself is fine, but the float switch might need attention.
Pay attention to unusual sounds during the test. Strange noises could signal a damaged impeller or a motor issue. If the motor runs but water isn’t being pumped out, unplug the unit and inspect the intake screen for debris like mud or stones. If the pump doesn’t start at all, check the "reset" button on your GFCI outlet – it might have tripped due to moisture. For pumps that have been idle over winter, unplugging and replugging the unit can sometimes reset the system.
These checks ensure your sump pump is ready to protect your basement from flooding whenever needed.
"A sump pump protects your home from basement flooding but won’t do much good if it’s not working right."
– Roto-Rooter
Maintaining Backup and Battery-Powered Sump Pumps
After ensuring your primary sump pump is in good shape, it’s just as important to keep your backup system ready for action. Backup sump pumps are your safety net when the main pump fails during a storm or power outage. To keep it reliable, check the battery charge every three to four months. Most modern systems make this easy with built-in indicator lights on the control box, showing the battery’s current status.
Even if the battery seems fine, replace it every 2 to 3 years to avoid unexpected failures. Batteries can fail without warning, and you might not realize there’s an issue until water starts pooling in your basement.
Test your backup system twice a year by unplugging the primary pump and filling the sump pit with water. The backup pump should kick in automatically when the water reaches the activation level. Many systems include alarms – either audible alerts or text notifications – to confirm the backup is working. During winter, test the system monthly since cold weather can reduce battery performance and freeze discharge lines. Regular testing ensures your backup is as dependable as your primary pump.
Battery maintenance is another key step. Clean the terminals twice a year to prevent corrosion. Look for any signs of damage, like leaks or swelling, and make sure all connections are secure. During your annual plumbing inspection, ask the technician to check for electrical issues that might not be obvious during routine checks. By keeping both your primary and backup sump pumps in top condition, you can protect your home from unexpected water damage all year long.
Common Sump Pump Problems and How to Prevent Them
Routine maintenance is essential, but it’s equally important to watch for common sump pump issues that could lead to basement flooding. Here’s what to look out for and how to address these problems.
Power failures are a major concern, especially during storms when sump pumps are needed the most. To avoid being caught off guard, consider installing a battery backup or a generator. These ensure your pump stays operational even if the power goes out during severe weather.
Another issue to watch for is frozen discharge lines, which can block water flow and lead to flooding. To prevent this, insulate the discharge lines and make sure water is directed at least 3 to 6 metres (10 to 20 feet) away from your home’s foundation.
Stuck float switches are another common problem. A float that gets tangled, pinned against the basin wall, or obstructed by debris can stop the pump from working or cause it to run non-stop. To prevent this, place your pump on level ground rather than directly on the basin floor, and check the float’s movement regularly to ensure it’s unobstructed.
Debris can also cause clogged inlets and impellers, affecting the pump’s performance. Use a properly fitted pit cover to keep larger debris out, and clean the inlet screen with a wire brush at least monthly during high-use periods. Strange noises like grinding, rattling, or whining could signal a jammed impeller, which needs immediate attention.
Lastly, failed check valves can allow water to flow back into the pit, making the pump work harder than necessary. To prevent this, verify that the valve’s arrow points away from the pump, indicating correct installation. If you notice water splashing back into the pit when the pump stops, it’s time to replace the valve. You can test for backflow by pouring in about 3 gallons of water and observing the results.
When to Repair or Replace Your Sump Pump
A typical sump pump lasts between 7 and 10 years, but if yours is nearing or surpassing this range, it might be time to think about replacing it. According to John Woodard from Fresh Water Systems, repairing an older pump often costs about the same as getting a new one, making replacement the smarter choice in many cases. If your pump operates frequently or you live in an area with a high water table, its lifespan may shrink to just 5–7 years.
But age isn’t the only factor to consider. Operational issues can also point to trouble. For instance, a pump that runs non-stop during dry periods may have underlying problems. Strange noises could mean worn-out components or a failing motor. If your pump cycles on and off erratically or doesn’t activate when it should, there could be wiring issues or it might lack the horsepower your home requires. Visible signs like rust, oil leaks, or a leaning pump are clear indicators that failure is imminent.
While some problems, like a stuck float switch or a clogged pipe, can be fixed relatively easily, more serious issues often mean it’s time for a replacement. If the motor is on its last legs, the pump is over 10 years old, or it’s simply not powerful enough for your needs, replacing it will likely save you money in the long run. A DIY replacement will cost between $200 and $300 for the pump and basic fittings, but hiring a professional can double that cost.
Leaquida Waterproofing provides expert sump pump installation and maintenance services in Toronto and nearby areas. Their skilled technicians can help you decide whether a repair will suffice or if a replacement is the better option. Professional installation ensures your pump is positioned and functioning correctly.
Don’t wait for a basement flood to address sump pump problems. Regular inspections can help you catch issues early. Annual professional check-ups are especially useful for spotting motor wear, electrical problems, or foundation sealing issues that you might miss during routine checks.
"Although it adds an upfront cost to your budget, [an annual tune-up] is far less expensive than dealing with the cleanup after a failed sump pump issue."
– Chad Vanvari, President of Flood Services Canada
Addressing potential problems promptly can keep your sump pump running smoothly and extend its lifespan.
Cost of Sump Pump Maintenance and Replacement
Understanding the costs associated with sump pump maintenance and replacement can help you avoid unexpected expenses. Many routine maintenance tasks are simple and free if you do them yourself. Tasks like testing the pump monthly with a bucket of water, clearing debris from the pit, and inspecting the discharge line don’t require professional assistance. However, scheduling an annual professional inspection typically costs between $100 and $200 – a small price compared to the potential cost of repairing flood damage.
Certain components will occasionally need replacement, which can add to your overall maintenance expenses. For example, float switches should be replaced roughly every two years, while backup batteries generally need replacing every two to three years. Backup batteries alone can cost anywhere from $150 to $250.
When your sump pump requires a full replacement, the costs can vary. Professional installation typically ranges from $300 to $750. The pump unit itself costs between $100 and $400, depending on the model and horsepower, with submersible pumps generally being more expensive than pedestal models. If you prefer a DIY approach, expect to spend about $527 on parts and materials, though hiring a plumber adds less than $300 to that total. Professional installation ensures the pump is positioned correctly, electrical connections are safe, and local building codes are followed.
Leaquida Waterproofing, a trusted service provider in Toronto and nearby areas, offers clear pricing for sump pump installation and maintenance. Their skilled technicians can evaluate your home’s specific needs and provide accurate cost estimates. Regular maintenance and timely replacements are crucial to preventing basement water damage, which could cost you thousands. By planning for these expenses, you can ensure your sump pump is ready to protect your home year-round.
Conclusion
Your sump pump might not grab your attention daily, but it’s a quiet hero when it comes to shielding your basement from flooding, foundation damage, and mould issues. Keeping it in good shape isn’t just a good idea – it’s a necessity to ensure it’s ready to perform when needed.
Simple maintenance can make all the difference. Monthly tests, seasonal cleaning, and winterising your discharge lines can help prevent breakdowns. Adding an annual professional inspection to check the motor, electrical connections, and float switch is a wise move that can save you from costly and stressful flood damage.
Leaquida Waterproofing provides sump pump installation and maintenance services across Toronto and nearby regions. Their team knows the specific needs of homes in the Greater Toronto Area, whether it’s dealing with spring snowmelt or navigating the City of Toronto’s Basement Flooding Protection Subsidy Program. From routine maintenance to emergency repairs and even assistance with rebates of up to CA$3,400, they offer straightforward pricing and dependable service.
FAQs
How do I know if my sump pump needs to be replaced?
To figure out if your sump pump needs replacing, start by giving it a simple test. Pour some water into the sump pit and check if the pump kicks on and efficiently clears the water. If it doesn’t start, works sluggishly, or makes odd noises like grinding or rattling, it could have mechanical problems or worn-out components that need attention.
Other red flags include the pump frequently cycling on and off, visible rust or corrosion, or if it’s been in use for over 7–10 years. While regular maintenance can help prolong its lifespan, persistent problems likely mean it’s time to invest in a new one.
What are the warning signs that your sump pump might be failing?
A sump pump that’s on the verge of failing often gives off clear warning signs. These might include the pump failing to activate when water fills the sump pit, draining water too slowly or not completely, or making unusual sounds like grinding or rattling. You might also notice visible issues, such as corrosion, cracks, or worn-out parts, which can signal trouble – especially during periods of heavy rain or melting snow.
Staying on top of regular maintenance and addressing these problems early can save you from expensive water damage in your basement or crawl space.
How often should I check my sump pump’s battery backup?
To keep your sump pump’s battery backup in top shape and ready for power outages, make it a habit to test it every three months. These regular check-ups ensure the battery stays charged and works as it should, so you’re prepared when unexpected storms or power failures hit.
If you spot any problems – like weaker performance or trouble holding a charge – it’s time to replace the battery. This simple step helps ensure your home remains well-protected.
 CLOGGED OR BROKEN WEEPING TILE