A leaking basement can lead to serious issues like foundation damage, mould growth, and reduced property value. Fixing leaks from the inside is often more practical and less disruptive than exterior solutions. Here’s a quick breakdown of common causes, how to address them, and ways to prevent future problems:
- Causes of Basement Leaks: Hydrostatic pressure, foundation cracks, poor drainage, and window well issues.
- Temporary Fixes: Use hydraulic cement for active leaks, epoxy/polyurethane injections for small cracks, and waterproof paints for minor dampness. These are short-term solutions.
- Permanent Solutions: Seal foundation cracks with epoxy or polyurethane, install interior drainage systems with sump pumps, and apply durable wall coatings or vapour barriers.
- Prevention Tips: Maintain gutters, ensure proper grading, install backwater valves, and keep humidity levels below 50%.
Interior fixes are often more cost-effective, with average costs in Canada ranging from CA$5,000 to CA$15,000, depending on the method. Regular maintenance and early intervention can save you from costly repairs later.
How to Stop Water Leaks In Your Basement With Hydraulic Cement
sbb-itb-5761e20
What Causes Basement Leaks
Understanding the common causes of basement leaks – especially during spring thaw and heavy rainfall – can help you address the problem effectively. Below, we break down the key factors contributing to basement leaks.
Hydrostatic Pressure and Groundwater Buildup
After heavy rain or snow melts, the soil around your home becomes saturated. This creates hydrostatic pressure, which pushes water against your basement walls. Over time, this pressure can force water through cracks, joints, or even porous sections of the concrete foundation.
During construction, loose backfilled soil around your foundation can act like a sponge, trapping water and increasing the pressure on your walls. If you notice water pooling where the basement floor meets the wall (commonly called the cove joint), that’s often a clear sign of hydrostatic pressure at work.
Foundation Cracks
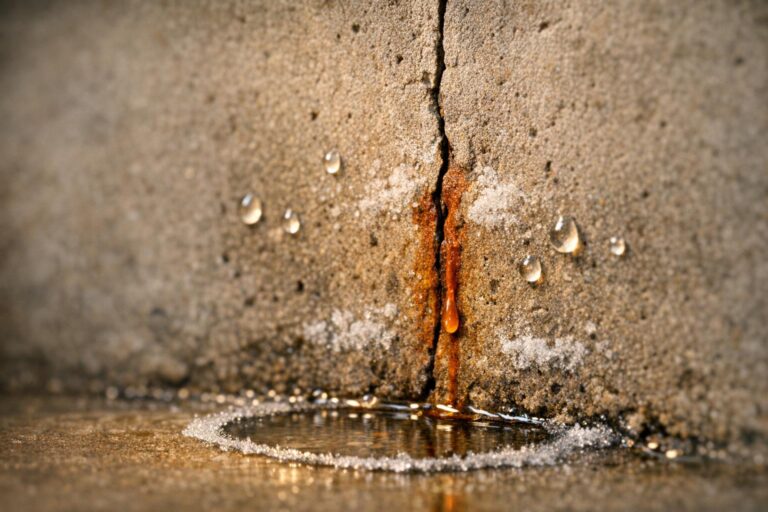
Cracks in your foundation are often caused by natural settling, temperature changes, or soil movement. While hairline cracks are generally harmless, cracks wider than 1/8 inch may require immediate attention.
“Water is the enemy of a strong foundation. Left unchecked, water seepage can lead to cracks, leaks, and even structural damage.” – Foundation Brothers
Another warning sign is the appearance of white, chalky deposits known as efflorescence. This residue forms when water carries minerals through your foundation walls, leaving behind visible traces.
Poor Drainage Systems
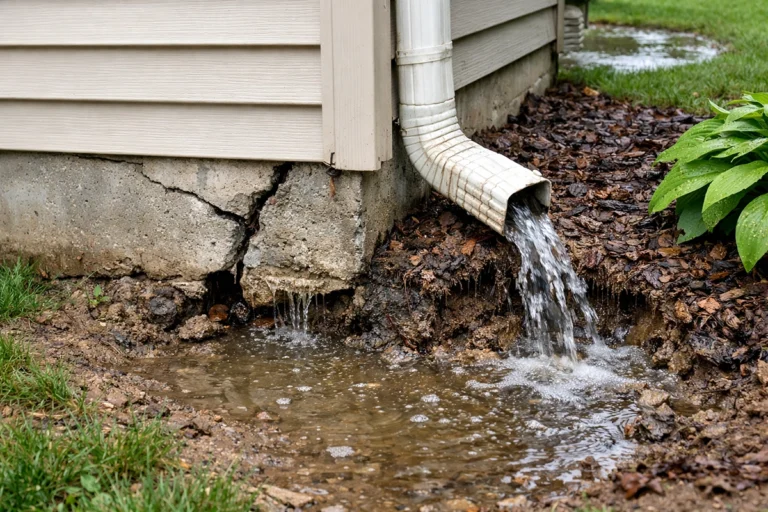
Improper drainage around your home can lead to water pooling near your foundation, increasing the risk of leaks. Common culprits include clogged gutters or downspouts that don’t extend far enough – ideally, they should discharge water at least 1.5–1.8 m (5–6 ft) away from your foundation.
Additional drainage issues include malfunctioning sump pumps, interior drain problems, or even a yard that slopes toward your house. All of these factors can worsen water intrusion.
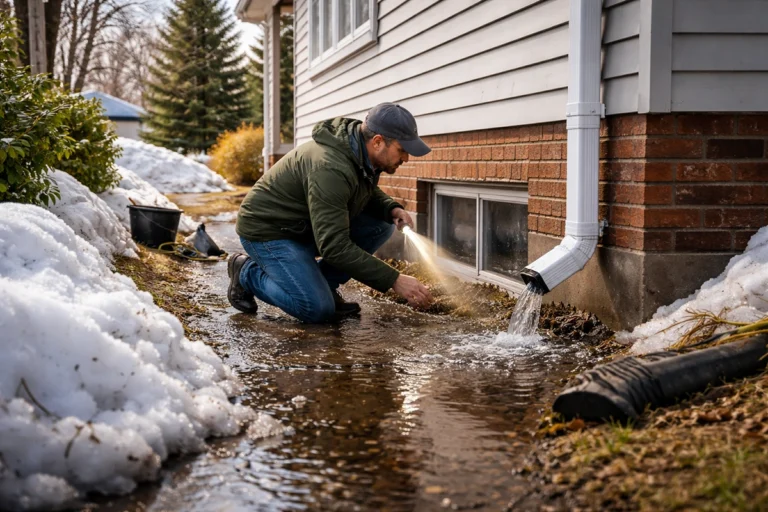
Basement Window Leaks
Basement windows can also be a weak spot. If window wells are uncovered or poorly drained, they can fill with rainwater, debris, or melted snow. This often forces water through unsealed or damaged window frames.
| Cause | What Happens | Common Sign |
|---|---|---|
| Hydrostatic Pressure | Water is forced through walls and floors | Water at cove joints or floor cracks |
| Foundation Cracks | Cracks form from settling or soil movement | Visible cracks, white efflorescence |
| Poor Drainage | Water pools near the foundation | Standing water near exterior walls |
| Window Wells | Overflowing wells force water through frames | Water stains around window frames |
How to Identify the Source of the Leak
Figuring out where a leak originates is key to addressing the issue effectively while avoiding unnecessary repairs.
Look for Visible Signs of Water Intrusion
Begin by inspecting your basement walls and floors for any telltale signs of water. Water stains often show up as brown streaks or rusty patches, while peeling or bubbling paint can indicate trapped moisture. Keep an eye out for efflorescence – a white, chalky residue left behind when water evaporates from concrete and deposits minerals. Other signs include soft or sagging drywall, rotted wood near window frames, and cracks in the foundation.
You can also try the aluminium foil test. Tape a piece of foil to your basement wall and leave it for several days. If the side facing the room is wet, the issue is likely condensation from indoor humidity. If the wall-facing side is wet, water is likely seeping in from outside.
Test Basements During Rain
The timing of water appearance can provide clues about the source. If water only shows up during or after heavy rain, it likely points to external drainage issues, such as clogged gutters or poor grading. On the other hand, constant water presence may indicate high groundwater levels or ongoing hydrostatic pressure. To investigate, use a flashlight to inspect your basement during rain, especially around the cove joint (where the walls meet the floor), for any signs of water entry.
“Draw a quick diagram of your basement, mark the damp areas, and note when water appears. Patterns emerge quickly, making diagnosis easier.” – Gamcon
Before a storm, clean your basement walls to remove dust and dirt. This makes it easier to spot fresh water tracks or damp spots during rainfall. While inspecting inside, step outside to ensure gutters aren’t overflowing and that downspouts are directing water at least 1.8 m (6 ft) away from your foundation.
These steps can help narrow down the potential sources of the leak.
Check Foundation Cracks and Windows
Next, map out the damp areas in your basement to detect patterns. Pay close attention to window wells, as debris can trap water and cause leaks. Additionally, examine areas where pipes or wires enter the basement – these points are often improperly sealed and can allow water to seep through. Finally, inspect corners of the basement for signs of poor drainage or structural issues.
| Leak Location | Likely Source | Common Signs |
|---|---|---|
| Cove Joint (wall/floor) | Hydrostatic Pressure | Water bubbling up at the seam during heavy rain |
| Mid-Wall | Foundation Cracks | Visible vertical or diagonal cracks; water “weeping” from a specific point |
| Window Frames | Window Well Issues | Water tracks below the window; rotted wood casings |
| Pipe Penetrations | Improper Sealing | Moisture around utility entry points |
Temporary Fixes for Basement Leaks
When to Use Temporary Fixes
Temporary fixes can be helpful when dealing with cracks smaller than 6 mm, slight dampness, or in emergency situations. These solutions act as short-term barriers but won’t address the root cause of the issue. If you notice more serious signs, like cracks wider than a dime, bowing walls, or high water pressure, it’s best to skip the DIY approach and call in a professional. Keep in mind, these fixes don’t resolve the hydrostatic pressure that forces water through your foundation – they just help manage the problem temporarily.
Examples of Temporary Fixes
One effective option is hydraulic cement, which is great for stopping active leaks. Its quick-setting properties and ability to cure underwater make it ideal for sealing holes or cracks where water is flowing. To apply it, widen the crack into an inverted “V” shape using a cold chisel, clean the area with a wire brush to remove any efflorescence, and then apply the hydraulic cement.
For smaller, dry cracks, epoxy or polyurethane injection kits are a good choice. These kits create a watertight seal and are particularly effective for hairline foundation cracks when applied correctly. Prices for these kits can vary, but they are widely available for DIY use.
Waterproof paints and coatings, such as Drylok, provide a temporary vapour barrier for interior surfaces. However, these solutions are not long-lasting. As Basement Systems explains:
“Waterproof paints and coatings… work for a few months, or maybe a couple years, before breaking down. Once it does, the waterproof paint will begin to bubble, peel, and flake off”.
If basement windows are leaking, you can try installing window well covers or sealing gaps around the frames with high-quality caulk or spray foam insulation. Additionally, extending your downspouts 1.2 to 1.8 metres (4 to 6 feet) away from the foundation can help reduce water pressure against your basement walls.
These temporary measures can help stabilize the situation until you’re ready to invest in permanent interior repairs.
Permanent Interior Solutions for a Leaking Basement
Once you’ve tried temporary fixes, it’s time to move on to permanent interior methods that tackle hydrostatic pressure and keep your basement dry for the long haul.
Sealing Foundation Cracks from the Inside
The best approach for sealing cracks depends on their type. Epoxy injections are ideal for structural cracks, as the resin not only creates a watertight seal but also bonds to the concrete, reinforcing it. On the other hand, polyurethane injections are better suited for non-structural cracks, particularly those that may expand or contract due to temperature changes. This material remains flexible, ensuring the seal stays intact.
Before applying any sealant, clean the crack thoroughly with a wire brush to remove dirt, dust, or peeling paint. This step ensures the sealant adheres properly to the concrete surface. If the crack is unusually wide or uneven, it’s wise to consult a professional.
Some systems, like FlexiSpan, combine a polyurethane sealant with a foam strip that channels any residual seepage into a drainage system or drywell. This two-layer system adds an extra layer of security against heavy rainfall and rising groundwater. As Basement Systems explains:
“When properly done, sealing leaking wall cracks is a permanent, effective solution”.
Once the cracks are sealed, the next step is to tackle groundwater pressure with an interior drainage system.
Installing an Interior Drainage System
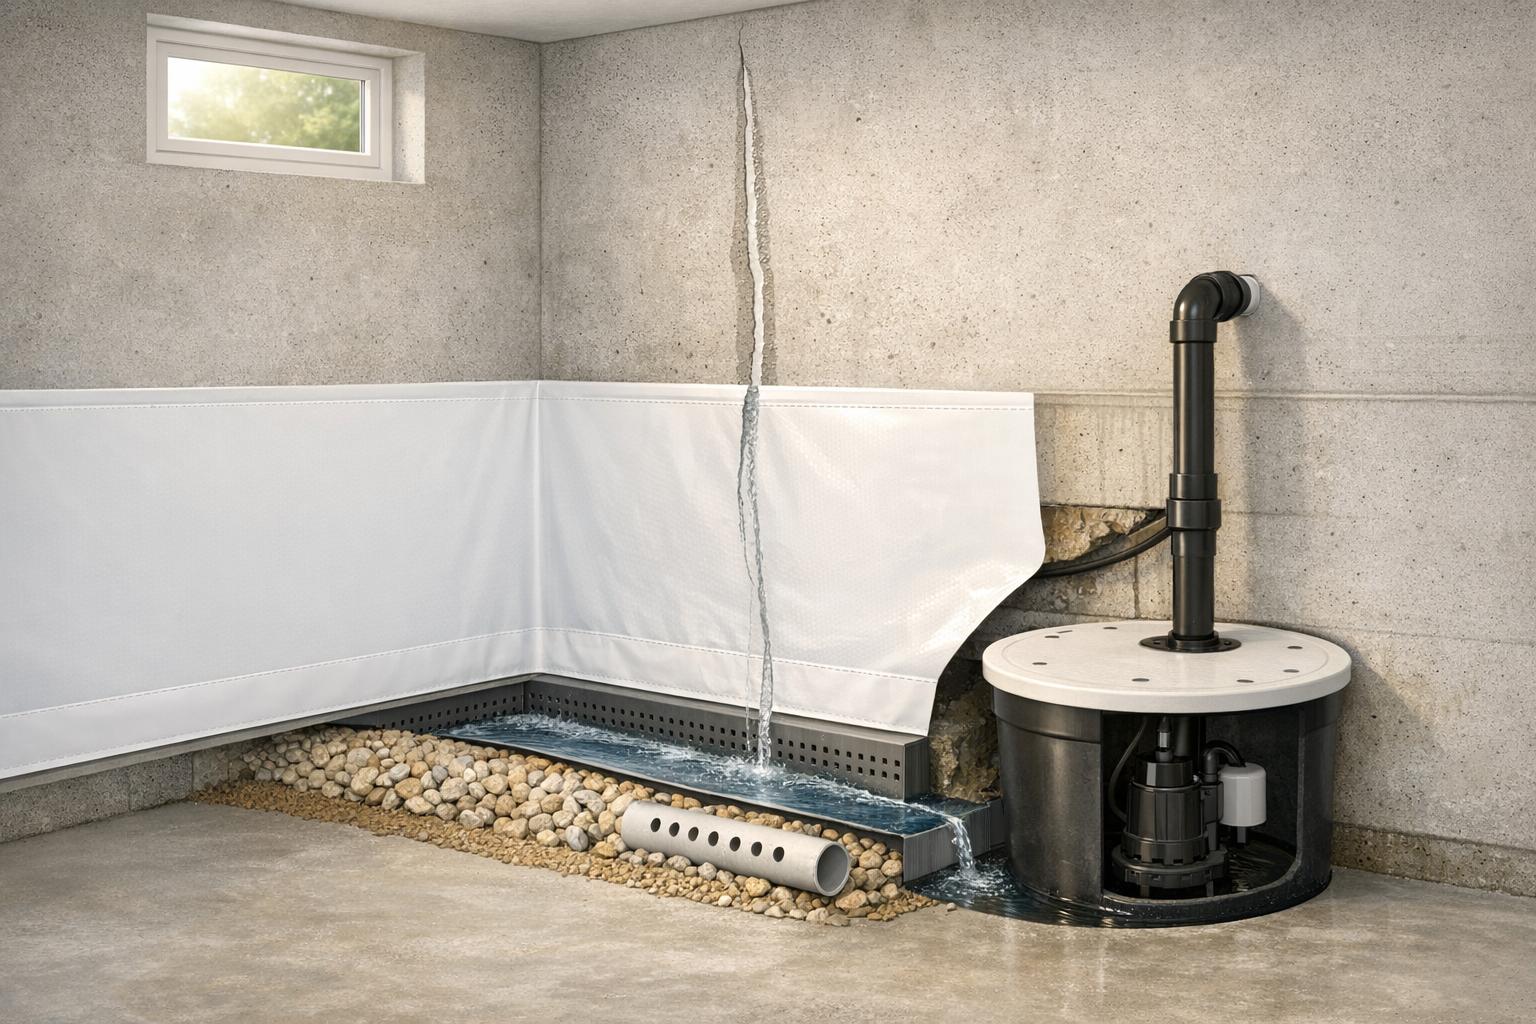
An interior drainage system is a long-term solution designed to capture water before it causes damage. This method is particularly effective at managing groundwater and reducing hydrostatic pressure that pushes water through your foundation. The system typically includes perforated drainage tubing (commonly known as a French drain), a sump pit, and a sump pump.
To install the system, a section of the concrete floor along the interior perimeter – usually 30 to 45 centimetres (12 to 18 inches) wide – is removed. A trench is then dug in the subfloor. The drainage tubing is placed in the trench, positioned either on or beside the foundation footing, and surrounded with gravel for stability. Water collected by the tubing flows to a sump basin located at the lowest point of the basement floor, where a pump directs it outside through discharge lines.
This type of system is a proven, permanent fix and is typically installed in just one day. It also costs about half as much as exterior waterproofing. To ensure reliability during storms, choose a sump pump equipped with a battery backup and a check valve – this is especially important because power outages often coincide with heavy rain.
Once the drainage system is in place, you can add another layer of protection by waterproofing your basement walls.
Applying Basement Wall Waterproof Coatings
For sealing basement walls, you have several options. Silicate-based sealers chemically bond to the concrete, sealing microscopic pores. Elastomeric coatings, on the other hand, create a durable, paint-on barrier. For more serious leaks, liquid rubber sealants offer a flexible and long-lasting solution.
However, many experts recommend 12-mil vapour barriers or rigid plastic wall panels instead of relying solely on paint-on coatings. These systems are mechanically fastened to the walls and direct water seepage into the interior drainage system, addressing the root cause of the problem rather than just the symptoms.
Before you apply any coating, clean the surface to remove loose material and efflorescence (the white, powdery residue) using a wire brush and masonry cleaner. Apply at least two coats of the product, brushing in different directions to ensure complete coverage and fill any pinholes. Waterproofing coatings generally last about 10 years, though their lifespan depends on the level of hydrostatic pressure. In Ontario, professional waterproofing services typically cost between $3.50 and $6.50 per square foot.
Dealing With Basement Window Leaks
Fixing basement window leaks is a key part of keeping your interior dry and protected. Older basement windows often let water in due to worn-out seals or frames that aren’t designed to keep moisture out. Water can seep through gaps in the frame or flood in when window wells fill up with rainwater and debris.
Installing Window Well Covers
A good way to stop water from pooling in window wells is by adding covers. These covers act as a shield, keeping out rain, melting snow, and debris like leaves and dirt that can clog drains and cause flooding. By keeping water from building up, they reduce the chance of moisture being forced through the windows.
Choose covers that fit tightly, are clear or sloped to shed water, and still allow light to pass through. Make it a habit to check twice a year that the drains inside the wells are free of blockages. Once the wells are secure, you can focus on sealing the window frames to address any remaining leaks.
Sealing Window Frames
After securing the window wells, turn your attention to sealing the window frames. Use masonry caulk to seal small gaps (up to 6 mm) around the frame, creating a watertight barrier. For larger gaps, or for extra reinforcement, spray foam insulation can be applied around the frame’s edges.
Before sealing, inspect the window casings for signs of decay or rust – these are common weak spots where water sneaks in. Also, check for water stains or mineral deposits on the wall below the window, as these are tell-tale signs of leaks that need attention.
Mould Prevention After Fixing the Leak
Once interior leaks are sealed for good, the next step is just as important: stopping mould from taking hold. Mould thrives in damp conditions and can grow on surfaces within just 24–48 hours. Health Canada warns that indoor mould poses serious health risks, contributing to asthma, bronchitis, and respiratory infections. Alarmingly, about 92% of inspected basements show signs of mould, often hidden, leaving only 8% completely mould-free. So, acting quickly after waterproofing is essential.
Drying and Dehumidifying the Basement
Getting rid of moisture is your first defence against mould. Start by removing any standing water. For small puddles, a mop will do, but for larger amounts, use a wet/dry vacuum. If flooding is severe, a submersible sump pump is your best bet. Increase air circulation by opening windows and doors (if outdoor humidity is low) and using powerful fans to dry floors and walls.
Run a dehumidifier continuously for 48 hours to pull moisture from the air. Place it 15–20 cm away from walls for optimal airflow. For basements under 1,000 square feet, a 70-pint dehumidifier is sufficient, but larger or wetter spaces may need a unit with a 100+ pint capacity. Canadian winters can be harsh, so look for models that operate efficiently in temperatures as low as 5°C and offer continuous drainage. After the initial drying phase, aim to keep humidity levels between 30% and 50%, with 45% being the sweet spot for mould prevention.
Some materials just can’t be saved. Discard porous items like carpet padding, drywall, insulation, and cardboard, as they trap moisture and become perfect breeding grounds for mould.
Applying Mould-Resistant Coatings
Once the basement is dry and clean, protect the surfaces with mould-resistant coatings. Proper preparation is key here. Use a wire brush to remove loose debris, dust, and peeling paint. If you notice white, powdery mineral deposits (efflorescence), clean them off with a masonry cleaner or a diluted muriatic acid solution. Make sure the surfaces are completely dry before applying any coating – fans or heaters can help speed this up.
For non-porous surfaces like concrete, metal, or glass, scrub with unscented soap and water or a bleach solution (1 cup of bleach per gallon of water) to kill bacteria and mould spores.
Next, patch up any visible cracks or holes using hydraulic cement, which expands as it dries to create a watertight seal. When applying the mould-resistant coating, brush in multiple directions to ensure thorough coverage and seal every pinhole. Apply two to three coats, letting each coat dry completely before adding the next.
Products like Drylok, priced around CA$50 per gallon, can cover 75 to 100 square feet. For a 300-square-foot wall needing multiple coats, you’re looking at a cost of roughly CA$500. Pay extra attention to the joints where walls meet floors, as these are common spots for moisture to sneak in.
When Interior Repairs Are Not Enough
If leaks persist despite interior fixes, it often points to a more serious issue. Studies show that about 90% of basements experience failed interior sealing, highlighting that recurring leaks might need more than just patchwork solutions. This is where structural warning signs come into play.
Structural warning signs demand immediate attention. Features like horizontal or stair-step cracks, a positive dime test, or bowing walls suggest structural movement and hydrostatic pressure – problems that can’t be solved with caulking or quick fixes. These situations require professional intervention to address the underlying structural issues.
Beyond cracks and bowing walls, it’s crucial to inspect cove joints. Water pooling at the cove joint often indicates that groundwater pressure is overwhelming the interior drainage system, pointing to exterior drainage problems. If leaks occur mainly during heavy rain or spring snowmelt, the root cause is likely poor grading or failing gutters rather than a simple wall defect.
When interior repairs fall short, exterior solutions become necessary. Porous concrete and water trapped in block walls can force moisture inside, weakening the structure and promoting mould growth. In such cases, excavation to install an exterior membrane or upgraded drainage system is essential. While exterior waterproofing is more expensive – ranging from CA$10,000 to CA$20,000+ in Ontario compared to CA$3,000 to CA$10,000 for interior repairs – it’s a critical investment in your home’s long-term foundation and structural health. Addressing these issues now ensures the stability and safety of your home for years to come.
Cost of Fixing a Leaking Basement from the Inside
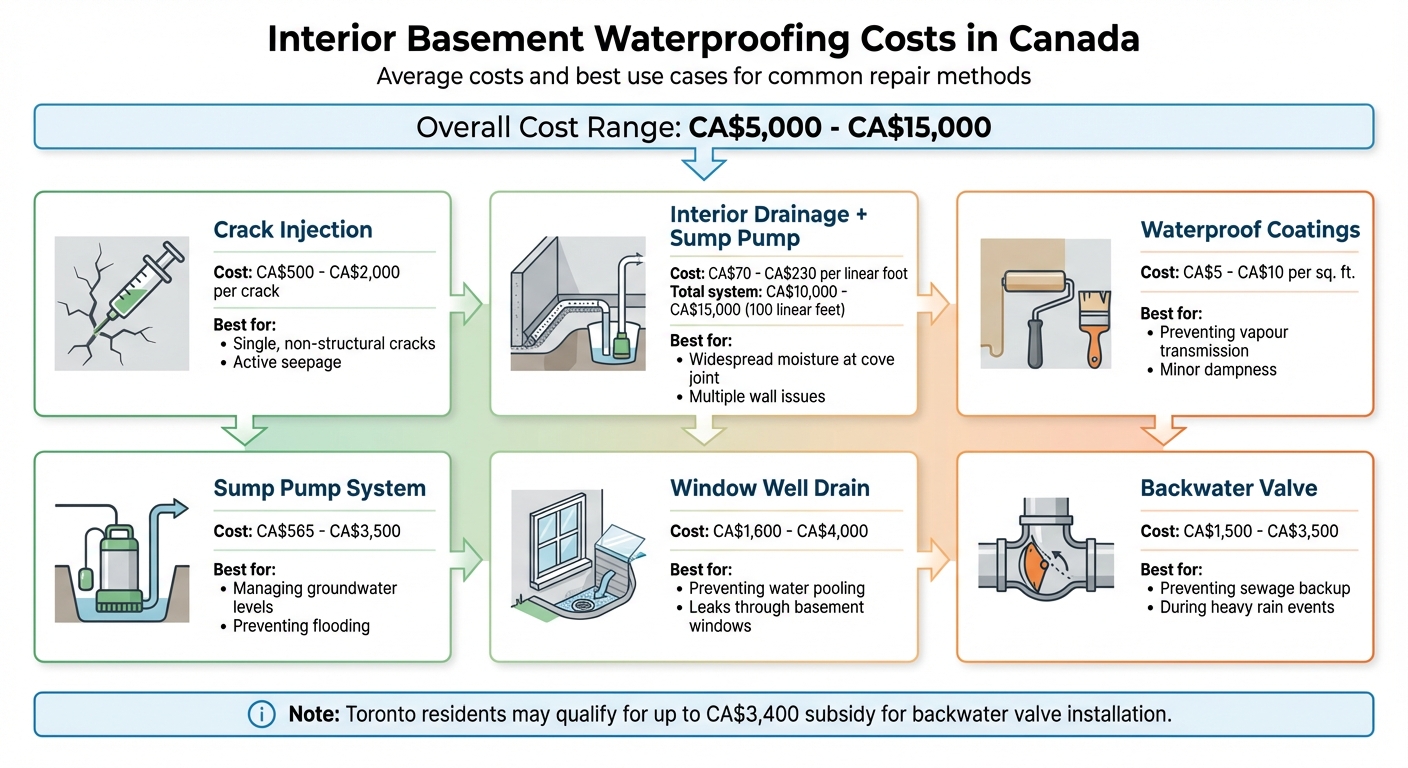
Cost Comparison of Interior Basement Waterproofing Methods in Canada
In Canada, the cost of interior waterproofing typically falls between CA$5,000 and CA$15,000, depending on the repair method, the extent of treatment, and the specific issues being addressed.
For isolated, non-structural cracks, foundation crack injection is a budget-friendly option, costing CA$500 to CA$2,000 per crack. However, if the problem involves widespread moisture at the cove joint, an interior drainage system is often necessary. This solution costs CA$70 to CA$230 per linear foot, meaning a standard 100-linear-foot installation combined with a sump pump will likely range from CA$10,000 to CA$15,000. Here’s a breakdown of common repair methods and their associated costs:
| Repair Method | Average Cost (CAD) | Suitable Use Case |
|---|---|---|
| Crack Injection | $500 – $2,000 per crack | Single, non-structural cracks with active seepage |
| Interior Drainage + Sump | $70 – $230 per linear foot | Widespread moisture at the cove joint or multiple wall issues |
| Waterproof Coatings | $5 – $10 per sq. ft. | Preventing vapour transmission and minor dampness |
| Sump Pump System | $565 – $3,500 | Actively managing groundwater levels and preventing flooding |
| Window Well Drain | $1,600 – $4,000 | Preventing water pooling and leaks through basement windows |
| Backwater Valve | $1,500 – $3,500 | Preventing sewage backup during heavy municipal rain events |
These costs highlight the range of solutions available for managing basement leaks, from addressing minor cracks to installing systems that handle more extensive moisture problems.
Tips to Prevent Future Basement Leaks
Once you’ve dealt with a basement leak, it’s time to think ahead. Preventing future water issues is not only smarter but also more economical. Exterior waterproofing, for instance, can cost up to three times more than interior fixes. Taking the right steps now can save you from bigger headaches later by tackling external water problems before they reach your home.
Maintain Exterior Drainage Systems
Keeping your drainage system in top shape is key. Clean your gutters and downspouts every three months to prevent blockages and water overflow near your foundation. Want to make the job easier? Gutter guards can help reduce debris buildup. Also, ensure your downspouts direct water at least 1.5–1.8 metres (5–6 feet) away from your home’s foundation. Don’t forget to clear out window wells before winter to stop water from pooling. And while you’re at it, test your sump pump monthly to make sure it’s ready to handle any storms.
Ensure Proper Grading
The slope of the ground around your house plays a big role in keeping water out. Ideally, the ground should drop about 15 cm (6 in) over 1.8 metres (6 ft). This slope directs water away, reducing pressure on your foundation. Check your grading every year with a four-foot level and tape measure – soil tends to settle and shift over time. If you notice garden edging or heavy gravel trapping water near your foundation, remove it. Also, keep drainage swales between homes clear of debris so water can flow freely.
Install Backwater Valves
Grading isn’t the only defence. Protecting your basement from sewer backups is just as important, especially if you live in areas with heavy rainfall. A backwater valve prevents city sewage from flowing into your home during storms. The City of Toronto even offers subsidies of up to CA$3,400 for installing these valves. Make sure a licensed plumber handles the installation, ensuring the foundation drains connect downstream. Once installed, clean the valve annually through its clean-out ports to keep it working smoothly. And remember: avoid flushing wipes, dental floss, or pouring grease down your drains, as these can clog the system and lead to backups.
| Maintenance Task | Frequency | Purpose |
|---|---|---|
| Clean Gutters & Downspouts | Every 3 Months | Prevent clogs and overflow near the foundation |
| Test Sump Pump | Monthly | Ensure functionality during heavy rain/power outages |
| Inspect Yard Grading | Annually | Maintain a positive slope away from the house |
| Clear Window Wells | Seasonally | Prevent water accumulation against basement windows |
| Check Downspout Extensions | Every 3 Months | Ensure water is discharged 1.5–1.8 m (5–6 ft) away |
Conclusion
A leaking basement isn’t something you can afford to overlook. Water intrusion can wreak havoc on your home’s foundation, encourage mould growth, and reduce its overall value. As Virginia Foundation Solutions puts it:
“Water problems in basements usually don’t show up with a splash. They sneak in. Quietly. Slowly. Until one day it’s not just a damp spot, it’s ruined drywall, mould in the air, and foundation cracks”.
The good news? Most leaks can be tackled from the inside, avoiding the need for expensive excavation.
As discussed, the first step is pinpointing the source of the water – whether it’s cracks, poor drainage, or issues with windows. For minor leaks, solutions like hydraulic cement and waterproof coatings can often do the trick. For more persistent problems, an interior drainage system paired with a sump pump can effectively manage hydrostatic pressure and keep your basement dry over the long haul. Addressing these issues early on helps you avoid more severe structural damage down the road.
Once repairs are complete, regular maintenance is key. Keep your gutters clean, check the grading around your home annually, and use a dehumidifier to maintain humidity levels below 50%. With proper care, a well-repaired basement can remain dry and functional for 20 to 30 years or more.
Don’t wait for a small damp spot to turn into a costly disaster. Inspect your basement after heavy rainfall, test your sump pump regularly, and repair any cracks as soon as they appear. Staying proactive with inspections and repairs will keep your basement dry and safe, safeguarding your home’s structure, your family’s health, and your financial investment.
 CLOGGED OR BROKEN WEEPING TILE