If water in your basement has become a recurring issue, you’re not alone – 60% of homes face moisture problems, with basements being the most affected area. Whether it’s heavy rain, snowmelt, or hydrostatic pressure, these challenges can lead to mould, structural damage, or even foundation failure. Fixing these problems can cost between CA$1,900 and CA$6,000, but proper waterproofing saves you from far more expensive repairs. Here’s a quick breakdown of the seven steps to protect your basement:
- Identify Moisture Sources: Check for water stains, musty smells, or cracks. Test during heavy rain to spot leaks.
- Fix Exterior Drainage: Ensure soil slopes away from your foundation and downspouts discharge water at least 2–3 m away.
- Seal Foundation Cracks: Use polyurethane, epoxy, or hydraulic cement for cracks under 3 mm. Larger cracks need professional help.
- Apply Interior Coatings: Use waterproofing sealers like silicates or epoxy to block moisture on walls and floors.
- Install Interior Drainage & Sump Pumps: Redirect groundwater with French drains and a sump pump system.
- Add Exterior Waterproofing Membranes: Protect your foundation from outside water with membranes and drainage boards.
- Maintain Your System: Regular inspections, sump pump tests, and gutter cleaning keep your basement dry.
Some tasks, like sealing small cracks or extending downspouts, can be done yourself. For larger issues like structural cracks or persistent flooding, call professionals like Leaquida Waterproofing for expert solutions. A dry basement not only protects your home but also gives you peace of mind.

7 Essential Steps to Waterproof Your Basement
How to Waterproof a Basement | This Old House

Step 1: Identify Moisture and Water Sources
Before diving into repairs, it’s essential to figure out where the moisture in your basement is coming from and how severe the problem is. The American Society of Home Inspectors reports that more than 60% of basements deal with some level of moisture seepage, while around 38% face mould and fungus issues due to high humidity levels. Catching these problems early can save you from expensive fixes down the road.
Common Signs of Water Problems
Start by checking for visible signs of water intrusion. Look for water stains on walls or floors – these often show up as dark spots or discolouration. Another red flag is efflorescence, which appears as a white, chalky residue on concrete walls. This happens when water evaporates and leaves behind mineral deposits, signalling capillary water seepage. Other indicators include peeling paint, damp carpets, musty smells, and cracks in the foundation walls or floors. Even small cracks can let water in. Don’t forget to inspect steel posts or water heaters for rust, and check wood panelling, drywall, or partitions for signs of decay or discolouration. Condensation on pipes, ducts, or windows is another clue that there’s too much moisture in the air.
How to Inspect Your Basement
For the best results, inspect your basement during or right after a heavy rainstorm. This timing makes it easier to spot exactly where water might be entering. Here’s a simple test: tape a 30‑cm square of foil to the wall and leave it there for two days. If the side facing the room is wet, you’re dealing with condensation. If the side touching the wall is wet, water is seeping in from outside.
Also, take a look at the exterior drainage around your home. Make sure the soil slopes away from your foundation – about 15 cm over the first 3 m – and that downspouts discharge water at least 2–3 m away from the house. You can use a garden hose to wet specific areas outside and check for drainage issues or weak spots in the foundation. Identifying these problems will help you decide if you need professional help.
When to Contact Leaquida Waterproofing

Certain situations call for expert assistance. If you notice active flooding, standing water, or water pooling on the floor, it’s time to get in touch with Leaquida Waterproofing. Likewise, if you see large foundation cracks, bowing walls, or signs of structural damage caused by hydrostatic pressure, professional help is a must.
Persistent problems like musty smells, mould growth, or ongoing dampness – even after running a dehumidifier – are also reasons to seek expert advice. If interior coatings or sealants fail quickly, it could be due to high hydrostatic pressure, which requires professional evaluation. Leaquida Waterproofing offers free assessments to identify the root cause of water issues and recommend the right repairs. Once immediate concerns are addressed, you’ll be ready to move on to the next steps to protect your basement.
Step 2: Fix Exterior Drainage and Grading
After pinpointing where water is entering your basement, the next step is to manage how water flows around your foundation. The aim here is simple: keep water moving away from your home instead of letting it pool against your foundation walls.
Grading and Landscaping Essentials
The soil around your foundation should slope downward, away from the house. Ideally, the ground should drop at least 15 cm over the first 3 metres from the foundation. This natural slope helps rainwater and melting snow flow away from your home rather than soaking into the soil near the foundation.
To check your grading, observe your property during or right after a heavy rainstorm. Watch for water pooling near the foundation or flowing toward the house instead of away from it. For a more precise check, use a string level or a carpenter’s level attached to a long straightedge. Place one end against the foundation and extend it 3 metres out – the ground at the far end should be noticeably lower.
If the ground is flat or slopes toward your house, you’ll need to add clean fill dirt to create a positive slope. Also, ensure that landscaping elements, like flower beds or decorative edging, don’t block water from flowing away from your home. Low spots near the foundation, often caused by settling backfill, should also be filled in.
If your home is at the bottom of a hill, you might need to dig a swale. A swale is a shallow, sloped ditch designed to redirect runoff around your property. This is particularly useful in areas with heavy clay soil, which tends to absorb water slowly.
Keeping Gutters and Downspouts in Check
Once your grading is in order, it’s time to make sure your gutters and downspouts are doing their job. Gutters and downspouts should be cleaned at least twice a year – spring and autumn are ideal times – to prevent clogs from leaves and debris. Installing leaf guards can also help reduce the build-up of debris.
Your downspouts should direct water at least 3 to 4.5 metres away from your foundation. At the discharge point, check to ensure water flows freely and doesn’t pool or run back toward the house. If space is tight, underground drainage pipes can help carry water further away from your home’s perimeter.
During or after a heavy rainstorm, inspect your gutters for leaks or signs of wear and tear. Even small leaks can funnel water to specific spots, causing localized saturation near your foundation.
When Exterior Grading Isn’t Enough
Sometimes, proper grading and gutter maintenance aren’t enough to solve the problem. If you’re dealing with bowing walls, large foundation cracks, or persistent efflorescence despite your efforts, it may be time to call in professionals for waterproofing.
Homes in areas with high groundwater levels or those near lakes, rivers, or other water bodies often need active systems like sump pumps or interior drainage solutions. These systems help manage saturated soil conditions that grading alone can’t fix. If you notice musty smells, mould, or damp spots even after adjusting the soil slope and cleaning your gutters, you may need professional-grade waterproofing membranes or interior drainage systems.
"Poor roof drainage and surface runoff due to gutter defects and improper site grading may be the most common causes of wet basements."
– Nick Gromicko, CMI®, InterNACHI
If you’re unsure whether grading improvements will be enough, companies like Leaquida Waterproofing can evaluate your situation. Professional waterproofing typically costs between $1,900 and $6,000, while water damage repairs range from $1,143 to $4,422. Once your drainage is sorted, the next step is sealing any cracks or entry points in your foundation.
Step 3: Seal Foundation Cracks and Entry Points
Once you’ve managed water flow outside your home, the next step is addressing cracks and openings in your foundation. Even tiny hairline cracks can let water seep in, especially when the soil around your home becomes saturated and creates hydrostatic pressure. Since most basements experience water damage over time, securing drainage is only part of the solution – sealing these entry points is equally important.
Fix Minor Cracks
For cracks smaller than 3 mm, start by cleaning the area thoroughly. Scrub away any debris, then vacuum to ensure a clean surface. Use polyurethane foam for active leaks and epoxy resin for added structural strength. If you’re dealing with wet surfaces, hydraulic cement can be a quick fix, though it’s not a permanent solution for deeper cracks.
For DIY injection repairs, follow these steps: install injection ports, apply a bonding agent, and inject the repair material from the bottom up. Keep in mind that high-quality injection kits can cost anywhere from $150 to over $400, while hiring a professional for the job typically runs between $800 and $1,500 per crack.
Priority Areas to Seal
Pay special attention to the most vulnerable spots where water is likely to enter:
- Cove joints (where the basement wall meets the floor)
- Pipe penetrations (gaps around pipes that can lead to damp spots)
- Window wells (where water stains often appear on walls below basement windows)
During or right after heavy rain, inspect floor cracks and foundation wall openings for active leaks or water tracks. These telltale signs can help you pinpoint problem areas.
When to Call Leaquida Waterproofing for Crack Repair
While small, vertical cracks are manageable with DIY methods, certain issues call for professional help. Cracks wider than 3 mm, multiple crack patterns, or signs of wall bulging may indicate structural concerns.
"Hydraulic cement and caulk are popular choices for DIY attempts… The problem is that neither works; using them to stop seepage only delays the inevitable call to the basement waterproofing professional."
– Matthew Stock, U.S. Waterproofing
Leaquida Waterproofing offers foundation crack repair services starting at $500 to $1,200 per crack. Professional polyurethane injections often come with lifetime warranties, providing a level of security that DIY solutions simply can’t match. If you notice persistent water pooling, recurring leaks despite previous repairs, or cracks reopening after sealing, it’s time to consult a professional. They can assess whether you need additional drainage systems or more extensive waterproofing measures.
Once the cracks are sealed, you can shift your attention to interior coatings and controlling basement humidity.
Step 4: Apply Interior Coatings and Control Humidity
Once you’ve sealed foundation cracks, the next step is to shield your basement’s interior surfaces from moisture. Interior coatings act as a barrier against water vapour, while managing humidity levels helps reduce condensation and mould. These efforts work alongside your external waterproofing measures to keep your basement dry and healthy.
Types of Interior Coatings
Choosing the right coating depends on your basement’s specific needs. Here’s a breakdown of common options:
- Densifiers (silicate-based sealers): These penetrate deep into concrete, reacting chemically to fill tiny pores and air capillaries. This not only strengthens the surface but also reduces dust. A single gallon of concentrated silicate sealer costs about CA$55 and, when diluted, can cover up to 1,000 square feet.
- Surface Waterproofers: Products like Drylock create a watertight film on basement walls. These are ideal for damp, non-leaking walls. Masonry waterproofers typically cost around CA$50 per gallon and cover 75–100 square feet per coat.
- Epoxy Sealers: Perfect for floors, especially before adding finished flooring, two-part epoxy systems bond directly to concrete, offering a strong moisture barrier. High-end kits are priced at about CA$260.
Before applying any coating, ensure the surface is properly prepared. Use a wire brush or diluted muriatic acid to remove efflorescence, and seal any cracks with hydraulic cement. For the best results, apply at least two coats to fully seal the concrete’s pores.
"Waterproofing coating products only adhere to dry surfaces." – Dallas Nevill, Owner, Rainbow Restoration
Control Indoor Humidity
Maintaining relative humidity between 45–55% is crucial to prevent condensation, musty smells, and mould growth. For basements, a dehumidifier designed for below-grade spaces is often necessary. For example, smaller basements under 140 m² typically require a unit that can remove 30–40 pints of moisture daily, while larger spaces up to 230 m² may need a 40–50 pint capacity.
To further improve air circulation, use fans and avoid placing items directly against walls. Ensure bathrooms have exhaust fans, and make sure clothes dryers vent directly outside. Wrap cold water pipes and HVAC ducts with insulation to prevent condensation, and use heavy-duty plastic vapour barriers in crawlspaces or on dirt floors to block moisture from the ground.
When Coatings Aren’t Enough
Sometimes, interior coatings alone can’t handle severe moisture issues. If water is actively seeping through walls or pooling on the floor, the problem might be hydrostatic pressure – something a coating can’t resolve.
"If your coating fails prematurely, you’ll probably need to install a drain, regrade around the foundation or, in severe cases, dig out the foundation and install a waterproof membrane." – Chris Deziel, home improvement expert
Signs that coatings may not suffice include persistent humidity levels above 60% despite using a dehumidifier, water at the cove joint where walls meet the floor, or recurring efflorescence even after cleaning. Structural issues like horizontal cracks, bowing walls, or flaking concrete (spalling) indicate the need for professional drainage solutions. In such cases, installing an interior drainage system with a sump pump may be necessary. For more details, continue to Step 5, which covers how to set up an interior drainage and sump pump system to safeguard your basement.
sbb-itb-5761e20
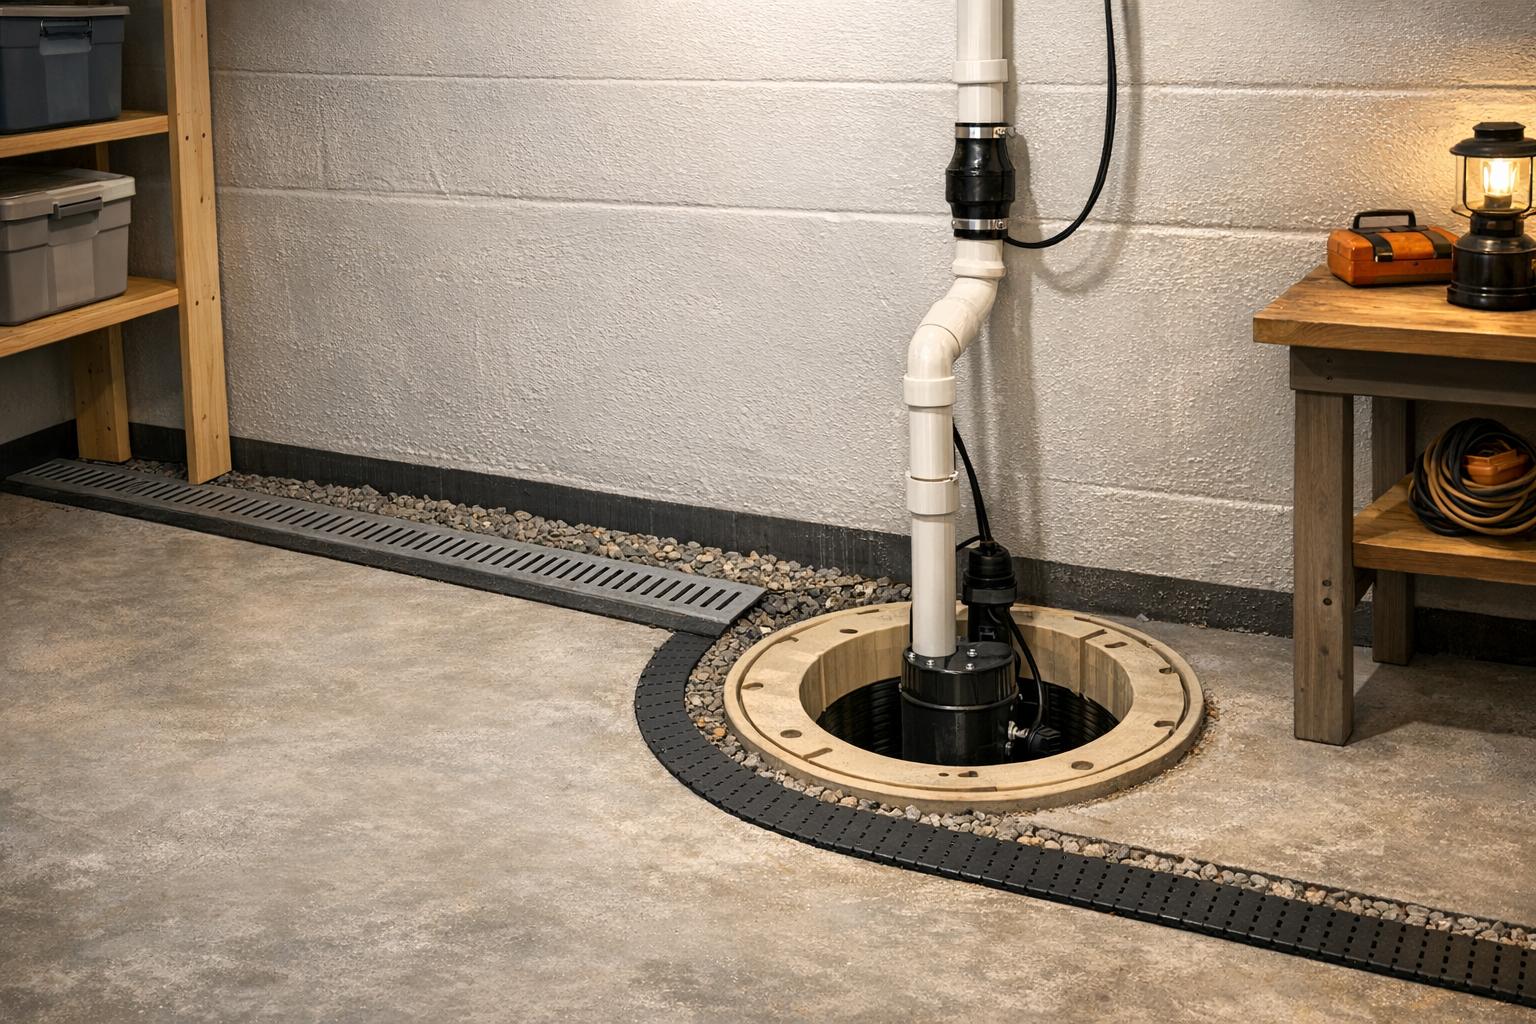
Step 5: Install Interior Drainage and Sump Pump Systems
When interior coatings can’t handle the challenge of active water seepage or hydrostatic pressure, it’s time to consider an interior drainage system paired with a sump pump. This setup works by redirecting groundwater away from your basement, offering a reliable solution where coatings fall short. Professional installation typically costs between CA$3.50 and CA$6.50 per square foot, with total project expenses ranging from CA$1,900 to CA$6,000.
How Interior Drainage Works
An interior drainage system – commonly referred to as a French drain or weeping tile – captures groundwater before it can collect on your basement floor. Here’s how it works: a trench is jackhammered along the inside perimeter of the basement wall, and a perforated drainpipe is laid in crushed stone. This pipe is slightly sloped so gravity carries water toward a central sump pit.
To enhance the system’s efficiency, cove diverters are often used. These dimpled membranes fit into the trench and catch water seeping through the wall–floor joint (known as the cove joint), funnelling it into the drainage system instead of allowing it to spread across the floor. Once the system is installed, the trench is sealed with fresh concrete, keeping everything neatly concealed beneath the basement floor.
Sump Pump Components and Operation
The sump pump is the heart of this system, housed in a durable basin located at the lowest point of your basement. As water from the drainage system flows into the sump pit, a float switch automatically activates the pump. The pump, typically made of cast iron for durability, expels the water through a discharge line, directing it at least 1.8 metres (6 feet) away from your home’s foundation.
Key components of a sump pump system include:
- A check valve to prevent backflow into the pit.
- An airtight lid to seal the basin, keeping out moisture, odours, and radon gas.
- For advanced setups, triple protection is available: a primary pump for regular use, a secondary pump for added capacity, and a battery-powered backup pump to handle power outages.
To ensure the system is functioning correctly, test it a few times a year by pouring a bucket of water into the pit. This activates the float switch and pump, confirming everything is in working order. For the best results and to maintain warranty coverage, professional installation is strongly recommended.
Professional Installation by Leaquida Waterproofing
Installing an interior drainage system isn’t your typical DIY project – it requires specialized tools, expertise, and experience. Leaquida Waterproofing handles everything from diagnosing moisture issues to trenching, installing the drainage system and sump pump, and setting up the discharge line. Their services range from CA$70 to CA$120 per linear foot and come with warranties and maintenance plans for long-term peace of mind.
"We don’t recommend you attempt French drain basement waterproofing as a DIY project. Installation is a major construction project… It’s better to leave this job for the pros." – United Structural Systems
Step 6: Install Exterior Waterproofing Membranes and Drainage
When interior solutions fall short, exterior waterproofing steps in to stop water before it even touches your foundation. While the cost can range from CA$3,000 to CA$15,000 for a 1,000-square-foot basement, this method offers long-term protection and helps maintain your home’s structural strength.
When Exterior Waterproofing Makes Sense
Exterior waterproofing is ideal for addressing water issues that interior fixes can’t resolve. For instance, if you own an older home with porous masonry foundations – like fieldstone or cinder block with ageing mortar joints – this approach provides the comprehensive protection these vulnerable materials require. It’s also a smart choice when your basement is already finished, and you want to avoid tearing up the interior. Additionally, if you’re building a new home, installing exterior waterproofing right from the start ensures your foundation is protected.
How Exterior Waterproofing Works
The process begins with digging a trench around your home to expose and repair any defects in the foundation. Next, a waterproof membrane is applied. Options include:
- Liquid-applied asphalt-modified polyurethane: CA$3–6 per square foot
- Rubberized sheet membranes: CA$3–7 per square foot
- Bentonite clay sheets: CA$3–4 per square foot
After applying the membrane, a dimpled drainage board is installed to reduce hydrostatic pressure and direct water away from the foundation. At the footing level, perforated PVC pipes wrapped in filter fabric are placed in washed gravel to collect and channel groundwater away from your home. Finally, the trench is backfilled with gravel and compacted soil, and the grading is adjusted to slope away from the foundation, ensuring proper surface water runoff. Depending on the size of your home, this entire process can take anywhere from a single day to a full week.
Why Choose Leaquida Waterproofing?
Exterior waterproofing projects require specialized skills, particularly for excavation and understanding local soil conditions. That’s where Leaquida Waterproofing comes in. From marking utility lines (always call 811 first) to excavation, membrane application, drainage installation, and proper backfilling, they handle every step with precision. Their services cost CA$100–250 per linear foot, and they back their work with long-term warranties.
In areas like the Greater Toronto Area, where clay-heavy soils and spring rainfall of 30 to 50 millimetres can create intense hydrostatic pressure, professional expertise is essential. Leaquida Waterproofing ensures your system is designed to tackle these local challenges. Combined with interior drainage solutions, exterior waterproofing offers comprehensive protection for your basement and peace of mind for you.
Step 7: Maintain Your Waterproofed Basement
Once your exterior waterproofing system is in place, keeping it in good shape is key to ensuring long-term protection. Regular maintenance every 3–5 years helps reinforce earlier steps like sealing, drainage installation, and applying coatings, giving your basement the best defence against water damage.
Inspect Regularly
Make it a habit to inspect your basement at least twice a year – once in the spring after the snow melts and again in the fall before winter arrives. Check the exterior foundation for new cracks or any signs of wear and tear. Inside, look for water stains, damp spots, musty smells, or white powdery residue (efflorescence) on walls and floors. After heavy rain or spring thaw, double-check for any signs of moisture. A hygrometer can help you monitor indoor humidity levels, which should stay below 50% to prevent mould growth. If you notice moisture, use the foil test to figure out if it’s from condensation or seepage.
Don’t forget your gutters and downspouts – make sure they’re clear of debris and that downspouts extend 4.5 to 6 metres away from your home.
Test Your Sump Pump
Your sump pump is a critical part of your waterproofing system, so test it every three to four months. To do this, pour water into the sump pit until the float switch activates the pump. Ensure the pump clears the water efficiently and listen for the check valve to close, which prevents backflow. Also, inspect the sump pit for debris that might clog the system. If you have a battery backup, unplug the main pump to confirm the backup kicks in as it should. Keep in mind that backup batteries need replacing every two years and typically last 7–10 hours during a power outage.
Follow Warranty Requirements
Routine maintenance isn’t just about keeping your system running – it’s also often a condition for maintaining your warranty. Many systems installed by professionals like Leaquida Waterproofing come with long-term warranties, but they require regular servicing to stay valid. Leaquida Waterproofing recommends scheduling professional maintenance annually. This includes cleaning the sump pump, flushing the system, replacing alarm batteries, and inspecting all components. It’s a small investment compared to the cost of water damage – fixing minor leaks can cost around CA$250, while filling a crack with epoxy might set you back CA$800 to CA$1,500 per crack.
Keep detailed records of your inspections, pump tests, and service appointments. Not only will this help with warranty claims, but it’ll also give you a clear picture of any recurring issues. Regular maintenance also extends the life of waterproofing coatings, which generally last about 10 years, depending on hydrostatic pressure.
Conclusion
Keeping your basement dry isn’t a quick fix; it’s about tackling both the causes and effects of water intrusion. This involves a mix of strategies, like improving exterior drainage, sealing cracks, installing sump pumps, and applying protective membranes. Each step works together to create a comprehensive solution. Relying on just one method often falls short – for instance, interior sealants won’t hold up if hydrostatic pressure from poor exterior drainage isn’t addressed. Proper waterproofing means managing your basement’s interior, exterior, and overall property drainage at the same time.
Ongoing maintenance is just as critical as the initial waterproofing. Testing your sump pump every three to four months, cleaning out gutters twice a year, and doing bi-annual inspections can help your system function when it’s needed most. Issues like changes in clay soil moisture – responsible for up to 90% of foundation cracking – or something as simple as clogged gutters can snowball into expensive structural damage if ignored.
While some tasks, such as applying waterproof coatings or extending downspouts, are manageable for homeowners, more serious issues like foundation cracks or extensive water intrusion call for professional expertise. As Dallas Nevill, Owner of Rainbow Restoration, explains: "A pro can determine a better basement waterproofing strategy than most homeowners". Hiring professionals typically costs between CA$1,900 and CA$6,000, but it’s an investment that safeguards your home’s structure and even enhances its market value.
If you’re facing ongoing moisture problems, active leaks, or structural concerns, reach out to Leaquida Waterproofing for a thorough assessment. Their team offers personalized solutions, from interior drainage systems to exterior membrane installations, all backed by long-term warranties and clear pricing. Don’t let a small leak snowball into a massive issue. Professional help ensures your basement stays dry, safe, and protected for years to come.
FAQs
What are the common signs that your basement has water issues?
Water issues in a basement often make themselves known through telltale signs like smells, visible damage, or dampness. A musty smell or the presence of mould and mildew on walls, floors, or stored belongings are often the first red flags. You might also notice water stains, darkened areas, or a chalky white substance called efflorescence on concrete surfaces. Patches of dampness or outright wet spots on walls or floors are also clear indicators.
Other warning signs can include peeling paint, bubbling wallpaper, cracked plaster, or warped flooring and carpets. In more serious situations, you might spot rust on metal fixtures, rust stains on concrete, or even condensation on pipes, which could point to groundwater intrusion caused by hydrostatic pressure.
If any of these issues appear, it’s a good idea to dig deeper and think about waterproofing solutions to safeguard your basement and home.
How often should I check my sump pump to make sure it’s working correctly?
Testing your sump pump twice a year is a smart move – once in the spring when snowmelt and rain are frequent, and again in the fall to prepare for winter. This routine check helps ensure your pump is ready to manage water effectively during heavy rainfall or thawing conditions.
Here’s how to test it: pour a bucket of water directly into the sump pit. Watch to see if the pump activates and efficiently drains the water. If it doesn’t perform as it should, check for blockages or consider calling a professional to service it. This simple step can go a long way in keeping your basement dry and safe.
When should I call a professional for basement waterproofing?
If the problem seems too complicated for a DIY fix or you’re noticing signs of bigger issues, it’s time to call in a professional. Keep an eye out for persistent water stains, a musty odour, visible mould growth, white salt deposits (efflorescence), or water pooling after heavy rain or snowmelt. Other red flags include a sump pump or dehumidifier that’s not functioning properly or widening cracks in the foundation. These are clear signals that expert assistance is needed.
Professionals have the tools and expertise to tackle more complex solutions, such as installing a French drain, adding a battery-backup sump pump, or addressing hydrostatic pressure problems. Plus, they can provide written estimates and warranties, which come in handy for insurance claims and offer added peace of mind. If your DIY attempts haven’t resolved the issue or you’re planning renovations that require a dry basement, scheduling an inspection before the next freeze-thaw cycle can help prevent further damage.
 CLOGGED OR BROKEN WEEPING TILE