Protecting a basement from water intrusion has always been one of the biggest challenges for homeowners in Canada. Excess moisture not only causes visible damage like cracks, dampness, or mold but also silently undermines the structural integrity of the foundation. One of the most effective solutions developed to manage groundwater and prevent basement flooding is the weeping tile system.
In this guide, we’ll explore in detail what a weeping tile is, how it works, different types of systems, installation processes, and costs. By the end, you’ll understand why a well-designed drainage system is essential for any home and how Leaquida Waterproofing approaches these projects with long-term protection in mind.
What Is a Weeping Tile?
The term weeping tile might sound outdated, but the technology remains highly relevant. A weeping tile is essentially a drainage pipe system designed to redirect groundwater away from the foundation of a house. Despite the name, modern systems are no longer made of clay “tiles” but rather durable perforated plastic pipes.
Historically, clay tiles with small gaps between sections were buried around the base of houses to “weep” excess water into the pipe and channel it away. Today, contractors use corrugated plastic pipes with precision-cut perforations that allow water to enter easily while preventing soil from clogging the system.
So, what does weeping tile do? Its main role is to relieve hydrostatic pressure around the foundation and stop water from seeping into basements. Without such a system, rainwater and groundwater accumulate around the footing of the house, eventually finding cracks or weak points to infiltrate.
How Does a Weeping Tile Work?
To understand how a weeping tile works, imagine a sponge pressed against the side of a basement wall. As rainwater and soil moisture build up, the pressure pushes that water toward the structure. If the water has nowhere to go, it will eventually penetrate the wall.
A properly installed weeping tile system interrupts this process. Here’s how it functions step by step:
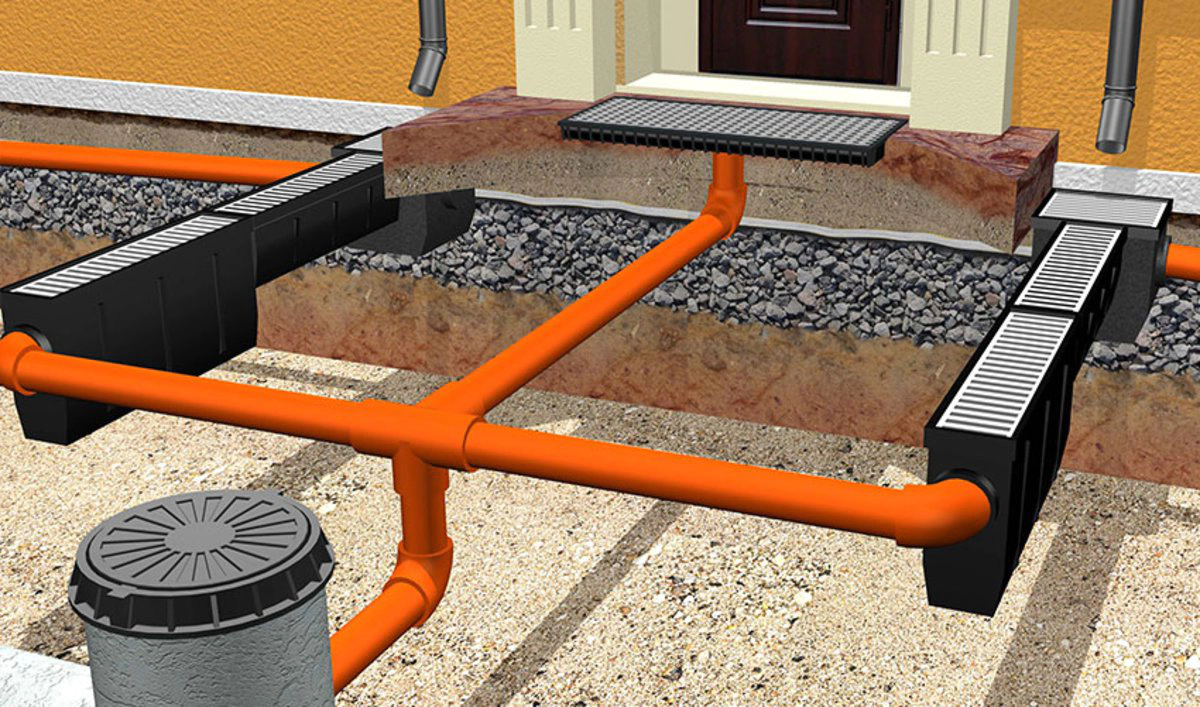
- Water collection – The perforated pipe is installed either along the outside perimeter of the foundation (exterior weeping tile) or beneath the basement floor slab (interior weeping tile). As groundwater levels rise, water seeps into the pipe through the perforations.
- Water redirection – Once inside the pipe, gravity guides the water toward a drainage point. This could be a storm sewer, sump pump pit, or a designated outlet away from the home.
- Pressure relief – By continuously collecting and channeling groundwater, the system reduces hydrostatic pressure against the basement walls. Less pressure means a lower risk of cracks, leaks, and structural issues.
- Ongoing protection – When combined with waterproof membranes, gravel backfill, and sump pumps, weeping tiles form a comprehensive defense line against flooding and moisture damage.
In short, a weeping tile is used for basement waterproofing and is considered the backbone of any long-lasting drainage solution.
What Does Weeping Tile Look Like?
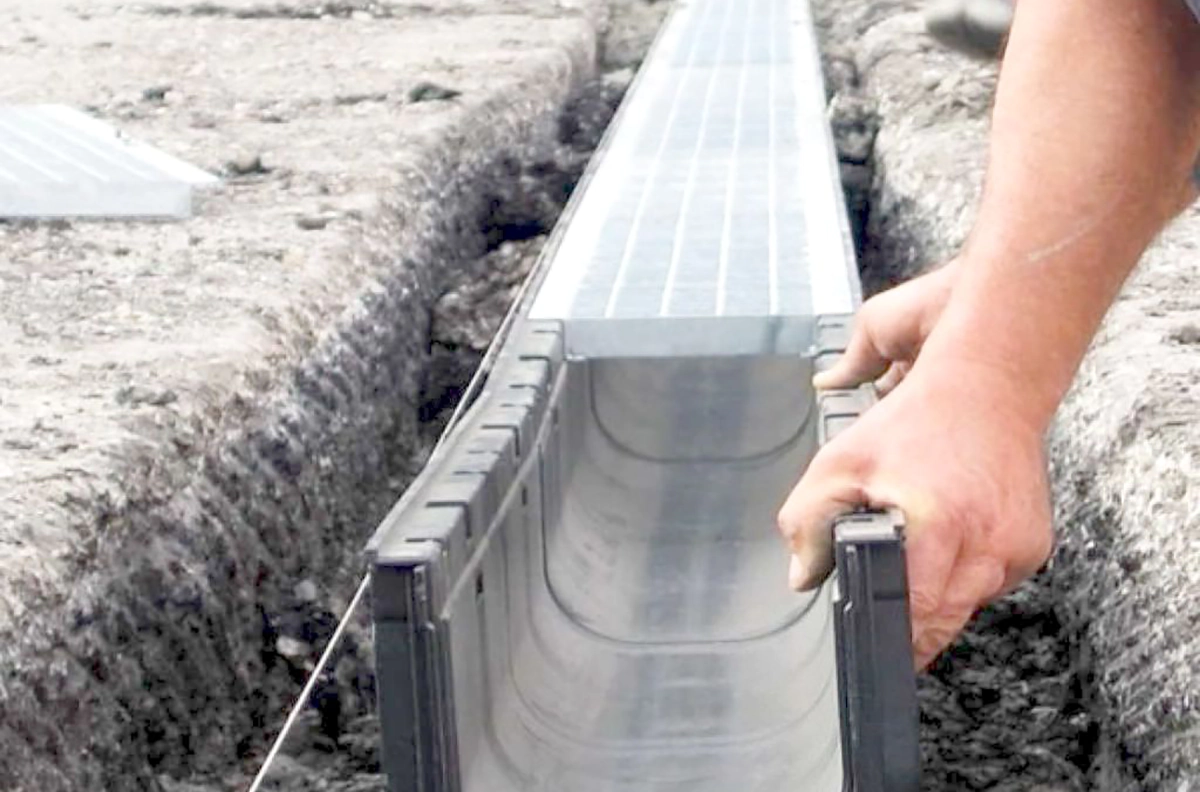
For homeowners unfamiliar with drainage systems, it can be difficult to picture what a weeping tile looks like. Typically, it’s a corrugated black or white plastic pipe, four inches in diameter, with rows of small perforations running along its length.
- Exterior weeping tiles are laid at the footing level, just outside the foundation wall, and surrounded by layers of gravel to ensure smooth water flow.
- Interior weeping tiles are placed beneath the basement floor slab, right along the edges of the foundation inside the home.
In both cases, the system connects to a sump pump basin or storm drain. To keep debris out, the pipe is often wrapped with a fabric sock filter. This prevents clogging from fine soil particles while allowing water to pass through freely.
If you’ve ever seen a large coil of perforated pipe at a construction site, that’s essentially what a modern weeping tile system looks like before it’s buried.
What Is a Weeping Tile System Used For?
A weeping tile system serves more purposes than simply stopping leaks. Its benefits extend into both structural protection and indoor health:
- Basement waterproofing – Prevents leaks and standing water.
- Foundation stability – Relieves pressure that could otherwise shift or crack walls.
- Mold prevention – Keeps the basement dry, reducing the risk of harmful fungal growth.
- Indoor air quality – A dry basement reduces humidity, which positively impacts the entire home.
- Property value – Homes with effective drainage systems are more appealing to buyers and less likely to suffer expensive damage.
This is why many building codes in Ontario and across Canada now require weeping tile for basements in new construction projects. Even in older homes, adding or upgrading a drainage system is one of the most effective investments for long-term protection.
Types of Weeping Tile Systems
Not all drainage systems are the same. Depending on the layout of the property, soil conditions, and severity of water issues, contractors may recommend different types of weeping tile installations.
1. Exterior Weeping Tile System
This is the most traditional and effective solution. Pipes are installed outside the foundation at footing level. The process requires excavation around the home, making it more invasive but also more reliable for severe water problems.
- Advantages: Provides direct protection at the source of groundwater pressure; long lifespan if installed correctly.
- Disadvantages: Requires heavy excavation; higher installation cost.
2. Interior Weeping Tile System
Instead of digging around the home, contractors cut a trench into the basement floor slab along the perimeter. The weeping tile is then laid in this trench and connected to a sump pump.
- Advantages: Less expensive than exterior systems; no need for exterior excavation.
- Disadvantages: Only manages water once it has already reached the interior; depends on pump reliability.
3. Combination Systems
In some cases, homes benefit from having both exterior and interior weeping tiles. This ensures maximum water management, particularly for houses located in areas with high water tables or heavy rainfall.
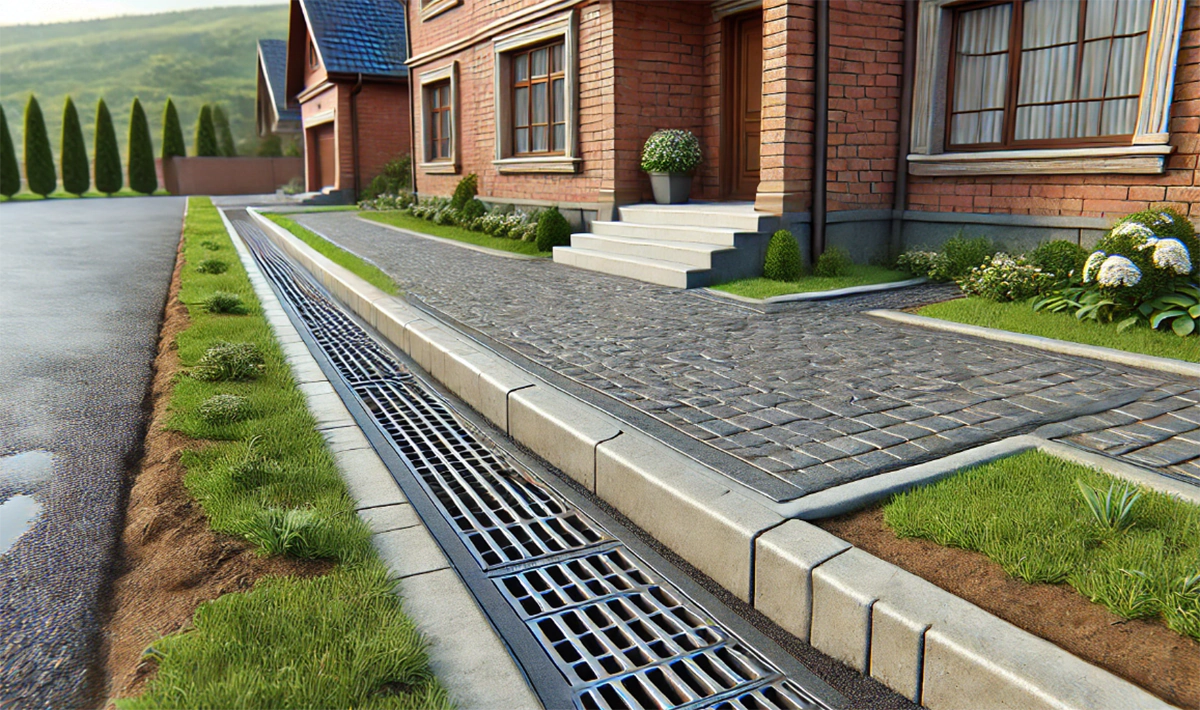
4. Backyard or Yard Drainage Weeping Tiles
Beyond basements, perforated pipes can also be installed in lawns or gardens to prevent surface pooling. For example, connecting weeping tiles to downspouts can keep water from saturating the soil near the home.
By choosing the right system, homeowners can effectively balance performance, cost, and disruption.
Weeping Tile Installation Cost
When planning drainage improvements, homeowners often ask: What is the cost of installing weeping tile? The answer depends on several variables, but understanding the key factors helps set realistic expectations.
Factors Affecting Weeping Tile Cost
- Type of system – Exterior systems are more expensive than interior ones because of excavation.
- Property size – Larger perimeters mean more pipe, gravel, and labour.
- Soil conditions – Clay-heavy or rocky soil requires extra work, increasing cost.
- Depth of foundation – Deeper basements require more excavation and disposal of soil.
- Accessibility – Limited space around a house or landscaping obstacles can raise costs.
- Additional waterproofing – Many projects include membranes, sump pump installation, or window well connections, which add to the final bill.
Typical Weeping Tile Costs in Ontario
- Exterior weeping tile installation cost: usually between $80 – $120 per linear foot. For an average home, this ranges from $8,000 – $15,000.
- Interior weeping tile system cost: typically $40 – $60 per linear foot, or around $3,500 – $7,000 for most basements.
- Combination systems: can exceed $20,000, but offer maximum protection.
It’s important to remember these figures are estimates. Each property has unique challenges, so the only way to know the exact weeping tile installation cost is to request an on-site inspection and quote.
Exterior Weeping Tile Installation Process
Exterior weeping tile is the most comprehensive solution, as it deals with water before it reaches the basement wall. However, it is also the most labour-intensive.
Step 1: Excavation
Contractors dig a trench around the entire foundation down to the footing. The width must allow enough room for pipe placement, gravel bedding, and waterproof membranes.
Step 2: Cleaning and Waterproofing the Wall
Once exposed, the foundation wall is cleaned and inspected. Any cracks are repaired, and waterproof coatings or membranes are applied to prevent moisture penetration.
Step 3: Laying the Weeping Tile
A perforated plastic pipe is placed at footing level. It’s sloped toward the drainage point, ensuring gravity does most of the work.
Step 4: Adding Gravel and Filter
The pipe is covered with several inches of clean gravel. A filter fabric may also be used to prevent soil from clogging the system.
Step 5: Backfilling
The trench is carefully refilled with soil. Proper compaction is essential to avoid future settlement.
Step 6: Connecting to Drainage
Finally, the system is connected to a sump pump, storm drain, or outlet. Once complete, the exterior landscaping is restored.
This process can take several days depending on property size and soil conditions, but it provides decades of reliable protection.
Interior Weeping Tile Installation Process
When exterior excavation is impractical—such as in tightly packed urban areas or for homes with extensive landscaping—an interior weeping tile system becomes the preferred option.
Step 1: Cutting the Floor
Contractors cut a narrow channel along the inside perimeter of the basement floor slab. The concrete is removed to expose the soil beneath.
Step 2: Installing the Pipe
A perforated pipe is laid in the trench, again sloping toward a sump pump pit. Gravel is used to provide a stable bedding.
Step 3: Connecting the Sump Pump
The pipe directs water to a sump basin where a pump actively expels it away from the house. In some cases, the system may connect directly to a storm sewer.
Step 4: Restoring the Floor
After installation, the trench is refilled with gravel and sealed with fresh concrete, leaving only minimal signs of the work.
Although interior systems don’t stop water from reaching the wall, they keep basements dry and are far less disruptive to install.
Window Well Weeping Tile
Another common application of drainage pipes is in window wells. Basement windows often sit below ground level, making them vulnerable to pooling rainwater. Without drainage, the pressure can cause leaks directly through the window frame.
A small vertical extension of the weeping tile system is installed beneath each window well. This directs water down into the main drainage pipe, preventing buildup in the well itself. For homeowners adding or upgrading basement windows, this step is crucial for long-term waterproofing.
Weeping Tile Maintenance
Like any drainage system, weeping tiles need occasional attention to remain effective. Fortunately, with proper installation and filters, maintenance is relatively simple.
How to Tell if Your Weeping Tile Is Plugged
Signs that your system may be clogged include:
- Persistent basement dampness despite waterproofing.
- Water pooling near the foundation after rain.
- Sump pump running continuously with little effect.
- Slow drainage in window wells.
If left unresolved, a blocked weeping tile can quickly lead to flooding.
How to Clean Weeping Tile
Professional contractors use high-pressure water jetting or mechanical snakes to flush out blockages. In older clay tile systems, collapsed sections may require replacement with modern plastic pipes.
For homeowners, prevention is key. Keeping gutters clear, grading soil away from the home, and ensuring downspouts drain properly all reduce the risk of overwhelming the weeping tile.
Why Choose Leaquida Waterproofing for Weeping Tile Installation?
At Leaquida Waterproofing, we specialize in basement waterproofing solutions tailored to Toronto and the GTA. Our team has decades of combined experience handling both modern installations and repairs of outdated clay systems.
What sets us apart:
- Comprehensive inspections – We don’t just look at one issue; we evaluate your entire drainage system.
- Tailored solutions – Every home is unique, and so is our approach. We recommend the right system for your property, not a one-size-fits-all fix.
- Transparent pricing – We provide clear breakdowns so you know your exact weeping tile cost per foot before work begins.
- Long-term protection – We combine weeping tile with waterproof membranes, sump pumps, and grading solutions to deliver full protection.
By investing in professional installation, homeowners gain peace of mind knowing their foundation is safeguarded for decades.
Final Thoughts
So, what is a weeping tile system? It is a foundational drainage solution designed to protect your home from one of the biggest threats—water. Whether you choose interior or exterior installation, the system works by collecting and redirecting groundwater away from the foundation, ensuring your basement stays dry and your home remains structurally sound.
From understanding how a weeping tile works to knowing the cost of installing a weeping tile, being informed helps you make smart decisions for your property. And when the time comes to install, repair, or upgrade, partnering with specialists like Leaquida Waterproofing ensures the job is done right.
 CLOGGED OR BROKEN WEEPING TILE